


ブログ - 2014カテゴリのエントリ
macOSでlsやfindコマンドでファイルリストを取り出すと,それはUTF-8-MAC形式となっていて,目視してると「が」に見えるが内部的には「か」と「”」のコードになっている.
よってファイルリストを取り出してgrepかけてもヒットしないので,例えば「ドラマ」を検索するときは「トラ」と「マ」を繋げるなどの小細工で対応してた.
iconvを使って変換できるのだけど,エラーが出ると停止してしまう.何でエラーが出たかも知りたい.プログラムを作る方法は脳内イメージできてもプログラム作るの面倒だ,という事で放置していたけど,AIに作らせてみた.
引用:
このプロンプトで生成AIとしてMicrosoft Copilotを使った結果がこちら.
引用:
早速実行してみた.
プログラムは正常に動作したのはまぁ期待通りなのだけど,実行結果についてプリントしてほしいというリクエストはしてないのに,気が利いている...当然私レベルのプログラミング能力は備えているというか,もう既にAIが私を超えてる自覚はある.
よってファイルリストを取り出してgrepかけてもヒットしないので,例えば「ドラマ」を検索するときは「トラ」と「マ」を繋げるなどの小細工で対応してた.
iconvを使って変換できるのだけど,エラーが出ると停止してしまう.何でエラーが出たかも知りたい.プログラムを作る方法は脳内イメージできてもプログラム作るの面倒だ,という事で放置していたけど,AIに作らせてみた.
引用:
macosを使ってfindコマンドで取り出したNFD形式のファイルmedialist.orgを,UTF8に変換するbashスクリプトを作ってください. 変換する際には1行づつデータを取り出して,変換が成功した場合はseiko.txt,エラーになったデータはshippai.txtファイルに保管してください.
このプロンプトで生成AIとしてMicrosoft Copilotを使った結果がこちら.
#!/bin/bash

input_file="medialist.org"
success_file="seiko.txt"
error_file="shippai.txt"

# ファイルの初期化
> "$success_file"
> "$error_file"

# ファイルが存在するか確認
if [ ! -f "$input_file" ]; then
    echo "入力ファイルが見つかりません: $input_file"
    exit 1
fi

# 1行ずつ読み込み、NFDをUTF-8に変換
while IFS= read -r line; do
    if normalized_line=$(echo "$line" | iconv -f UTF-8-MAC -t UTF-8 2>/dev/null); then
        echo "$normalized_line" >> "$success_file"
    else
        echo "$line" >> "$error_file"
    fi
done < "$input_file"

echo "変換が完了しました。成功したデータは $success_file に、エラーになったデータは $error_file に保存されました。"
引用:
このスクリプトの説明は以下の通りです:
・入力ファイルと出力ファイルを定義: input_fileに変換元のファイル名、success_fileに成功したデータを保管するファイル名、error_fileにエラーになったデータを保管するファイル名を指定します。
・ファイルの初期化: > "$success_file" と > "$error_file" によって、出力ファイルを初期化します(既存の内容がある場合は削除されます)。
・ファイルの存在チェック: 入力ファイルが存在するか確認し、存在しない場合はエラーメッセージを表示してスクリプトを終了します。
・1行ずつ読み込み、NFDをUTF-8に変換: while IFS= read -r line で入力ファイルの各行を読み込みます。iconvコマンドを使用してNFDをUTF-8に変換し、成功した場合はsuccess_fileに書き込み、エラーが発生した場合はerror_fileに書き込みます。
・変換完了メッセージの表示: 変換が完了した旨のメッセージを表示します。
このスクリプトを実行することで、NFD形式のファイルをUTF-8に変換し、成功とエラーの結果をそれぞれのファイルに保管します。
他にご質問やサポートが必要なことがあれば教えてくださいね。
早速実行してみた.
juno:Copilot ujpadmin$ bash henkan.sh
変換が完了しました。成功したデータは seiko.txt に、エラーになったデータは shippai.txt に保存されました。
juno:Copilot ujpadmin$
macにssh接続して無線LANをオンにする方法.
現状確認.
インタフェイスをオンにする.
状態確認.
現状確認.
$ ifconfig  en1🆑
en1: flags=8823<UP,BROADCAST,SMART,SIMPLEX,MULTICAST> mtu 1500
	options=400<CHANNEL_IO>
	ether AA:AA:AA:AA:AA
	nd6 options=201<PERFORMNUD,DAD>
	media: autoselect (<unknown type>)
	status: inactive🈁
$
$ networksetup -SetAirportPower en1 on🆑
[macmini2014:server 02:46:24 ~ ]
$
$ ifconfig  en1🆑
en1: flags=8863<UP,BROADCAST,SMART,RUNNING,SIMPLEX,MULTICAST> mtu 1500
	options=400<CHANNEL_IO>
	ether AA:AA:AA:AA:AA
	inet6 2222::333:1111:4444:e11a%en1 prefixlen 64 secured scopeid 0x6
	inet 192.168.20.34 netmask 0xffffff00 broadcast 192.168.20.255
	nd6 options=201<PERFORMNUD,DAD>
	media: autoselect
	status: active🈁
$
Mac Pro 2013でボンディングしてみたのだけど,使っているL2スイッチがリンクアグリゲーション非対応だったので,改めてIEEE802.3adに対応したPanasonic Switch-M8eG(PN28080K)という業務用L2スイッチを導入したので試してみた.
今回は物理的な距離から前回のMac Pro 2013ではなく,mac mini 2014で試験.
まずはボンディングのインタフェイスを作成してLANケーブルを2つ刺してみた.
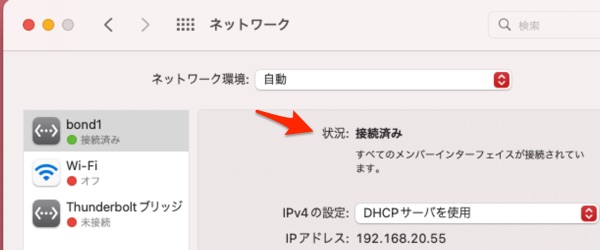
「すべてのメンバーインタフェイスが接続されています」と出てますね.
1本LANケーブルを抜いてみました.
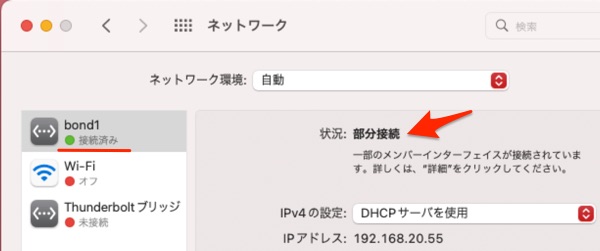
「部分接続」になっています.
持続性に対してどうなのか調べてみたのだけど,LANケーブルを抜いた時に,pingが一瞬途切れる時がたまにあるという感じでした.
2本束ねることによる速度アップについては,調査環境がないので,また後日かな.
今回は物理的な距離から前回のMac Pro 2013ではなく,mac mini 2014で試験.
まずはボンディングのインタフェイスを作成してLANケーブルを2つ刺してみた.
「すべてのメンバーインタフェイスが接続されています」と出てますね.
1本LANケーブルを抜いてみました.
「部分接続」になっています.
持続性に対してどうなのか調べてみたのだけど,LANケーブルを抜いた時に,pingが一瞬途切れる時がたまにあるという感じでした.
64 bytes from 192.168.20.55: icmp_seq=235 ttl=64 time=2.511 ms
64 bytes from 192.168.20.55: icmp_seq=236 ttl=64 time=1.541 ms
64 bytes from 192.168.20.55: icmp_seq=237 ttl=64 time=1.735 ms
64 bytes from 192.168.20.55: icmp_seq=238 ttl=64 time=2.530 ms
64 bytes from 192.168.20.55: icmp_seq=239 ttl=64 time=2.373 ms
Request timeout for icmp_seq 240
64 bytes from 192.168.20.55: icmp_seq=241 ttl=64 time=1.989 ms
64 bytes from 192.168.20.55: icmp_seq=242 ttl=64 time=2.677 ms
64 bytes from 192.168.20.55: icmp_seq=243 ttl=64 time=1.983 ms
64 bytes from 192.168.20.55: icmp_seq=244 ttl=64 time=3.233 ms
何度目かのWebサーバの移行をしようと,データをコピーしようとしたら,ルートディレクトリに書き込めない.
Catalinaから,そういう仕様になった模様.そうなのか...バージョンアップした場合,残骸として昔のディレクトリが残るというのはあるのだろうな.
追記2023/10/24
SIPをオフにすれば書き込める場合もある模様.High Sierraだと書き込めたけどね.
mkdir: cannot create directory Read-only file systemCatalinaから,そういう仕様になった模様.そうなのか...バージョンアップした場合,残骸として昔のディレクトリが残るというのはあるのだろうな.
追記2023/10/24
SIPをオフにすれば書き込める場合もある模様.High Sierraだと書き込めたけどね.
場所が変更された項目 MojaveからmacoS Monterey 12.2へアップグレード
- ブロガー :
- ujpblog 2022/2/24 17:24
mac mini 2014をMojaveからMontereyに上書きアップグレード.
macosのメモリ使用量をSNMPで取得しながらMRTGを設定していたのだけれど,メモリ使用量がSNMPで取得できなかった.
何かヒントがあるのかと思って,デスクトップにある「場所が変更された項目」を確認.

snmpd.confに関するものは1つもなかった.代わりに,shells.system_defaultとsyslog.confが移動されている模様.
確認してみる.
変更した記憶がないけれどなぁ...どうなっているのか確認.
/bin/dashが無くなって,/usr/local/bin/pwshが増えた模様.pwshはPowerShellなので入れたやつ,だが./bin/dashはDebianやUbuntuでデフォルトになっているシェルの模様.bashとは互換性が無いそうだけれど,削除されたのか.
そしてもう1つsyslog.conf.
現在のファイルは次の通り.
中身に違いはないが,入れ替わってる模様.
そして肝心のsnmpd.confは,まっさらの設定に置き換わっていました.丁寧に「場所が変更された項目」に移動されるかと思ったら全くそんなこと無いのか.
macosのメモリ使用量をSNMPで取得しながらMRTGを設定していたのだけれど,メモリ使用量がSNMPで取得できなかった.
何かヒントがあるのかと思って,デスクトップにある「場所が変更された項目」を確認.
snmpd.confに関するものは1つもなかった.代わりに,shells.system_defaultとsyslog.confが移動されている模様.
確認してみる.
macmini2014:~ root$ cat /Users/Shared/Relocated\ Items/Configuration/private/etc/shells.system_default🆑
# List of acceptable shells for chpass(1).
# Ftpd will not allow users to connect who are not using
# one of these shells.

/bin/bash
/bin/csh
/bin/dash
/bin/ksh
/bin/sh
/bin/tcsh
/bin/zsh
macmini2014:~ root$
$ cat /private/etc/shells🆑
# List of acceptable shells for chpass(1).
# Ftpd will not allow users to connect who are not using
# one of these shells.
# /bin/false was added for FTP users that do not have a home directory.

/bin/bash
/bin/csh
/bin/ksh
/bin/sh
/bin/tcsh
/bin/zsh
/usr/bin/false
/usr/local/bin/pwsh
[macmini2014:root 17:16:19 ]
$そしてもう1つsyslog.conf.
macmini2014:~ root$ cat /Users/Shared/Relocated\ Items/Configuration/private/etc/syslog.conf🆑
# Note that flat file logs are now configured in /etc/asl.conf

install.*						@127.0.0.1:32376

# used for the adaptive firewall: man emlog.pl
auth.*                                @127.0.0.1:60762

macmini2014:~ root$
現在のファイルは次の通り.
$ cat /private/etc/syslog.conf🆑
# Note that flat file logs are now configured in /etc/asl.conf

install.*						@127.0.0.1:32376

# used for the adaptive firewall: man emlog.pl
auth.*                                @127.0.0.1:60762

[macmini2014:mrtg 17:15:22 ]
そして肝心のsnmpd.confは,まっさらの設定に置き換わっていました.丁寧に「場所が変更された項目」に移動されるかと思ったら全くそんなこと無いのか.
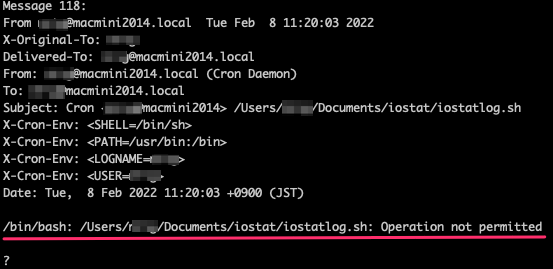
macoS Monterey 12.2でcrontabがOperation not permttedになる件
- ブロガー :
- ujpblog 2022/2/8 11:41
iTunesやら写真の母艦にしようと,macOS 10.14のMojaveから一気にCatalina,BigSur をすっとばしてmacOS Monterey 12.2にバージョンアップ.
とりあえず,問題なさそうなんだけれど,MRTGが更新されてなくて,crontabで実行しているコマンドがエラーになっていた.
どうもコマンド単体で実行すると問題ないのだけれど,crontabにフルディスクアクセス権限の付与が必要だそうで.
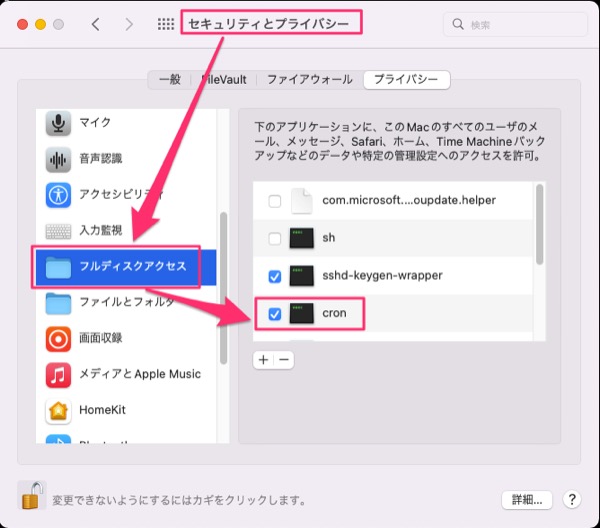
これをみると,たしかにシェル(sh)だとフルディスクアクセスが適用されています.自分で設定した覚えはないのだけれど.ここにcrontabを追加します.
ファイル選択ダイアログのところで,[command] + [shift] + [G] を押してファイル名を直接入力する様になるので,/usr/sbin/cronを指定すれば良いです.
ちなみに,アンチウイルス対策ソフトとかのディスク上のファイルに隈なくアクセスするタイプのアプリも,この設定が必要になりますね.Catalinaあたりからキツくなりました.
とりあえず,問題なさそうなんだけれど,MRTGが更新されてなくて,crontabで実行しているコマンドがエラーになっていた.
どうもコマンド単体で実行すると問題ないのだけれど,crontabにフルディスクアクセス権限の付与が必要だそうで.
これをみると,たしかにシェル(sh)だとフルディスクアクセスが適用されています.自分で設定した覚えはないのだけれど.ここにcrontabを追加します.
ファイル選択ダイアログのところで,[command] + [shift] + [G] を押してファイル名を直接入力する様になるので,/usr/sbin/cronを指定すれば良いです.
ちなみに,アンチウイルス対策ソフトとかのディスク上のファイルに隈なくアクセスするタイプのアプリも,この設定が必要になりますね.Catalinaあたりからキツくなりました.
macOSはBSDベースなので,iostatのコマンドパラメータもLinuxとは異なる.
何もパラメータをつけずに実行すると次の通り.
I/Oにで利用しているCPUロードアベレージの情報が不要な場合は,-dオプションを使う.
CPU情報が消えたら,disk4が増えた.
このドライブには1つの内蔵SSDと,8つのUSB接続のHDDがあるのだけれど,9台分は表示されてない. -nオプションを指定すれば,指定した台数分が表示される.
3台分表示したい場合の例.
実際には接続されてない台数を指定しても良い.
直接指定することもできる.
この時に出ている80.39/KB/tとかは,このコマンドを実行した瞬間のもの.
繰り返し実行するためには,-cコマンドで繰り返し回数を指定.
この状態だとデフォルトは1秒ごとに3回実行.待ち時間を変更するためには,-wオプション.
5秒ごとに3回実行.
ここまでで表示されているのはiostatを実行した時間の平均統計量なのであって,5秒ごとにしたところでその間の合計ではない.そんな時に-I(あい)オプションを使うと,統計量が表示される.
ここで気づくけれど,フォーマットが変わってくる...
統計を取る期間は数値で.次の例は5秒毎の総計量.
Control+Cを押さないと永遠に続く.このあたりはvmstat(vm_stat)と似た様な作りになっている.
今まで通り,CPUの情報が不要だったり,disk5だけの情報が取りたくても,言うこと聞いてくれない.
何もパラメータをつけずに実行すると次の通り.
$ /usr/sbin/iostat🆑
              disk0               disk2               disk3       cpu    load average
    KB/t  tps  MB/s     KB/t  tps  MB/s     KB/t  tps  MB/s  us sy id   1m   5m   15m
    6.55   21  0.13   928.40   16 14.09   802.21   17 13.57   3  3 94  1.52 1.53 1.60
$
$ /usr/sbin/iostat -dt🆑
              disk0               disk2               disk3               disk4
    KB/t  tps  MB/s     KB/t  tps  MB/s     KB/t  tps  MB/s     KB/t  tps  MB/s
    6.55   21  0.13   928.83   16 14.16   802.21   17 13.56   658.55    6  3.93
$
このドライブには1つの内蔵SSDと,8つのUSB接続のHDDがあるのだけれど,9台分は表示されてない. -nオプションを指定すれば,指定した台数分が表示される.
3台分表示したい場合の例.
$ /usr/sbin/iostat -d -n 3🆑
              disk0               disk2               disk3
    KB/t  tps  MB/s     KB/t  tps  MB/s     KB/t  tps  MB/s
    6.55   21  0.13   930.47   16 14.41   802.21   17 13.53
$
直接指定することもできる.
$ /usr/sbin/iostat -d disk9🆑
              disk9
    KB/t  tps  MB/s
   80.39    0  0.00
$
繰り返し実行するためには,-cコマンドで繰り返し回数を指定.
$ /usr/sbin/iostat -c 3 -d disk2🆑
              disk2
    KB/t  tps  MB/s
  933.43   16 14.88
 1024.00  129 128.51
 1024.00  128 127.93
$$ /usr/sbin/iostat -c 3 -w 5 -d disk2🆑
disk2
KB/t tps MB/s
933.87 16 14.95
1021.85 121 120.28
1024.00 127 127.33
$
ここまでで表示されているのはiostatを実行した時間の平均統計量なのであって,5秒ごとにしたところでその間の合計ではない.そんな時に-I(あい)オプションを使うと,統計量が表示される.
$ /usr/sbin/iostat -I🆑
              disk0               disk2               disk3       cpu    load average
    KB/t xfrs   MB     KB/t xfrs   MB     KB/t xfrs   MB  us sy id   1m   5m   15m
    6.57 2381262 15269.94   935.63 1918951 1753348.04   802.21 1971155 1544211.79   3  3 94  1.42 2.24 2.45
$
統計を取る期間は数値で.次の例は5秒毎の総計量.
$ /usr/sbin/iostat -I 5🆑
              disk0               disk2               disk3       cpu    load average
    KB/t xfrs   MB     KB/t xfrs   MB     KB/t xfrs   MB  us sy id   1m   5m   15m
    6.58 2396354 15401.81   943.97 2123914 1957915.38   802.21 1971155 1544211.79   3  3 94  1.24 1.43 1.60
    4.80   5  0.02  1024.00 621 621.00     0.00   0  0.00   1  4 95  1.30 1.44 1.60
    4.80   5  0.02  1024.00 1236 1236.00     0.00   0  0.00   1  4 95  1.35 1.45 1.61
    4.80   5  0.02  1023.78 1780 1779.62     0.00   0  0.00   1  4 95  1.32 1.44 1.60
    4.44   9  0.04  1023.84 2408 2407.62     0.00   0  0.00   2  5 93  1.38 1.45 1.60
^C
$
今まで通り,CPUの情報が不要だったり,disk5だけの情報が取りたくても,言うこと聞いてくれない.
$ /usr/sbin/iostat -I 5 -d🆑
              disk0               disk2               disk3       cpu    load average
    KB/t xfrs   MB     KB/t xfrs   MB     KB/t xfrs   MB  us sy id   1m   5m   15m
    6.58 2397255 15406.45   944.65 2142570 1976536.11   802.21 1971155 1544211.79   3  3 94  1.52 1.46 1.58
$ /usr/sbin/iostat -I 5 disk5🆑
              disk0               disk2               disk3       cpu    load average
    KB/t xfrs   MB     KB/t xfrs   MB     KB/t xfrs   MB  us sy id   1m   5m   15m
    6.58 2397260 15406.49   944.67 2143301 1977267.11   802.21 1971155 1544211.79   3  3 94  1.72 1.51 1.60
$
macOSはMojaveのままだけれど,以下を設定.
macosのメモリ使用量をSNMPで取得する
pokemonsay
macOS High SierraにMRTGを設定
今度こそメディアサーバにするのだ!?
macosのメモリ使用量をSNMPで取得する
pokemonsay
macOS High SierraにMRTGを設定
今度こそメディアサーバにするのだ!?
7zip形式のファイル7zを受け取ったけれど,macOS Mojaveだとツールが入ってないので入れてみた.
まずはパッケージを検索.
p7zipが該当する模様.パッケージを確認.
過去30日で19,502件ダウンロードなので,いいものだろうと思われる.
インストールする.
インストールされたディレクトリを確認する.
7zコマンドなどがあった.
ファイルパスが通っているか確認.
7zコマンドのヘルプを確認.
インストールできたので,.7zファイルを展開する.
ファイルを展開(解凍)する際には,xオプションを使う.
パスワード付き7zファイルも対応していた.
まずはパッケージを検索.
$ brew search 7zip🆑
==> Formulae
p7zip
[macmini2014:ujpadmin 14:07:07 ~ ]
$
[macmini2014:ujpadmin 14:07:11 ~ ]
$ brew info p7zip🆑
p7zip: stable 16.02 (bottled)
7-Zip (high compression file archiver) implementation
https://p7zip.sourceforge.io/
Not installed
From: https://github.com/Homebrew/homebrew-core/blob/HEAD/Formula/p7zip.rb
License: LGPL-2.1-or-later and GPL-2.0-or-later
==> Analytics
install: 24,531 (30 days), 58,693 (90 days), 167,272 (365 days)
install-on-request: 19,502 (30 days), 46,053 (90 days), 129,176 (365 days)
build-error: 0 (30 days)
[macmini2014:ujpadmin 14:07:18 ~ ]
$
インストールする.
[macmini2014:ujpadmin 14:07:46 ~ ]
$ brew install p7zip🆑
Updating Homebrew...
==> Auto-updated Homebrew!
Updated 2 taps (homebrew/core and homebrew/cask).
==> Updated Formulae
Updated 30 formulae.
==> Updated Casks
Updated 7 casks.
==> Deleted Casks
racket-cs

==> Downloading https://homebrew.bintray.com/bottles/p7zip-16.02_3.mojave.bottle.tar.gz
==> Downloading from https://d29vzk4ow07wi7.cloudfront.net/971a247c66fae4b54fdf169fdea79b79a85af6a8d6dc01a3119df014a
######################################################################## 100.0%
==> Pouring p7zip-16.02_3.mojave.bottle.tar.gz
🍺  /usr/local/Cellar/p7zip/16.02_3: 102 files, 4.4MB
[macmini2014:ujpadmin 14:08:32 ~ ]
$
$ ls -la /usr/local/Cellar/p7zip/16.02_3/🆑
total 60
drwxr-xr-x 10 ujpadmin staff   320  2 15 14:08 .
drwxr-xr-x  3 ujpadmin staff    96  2 15 14:08 ..
drwxr-xr-x  3 ujpadmin staff    96  7 14  2016 .brew
-rw-r--r--  1 ujpadmin staff 39517  7 14  2016 ChangeLog
-rw-r--r--  1 ujpadmin staff   821  2 15 14:08 INSTALL_RECEIPT.json
-rw-r--r--  1 ujpadmin staff 12069  2 15 14:08 README
-rw-r--r--  1 ujpadmin staff   704  7 14  2016 TODO
drwxr-xr-x  5 ujpadmin staff   160  2 15 14:08 bin🈁
drwxr-xr-x  3 ujpadmin staff    96  7 14  2016 lib
drwxr-xr-x  4 ujpadmin staff   128  7 14  2016 share
[macmini2014:ujpadmin 14:09:32 ~ ]
$ ls -la /usr/local/Cellar/p7zip/16.02_3/bin🆑
total 12
drwxr-xr-x  5 ujpadmin staff 160  2 15 14:08 .
drwxr-xr-x 10 ujpadmin staff 320  2 15 14:08 ..
-r-xr-xr-x  1 ujpadmin staff  63  2 15 14:08 7z🈁
-r-xr-xr-x  1 ujpadmin staff  64  2 15 14:08 7za
-r-xr-xr-x  1 ujpadmin staff  64  2 15 14:08 7zr
[macmini2014:ujpadmin 14:09:36 ~ ]
$
ファイルパスが通っているか確認.
$ which 7z🆑
/usr/local/bin/7z🈁
[macmini2014:ujpadmin 14:09:56 ~ ]
$ ls -la /usr/local/bin/7z🆑
lrwxr-xr-x 1 ujpadmin admin 30  2 15 14:08 /usr/local/bin/7z -> ../Cellar/p7zip/16.02_3/bin/7z🈁
[macmini2014:ujpadmin 14:10:05 ~ ]
$
$ 7z -h🆑

7-Zip [64] 16.02 : Copyright (c) 1999-2016 Igor Pavlov : 2016-05-21
p7zip Version 16.02 (locale=utf8,Utf16=on,HugeFiles=on,64 bits,4 CPUs x64)

Usage: 7z <command> [<switches>...] <archive_name> [<file_names>...]
       [<@listfiles...>]

<Commands>
  a : Add files to archive
  b : Benchmark
  d : Delete files from archive
  e : Extract files from archive (without using directory names)
  h : Calculate hash values for files
  i : Show information about supported formats
  l : List contents of archive
  rn : Rename files in archive
  t : Test integrity of archive
  u : Update files to archive
  x : eXtract files with full paths🈁

<Switches>
  -- : Stop switches parsing
  -ai[r[-|0]]{@listfile|!wildcard} : Include archives
  -ax[r[-|0]]{@listfile|!wildcard} : eXclude archives
  -ao{a|s|t|u} : set Overwrite mode
  -an : disable archive_name field
  -bb[0-3] : set output log level
  -bd : disable progress indicator
  -bs{o|e|p}{0|1|2} : set output stream for output/error/progress line
  -bt : show execution time statistics
  -i[r[-|0]]{@listfile|!wildcard} : Include filenames
  -m{Parameters} : set compression Method
    -mmt[N] : set number of CPU threads
  -o{Directory} : set Output directory
  -p{Password} : set Password
  -r[-|0] : Recurse subdirectories
  -sa{a|e|s} : set Archive name mode
  -scc{UTF-8|WIN|DOS} : set charset for for console input/output
  -scs{UTF-8|UTF-16LE|UTF-16BE|WIN|DOS|{id}} : set charset for list files
  -scrc[CRC32|CRC64|SHA1|SHA256|*] : set hash function for x, e, h commands
  -sdel : delete files after compression
  -seml[.] : send archive by email
  -sfx[{name}] : Create SFX archive
  -si[{name}] : read data from stdin
  -slp : set Large Pages mode
  -slt : show technical information for l (List) command
  -snh : store hard links as links
  -snl : store symbolic links as links
  -sni : store NT security information
  -sns[-] : store NTFS alternate streams
  -so : write data to stdout
  -spd : disable wildcard matching for file names
  -spe : eliminate duplication of root folder for extract command
  -spf : use fully qualified file paths
  -ssc[-] : set sensitive case mode
  -ssw : compress shared files
  -stl : set archive timestamp from the most recently modified file
  -stm{HexMask} : set CPU thread affinity mask (hexadecimal number)
  -stx{Type} : exclude archive type
  -t{Type} : Set type of archive
  -u[-][p#][q#][r#][x#][y#][z#][!newArchiveName] : Update options
  -v{Size}[b|k|m|g] : Create volumes
  -w[{path}] : assign Work directory. Empty path means a temporary directory
  -x[r[-|0]]{@listfile|!wildcard} : eXclude filenames
  -y : assume Yes on all queries
[macmini2014:ujpadmin 14:10:12 ~ ]
$
ファイルを展開(解凍)する際には,xオプションを使う.
$ 7z x virus.zip.7z🆑

7-Zip [64] 16.02 : Copyright (c) 1999-2016 Igor Pavlov : 2016-05-21
p7zip Version 16.02 (locale=utf8,Utf16=on,HugeFiles=on,64 bits,4 CPUs x64)

Scanning the drive for archives:
1 file, 53103 bytes (52 KiB)

Extracting archive: virus.zip.7z
--
Path = virus.zip.7z
Type = 7z
Physical Size = 53103
Headers Size = 127
Method = Copy 7zAES
Solid = -
Blocks = 1


Enter password (will not be echoed):🔑🔑🔑🔑🔑
Everything is Ok

Size:       52962
Compressed: 53103
[macmini2014:ujpadmin 14:28:17 ~ ]
$
エラーになって進まない...
同じ悩みの人も...
https://github.com/BloodHoundAD/BloodHound-Tools/issues/22
(Cmd) generate
Starting data generation with nodes=500
Populating Standard Nodes
Traceback (most recent call last):
  File "/Users/ujpadmin/bin/BloodHound-Tools/DBCreator/DBCreator.py", line 806, in <module>
    MainMenu().cmdloop()
  File "/Users/ujpadmin/bin/BloodHound-Tools/DBCreator/DBCreator.py", line 69, in cmdloop
    cmd.Cmd.cmdloop(self)
  File "/usr/local/Cellar/python@3.9/3.9.1_8/Frameworks/Python.framework/Versions/3.9/lib/python3.9/cmd.py", line 138, in cmdloop
    stop = self.onecmd(line)
  File "/usr/local/Cellar/python@3.9/3.9.1_8/Frameworks/Python.framework/Versions/3.9/lib/python3.9/cmd.py", line 217, in onecmd
    return func(arg)
  File "/Users/ujpadmin/bin/BloodHound-Tools/DBCreator/DBCreator.py", line 200, in do_generate
    self.generate_data()
  File "/Users/ujpadmin/bin/BloodHound-Tools/DBCreator/DBCreator.py", line 261, in generate_data
    session.run(f"{base_statement},n.highvalue=true", gname=cn(
  File "/usr/local/lib/python3.9/site-packages/neo4j/__init__.py", line 503, in run
    self._connection.fetch()
  File "/usr/local/lib/python3.9/site-packages/neobolt/direct.py", line 419, in fetch
    return self._fetch()
  File "/usr/local/lib/python3.9/site-packages/neobolt/direct.py", line 461, in _fetch
    response.on_failure(summary_metadata or {})
  File "/usr/local/lib/python3.9/site-packages/neobolt/direct.py", line 755, in on_failure
    raise CypherError.hydrate(**metadata)
neobolt.exceptions.ClientError: Supplied bookmark [FB:kcwQTQsLDdTOQhS7m6W//Z2RdyGQ] does not conform to pattern neo4j:bookmark:v1:tx
https://github.com/BloodHoundAD/BloodHound-Tools/issues/22
rubyのバージョンがOS標準になっているので動かなかったので,環境を整える.
rbenvでインストールされている環境を確認.
rbenvのバージョンを確認.
rbenvの2.5.8をインストール.
.bash_profileに記載の追加.
rubyのバージョンを確認.
やっとiStatsのインストール.
エラーになった.
エラーメッセージにある通り,ディレクトリを指定して再実行.
成功した.
実行してみる.
OK.
[macmini2014:ujpadmin 01:29:41 ~ ]
$ which ruby🆑
/usr/bin/ruby🈁
[macmini2014:ujpadmin 01:29:50 ~ ]
$ rbenv install --list🆑
2.5.8🈁
2.6.6
2.7.2
3.0.0
jruby-9.2.14.0
mruby-2.1.2
rbx-5.0
truffleruby-20.3.0
truffleruby+graalvm-20.3.0

Only latest stable releases for each Ruby implementation are shown.
Use 'rbenv install --list-all / -L' to show all local versions.
[macmini2014:ujpadmin 01:30:01 ~ ]
$ rbenv -v🆑
rbenv 1.1.2🈁
[macmini2014:ujpadmin 01:31:10 ~ ]
$ rbenv install 2.5.8🆑
#20210118
if which rbenv > /dev/null; then eval "$(rbenv init -)"; fi
export RUBY_CONFIGURE_OPTS="--with-openssl-dir=$(brew --prefix openssl@1.1)"
$ which ruby🆑
/Users/ujpadmin/.rbenv/shims/ruby
[macmini2014:ujpadmin 01:36:55 ~ ]
$
$ sudo gem install iStats🆑
Password:🔑
Building native extensions. This could take a while...
ERROR:  While executing gem ... (Gem::FilePermissionError)
    You don't have write permissions for the /usr/bin directory.🈁
[macmini2014:ujpadmin 01:37:21 ~ ]
$
エラーメッセージにある通り,ディレクトリを指定して再実行.
$ sudo gem install iStats -n /usr/local/bin🆑
Building native extensions. This could take a while...
Successfully installed iStats-1.6.1
Parsing documentation for iStats-1.6.1
Done installing documentation for iStats after 0 seconds
1 gem installed
[macmini2014:ujpadmin 01:38:32 ~ ]
$
実行してみる.
$ /usr/local/bin/istats all🆑
--- CPU Stats ---
CPU temp:               46.63°C     ▁▂▃▅▆▇

--- Fan Stats ---
Total fans in system:   1
Fan 0 speed:            1806 RPM    ▁▂▃▅▆▇

--- Battery Stats ---
No battery on system

For more stats run `istats extra` and follow the instructions.
[macmini2014:ujpadmin 00:44:29 ~ ]
$
これからも在宅勤務も長く続くだろうし,リアルデスクトップの整理を.
それでメインで使っているMacBook Pro 2015が,どうしても3画面利用+PC利用で併用できないので,メインをmac mini 2014にすることを思いついた.
するとそれを配置するために検討したのがこの方法.
まずは今回の整理対象.
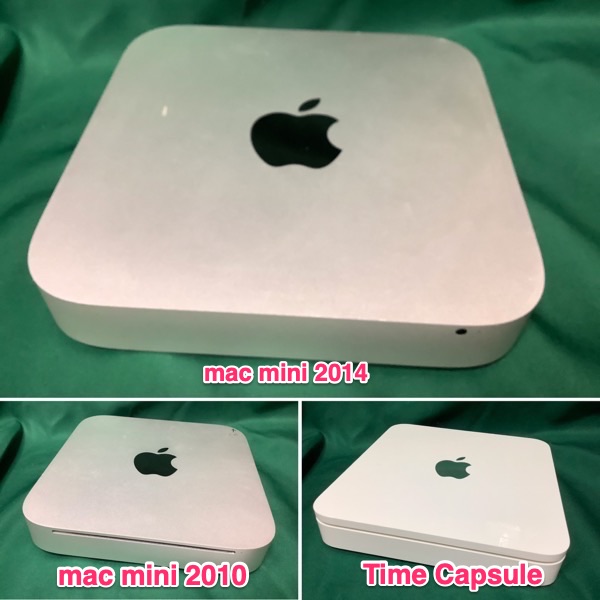
2010年に購入したmac mini 2010と2011年に購入したTime Capsuleとこの前買ったmac mini 2014を積み重ねてみた.
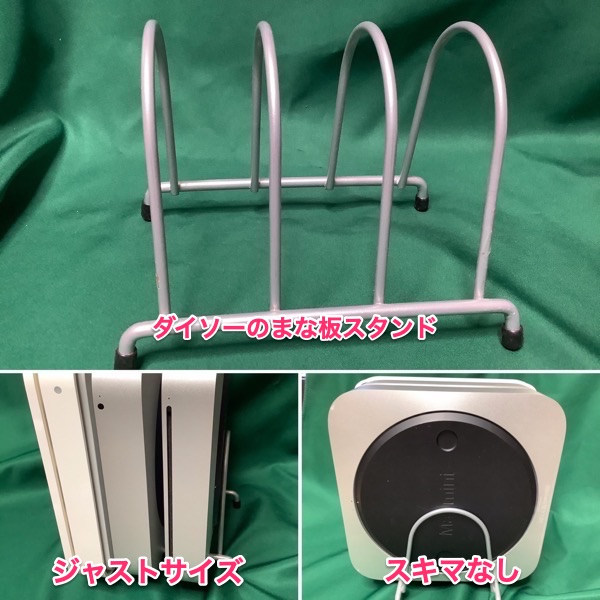
ぴったりサイズすぎて怖いくらい.
それでメインで使っているMacBook Pro 2015が,どうしても3画面利用+PC利用で併用できないので,メインをmac mini 2014にすることを思いついた.
するとそれを配置するために検討したのがこの方法.
まずは今回の整理対象.
2010年に購入したmac mini 2010と2011年に購入したTime Capsuleとこの前買ったmac mini 2014を積み重ねてみた.
ぴったりサイズすぎて怖いくらい.
brewでインストールするパッケージ.
そのほかのツール.
そして環境変数.
App Storeで入れたのは,
ダウンロードしてインストールは,
ブラウザ入れすぎたかな.
brew update
brew install tree
brew install wget
brew install cask
brew install gnu-sed
brew install coreutils
brew install imagemagick
brew install openjpeg
brew install fontconfig
brew install nkf
brew install curl
brew install ffmpeg
brew install mrtg
brew install cowsay
brew install sl
brew install neofetch
brew install figlet
brew install youtube-dl
brew install openjdk@8
brew install cask
brew install --cask iTerm2
sudo gem install iStats -n /usr/local/bin
git clone http://github.com/possatti/pokemonsay
cd pokemonsay/
./install.sh
vi ~/.bash_profile
#PATH 20200106
export PATH="/usr/local/bin:$PATH"
export PATH="/usr/local/sbin:$PATH"
export PATH="/usr/local/opt/apr-util/bin:$PATH"
export PATH="/usr/local/opt/apr/bin:$PATH"
export PATH="/usr/local/opt/coreutils/libexec/gnubin:$PATH"
export PATH="/usr/local/opt/curl/bin:$PATH"
export PATH="/usr/local/opt/gettext/bin:$PATH"
export PATH="/usr/local/opt/gnu-sed/libexec/gnubin:$PATH"
export PATH="/usr/local/opt/openldap/bin:$PATH"
export PATH="/usr/local/opt/openssl/bin:$PATH"
export PATH="/usr/local/opt/sphinx-doc/bin:$PATH"
export PATH="/usr/local/opt/sqlite/bin:$PATH"
export PATH="/usr/local/opt/icu4c/sbin:$PATH"
export PATH="/usr/local/opt/openjdk@8/bin:$PATH"

PS1='\[\e[0;36m\][\h:\u \t \w ]\[\e[0m\]\n\$ '
export COWPATH=/usr/local/Cellar/cowsay/3.04_1/share/cows
#cowsay -f daemon `hostname`
bin/pokemonsay -p Snorlax `hostname`
App Storeで入れたのは,
日めくり
Skitch
Microsoft Remote Desktop
Apple Remote Desktop
macOS Server
Display Menu
Blackmagic Disk Speed Test
Chromium
Google Chrome
Firefox
SeaMonkey
Brave Browser
Opera Neon
Opera
Kraniner-Elements
Microsoft Office 16.44(Microsoft 365)
DeepL
Error: Calling brew cask install is disabled! Use brew install [--cask] instead.
- ブロガー :
- ujpblog 2021/1/7 0:18
mac mini 2014に利用環境を作ろうとしてコマンドを実行している.
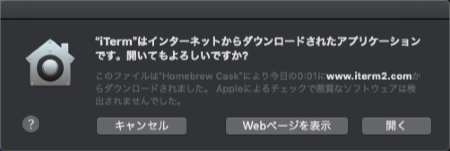
ターミナルアプリのiTerm2をbrewでインストールしようとしたらエラーが...
brew caskのインストールは非推奨になったようだ.今現在は,--caskをつけることで実行できるとのこと.
Gatekeeperの関係かな? このダイアログ.
仕方ないね.
ターミナルアプリのiTerm2をbrewでインストールしようとしたらエラーが...
macmini2014:~ ujpadmin$ brew cask install iTerm2🆑
Error: Calling brew cask install is disabled! Use brew install [--cask] instead.
macmini2014:~ ujpadmin$
macmini2014:~ ujpadmin$ brew install --cask iTerm2🆑
==> Downloading https://iterm2.com/downloads/stable/iTerm2-3_4_3.zip
######################################################################## 100.0%
==> Installing Cask iterm2
==> Moving App 'iTerm.app' to '/Applications/iTerm.app'.
🍺  iterm2 was successfully installed!
macmini2014:~ ujpadmin$
Gatekeeperの関係かな? このダイアログ.
仕方ないね.
CPUがARMベースになったM1 Mac miniがリリースされて,旧型のmacの中古価格が大暴落・・・と聞いて急いで(検診のついでに)秋葉原に行ってみた.
それらしい暴落マシンはなかったけれど,mac mini 2014がメモリ16GBで24,999円(税別)で売られていたのを目をつけて,ぐるっと巡回した後にもう一度訪問してみたらまだ残っていたので購入してみました.
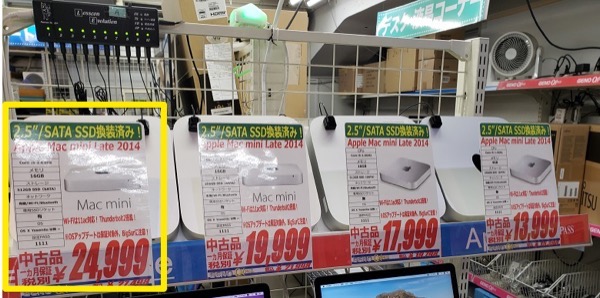
売ってた店のTwitterの投稿より
値段が様々だったけれど,ここはもう最高スペックのものを.
1ヶ月保証なのでまずは動作確認のための開封の儀.プチプチの簡易包装だけれど.
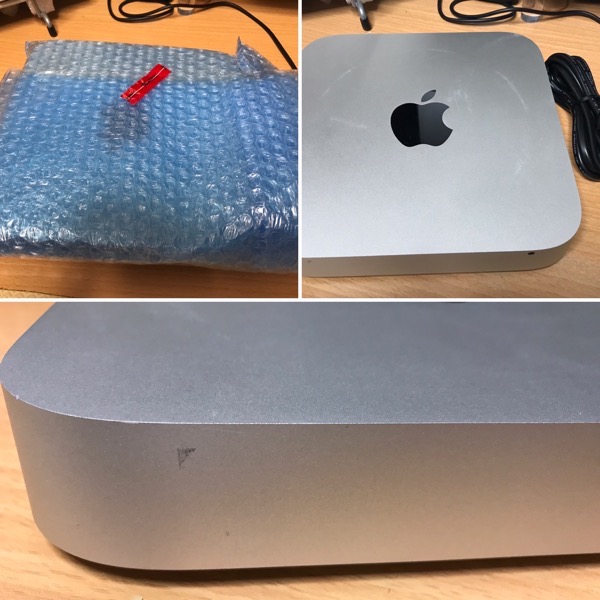
上面にmac miniの底がつけられていた痕跡が.積み重ねて使われていたからか,中古売却時に積み重ねて置いてあっただけなのか.
側面にシール跡があったので,やはりサーバにして使われていたのではなかろうか.2014年当時,本体だけで10万円くらいしていたから,このスペックだと20万円近かったんじゃなかろうか.このモデルはメモリ増設できないタイプ.
早速ディスクスピードのベンチマークを.
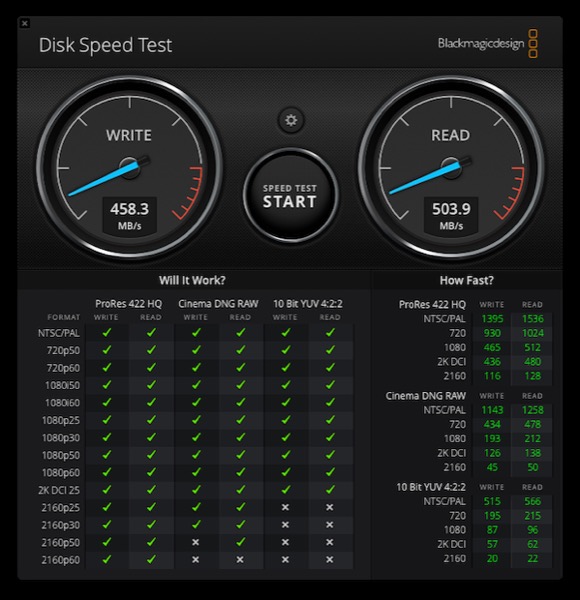
Write 458.3MB/sとRead 503.0MB/s
うちの2代目mac mini 2010にSSDを増設した状態を振り返って見ると.
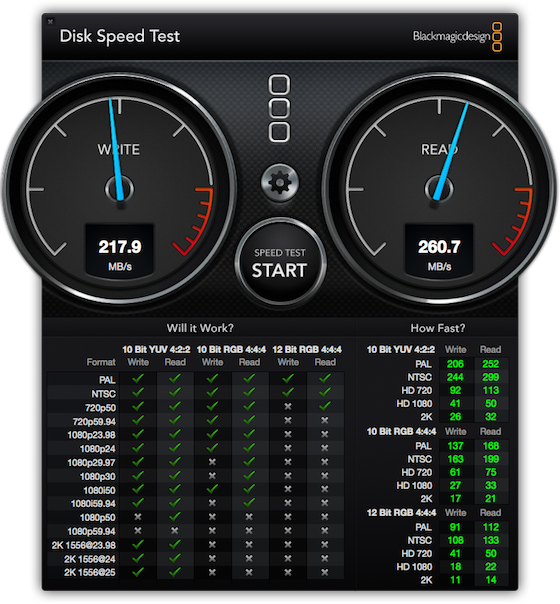
Write 217.9MB/sとRead 260.7MB/s
おお.倍か.
それらしい暴落マシンはなかったけれど,mac mini 2014がメモリ16GBで24,999円(税別)で売られていたのを目をつけて,ぐるっと巡回した後にもう一度訪問してみたらまだ残っていたので購入してみました.
売ってた店のTwitterの投稿より
値段が様々だったけれど,ここはもう最高スペックのものを.
1ヶ月保証なのでまずは動作確認のための開封の儀.プチプチの簡易包装だけれど.
上面にmac miniの底がつけられていた痕跡が.積み重ねて使われていたからか,中古売却時に積み重ねて置いてあっただけなのか.
側面にシール跡があったので,やはりサーバにして使われていたのではなかろうか.2014年当時,本体だけで10万円くらいしていたから,このスペックだと20万円近かったんじゃなかろうか.このモデルはメモリ増設できないタイプ.
早速ディスクスピードのベンチマークを.
Write 458.3MB/sとRead 503.0MB/s
うちの2代目mac mini 2010にSSDを増設した状態を振り返って見ると.
Write 217.9MB/sとRead 260.7MB/s
おお.倍か.
