


ブログ - サイト構築カテゴリのエントリ
芥川賞受賞作品も一部生成AIを使った昨今,サイトのロゴの生成を手伝ってもらっても良いだろうと考えて,「お絵描きばりぐっどくん」で生成してみた.
現在,このサイトはサイバーセキュリティと証券株取引のサイトになっているので,それをベースに情報を食べさせてみた.
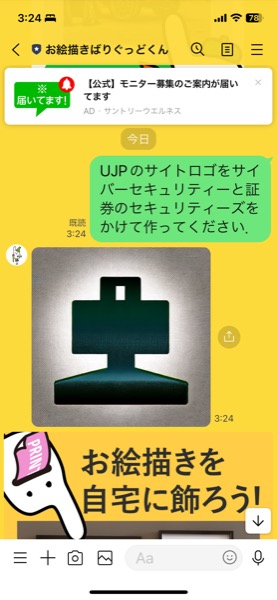
警備のセキュリティ感が多いかな.カギのようなシルエットで,ちょっとパッとしない.
そして2つ目.
現在,このサイトはサイバーセキュリティと証券株取引のサイトになっているので,それをベースに情報を食べさせてみた.
警備のセキュリティ感が多いかな.カギのようなシルエットで,ちょっとパッとしない.
そして2つ目.
Apache2で運用しているサーバで,アクセスログをみるとIPアドレスで記録されている場合とホスト名で記録されているものがあった.
調べるとHostnameLookups onにすればIPアドレスじゃなくホスト名でログされるようになるが,デフォルトではoffとのこと.
しかし,明示的にoffに変えてもホスト名で記録されてしまう.
さらに調べた結果,httpd.confの中にallow,denyの部分でコメントの書き方に作法があるようでした.
このようにコメントを書くと,HostnameLookups offでもホスト名がログに記録されます.
同じ行に書かれている(この場合「#コメント」)部分がホスト名だと勘違いされてオーバライドされるので名前解決するのだとか.
次のように記述すると良いそうです.
そしてうちの場合,httpd.confにこのような記述はなかったのだけど,.htaccessとか設定を外だしでInclude conf/extra/deny.confとかにしている場合は,それをチェックすれば良いでしょう.
調べるとHostnameLookups onにすればIPアドレスじゃなくホスト名でログされるようになるが,デフォルトではoffとのこと.
しかし,明示的にoffに変えてもホスト名で記録されてしまう.
さらに調べた結果,httpd.confの中にallow,denyの部分でコメントの書き方に作法があるようでした.
このようにコメントを書くと,HostnameLookups offでもホスト名がログに記録されます.
deny from 192.168.0.1 #コメント
次のように記述すると良いそうです.
#コメント
deny from 192.168.0.1
ずっと考えているシステム移行.面倒なので放置.
共存していたメールサーバは移行完了
現在実現できているのは,これだけ.でもまぁメールは生命線だからそれなりに大事.
バージョンアップ
PHPのバージョンアップにつられて動作しない問題が多々あったXOOPS Cubeだけど,追いつくのをやめてしまった.するとどうでしょう.
XOOPS Cubeを使ってサイトを構築しているけれど,XOOPS Cubeが無くなってしまった.周辺の「モジュール」とされる拡張機能を作って提供していたサイトも閉鎖されてしまった.
時代的にパッケージマネージャをHomeBrewじゃなくてMacPortsで作ってしまったので再現性が難しい.
別のCMSに移行
今だったらWordPressになるのだろう.でも問題の先送り感があるなぁ.結局データ移行しなきゃいけないし.
これに頼ったら,また将来ツールがなくなった時の問題に振り回されるのかな?なんて思ったりする.
静的サイトジェネレータ
サーバソフトが不要という点が良い.ただ,いつでもどこでもどの端末でも更新できるというメリットがなくなる.
これに頼ったら,また将来ツールがなくなった時の問題に振り回されるのかな?なんて思ったりする.
仮想化サーバ化
現在稼働しているシステムを仮想化して仕舞えば,例えばヤラれた時も復旧しやすいかなと思っていたりする.
仮想イメージ化して仕舞えば,しばらくはどうにかなるかな.まだ問題の先送りを先送りできる.
メールサーバの運用で,10年くらい,グレイリスト運用をしていたけど止めた.
グレイリストは,メールが来ても一旦送信メールサーバにメールを返却.再送されてきたら受け入れるって感じ.偽のメールサーバから送られてきていたら,返送できないのでその時点で削除.
ただし,これには問題があって,正しいメールサーバだったとして,再送してくるタイミングは相手のメールサーバによって異なる.再送してこないメールサーバもある.
何かに入会する際にメールアドレスの登録をするけど,そのメアドの確認メールにあるURLをクリック可能なタイムリミットが,15分以内とかの場合間に合わない場合がある.当然再送されない時もあるのでそうなると会員登録できないこともある.
これらの不便さに耐えるよりも,迷惑メールを受け入れフィルタを強化して除外する方向性に変更,という感じ.
お名前.comのサービス調整費が20%超える値上げになったのでレジストラを移管しようとしていた件.
以前同じ理由で移管した時は申請が土日を挟んでいたので時間がかかったのかと思っていたけど,今回は平日だけど3日かかりました.
ということで,月末駆け込みで移管するというのはナンセンスだし,更新直前に移管する必要もないので,移管先のレジストラが決まったらさっさと移管作業してしまうのが良いでしょう.
以前同じ理由で移管した時は申請が土日を挟んでいたので時間がかかったのかと思っていたけど,今回は平日だけど3日かかりました.
ということで,月末駆け込みで移管するというのはナンセンスだし,更新直前に移管する必要もないので,移管先のレジストラが決まったらさっさと移管作業してしまうのが良いでしょう.
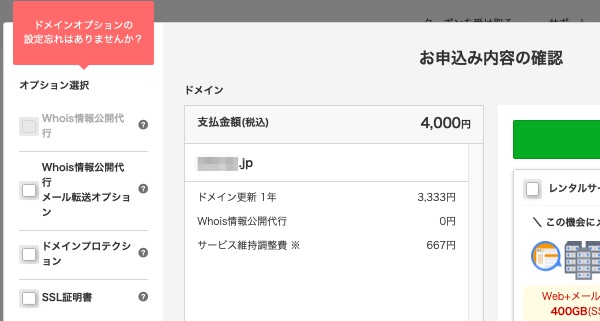
お名前.comで登録してある某ドメインが更新1ヶ月前になりました.
自動更新を切っておいたので,もう毎日数通の更新催促メールがスパムのようにくる感じです...
おさらいとして現在の条件のまま,お名前.comでドメインを更新したときの価格.
自動更新を切っておいたので,もう毎日数通の更新催促メールがスパムのようにくる感じです...
おさらいとして現在の条件のまま,お名前.comでドメインを更新したときの価格.
2023年年初からサービス維持調整費と言う名目でコストが流動的になった,お名前.comの料金.
2022.12.26 【お知らせ】 【重要】[お名前.com]「サービス維持調整費」についてのご案内
https://www.onamae.com/news/domain/20221226_1/
引用:
「1~3ヶ月ごと」に「10~20%程度」となっているけれど,実際にはこんな感じで通知が来ている.
毎月変更されて,20%以上になってしまった. これは残るドメインも,移管を考えたほうが良いかな.よく計算してみよう.
2022.12.26 【お知らせ】 【重要】[お名前.com]「サービス維持調整費」についてのご案内
https://www.onamae.com/news/domain/20221226_1/
引用:
サービスにおいて、2023年2月1日以降の新規ご契約・契約更新で発生するご請求
に対し10~20%程度の「サービス維持調整費」を請求させていただきます。
なお、「サービス維持調整費」は、1~3ヶ月ごとを目処に市場動向に応じた
見直しを予定しており、変動が生じる際はご利用のお客様へ都度ご案内いたします。
「1~3ヶ月ごと」に「10~20%程度」となっているけれど,実際にはこんな感じで通知が来ている.
2023年 サービス維持調整費
2月 18.25%
3月 18.25% ⇒ 18%
4月 18% ⇒ 18.75%
5月 18.75% ⇒ 18.5%
6月 18.5% ⇒ 19.5%
7月 19.5% ⇒ 20.0%
8月 20.0% ⇒ 20.5%
ドメインの所有者に関する情報はwhoisサーバで公開されるのだけれど,公開したくない場合,レジストラのサービスを使うことができます.
お名前.comでは「Whois情報公開代行」でゴンベエドメインでは「JPWhoisガードサービス設定」と言うサービスです.
今回移行対象の度面ではは,2005年に登録したJPドメインで,その時はWhois情報公開代行が無料でサービスが追加されたけれど,試用期間後に有償化されました.確か1年で500円.
その後,値上げされて現在は1年で1078円.さらにお名前.comからの悪意のあるメルマガに載せられて2年くらい前から「Whois情報公開代行メール転送オプション 330円」も追加されていました.
ドメイン移管に伴い,Whois情報サービスを解除して,移管後に「JPWhoisガードサービス」を入れたので,その違いを確認してみます.
お名前.comが不確定変動値上げで16%費用アップしたのでレジストラの変更をしようとしている件.
移管先のゴンベエドメインで「Gonbei Domain ドメイン移管オンラインサインアップ」
ドメイン移管(引っ越し)
https://www.gonbei.jp/trans/index.html
このページの「汎用型・都道府県型JPドメインの移管」から遷移.
汎用型・都道府県型JPドメインの移管
https://www.gonbei.jp/trans/hanyou01.html
下のようにある「今すぐ申請」をクリック.
以下のフローに沿ってお手続きしてください。のページになる.
https://www.gonbei.jp/trans/hanyou02.html
オンラインサインアップをクリック.
利用規約を呼んでチェックし,「同意して申し込む」をクリック.
次に,移管するドメインを入力し,お客様情報の入力へ進む.
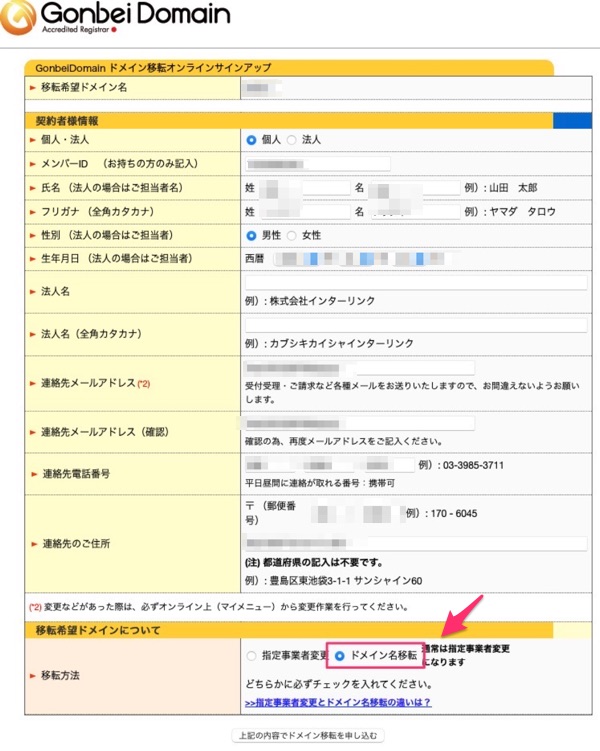
ここで顧客情報を入力.
今回はお名前.comで管理しているドメインのうちの1つだけを移管するので,「ドメイン名移転」をチェックする.
「通常は指定事業者変更になります」となっているけど,お名前.comで持っているすべてのドメインを移管する場合は「指定事業者変更」にすれば良い模様.
移管先のゴンベエドメインで「Gonbei Domain ドメイン移管オンラインサインアップ」
ドメイン移管(引っ越し)
https://www.gonbei.jp/trans/index.html
このページの「汎用型・都道府県型JPドメインの移管」から遷移.
汎用型・都道府県型JPドメインの移管
https://www.gonbei.jp/trans/hanyou01.html
下のようにある「今すぐ申請」をクリック.
以下のフローに沿ってお手続きしてください。のページになる.
https://www.gonbei.jp/trans/hanyou02.html
オンラインサインアップをクリック.
利用規約を呼んでチェックし,「同意して申し込む」をクリック.
次に,移管するドメインを入力し,お客様情報の入力へ進む.
ここで顧客情報を入力.
今回はお名前.comで管理しているドメインのうちの1つだけを移管するので,「ドメイン名移転」をチェックする.
「通常は指定事業者変更になります」となっているけど,お名前.comで持っているすべてのドメインを移管する場合は「指定事業者変更」にすれば良い模様.
インターネットドメイン取得・維持費用が変動性になったお名前.comから,コストダウンの為にレジストラをゴンベエドメインに変更する事にした.
まずは王道の,お名前.comのヘルプを見てみる.
【ドメイン】お名前.comから他の登録業者へ移管する方法は?
https://help.onamae.com/answer/8593
うちの場合,「.com」「.net」とかじゃなくて「.jp」で,「.co.jp」とかの「属性型JPドメイン」でもない「汎用型JPドメイン」になるので,次のような手順になる模様.
1.whois情報に誤りがないか,お名前.comの画面で確認・更新する.
→連絡先に誤り(情報が古いなど)があると,移管先との調整に失敗することがある.
2.お名前.comで,Whois情報公開代行を解除する
→移管先のレジストラが情報を確認する為に必要.
3.移管先のゴンベエドメインで,ドメイン移管申請をする.
4.ゴンベエドメインの運営が移管申請を受信後,移管作業を行う.
5.JPドメインを管理するJPRSで調整後,ゴンベエドメインとお名前.comとで作業完了.
6.お名前.comから承認依頼メールが所有者(私)に来る.
7.メール受信後に,承認する.
8.ドメイン移管完了.
調べたところ,お名前.comからゴンベエドメインに移管する際には,「DNS情報は以前のDNS設定がそのまま継承されます。」とあります.DNS設定が何を示すのか,今現在不明ですが,レコード情報は別途把握しておいた方が良いでしょう.
お名前.comには,レコード情報をダウンロードする機能があります.
それと,ここまでやってきて気づいたのだけれど,「指定事業者変更」だと現在のお名前.comで管理しているすべてのドメインが移管されてしまう.1つのドメインだけレジストラを変えたい場合「ドメイン移転」にする必要がありますね.
参考情報
引用:
汎用型・都道府県型JPドメインの移管(指定事業者変更)
https://www.gonbei.jp/trans/hanyou01.html
引用:
指定事業者変更とは さくらインターネット
https://help.sakura.ad.jp/domain/2283/
引用:
指定事業者制度 - JPRS WHOIS
https://jprs.jp/about/dom-rule/framework/
まずは王道の,お名前.comのヘルプを見てみる.
【ドメイン】お名前.comから他の登録業者へ移管する方法は?
https://help.onamae.com/answer/8593
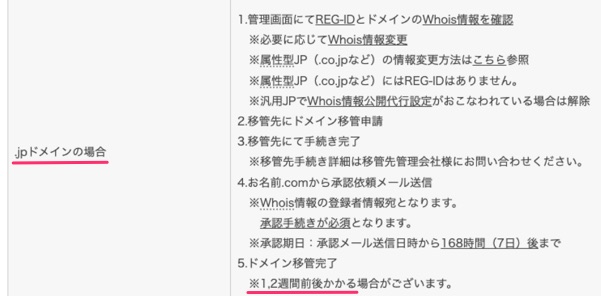
1.管理画面にてREG-IDとドメインのWhois情報を確認
 ※必要に応じてWhois情報変更
 ※属性型JP(.co.jpなど)の情報変更方法はこちら参照
 ※属性型JP(.co.jpなど)にはREG-IDはありません。
 ※汎用JPでWhois情報公開代行設定がおこなわれている場合は解除
2.移管先にドメイン移管申請
3.移管先にて手続き完了
 ※移管先手続き詳細は移管先管理会社様にお問い合わせください。
4.お名前.comから承認依頼メール送信
 ※Whois情報の登録者情報宛となります。
  承認手続きが必須となります。
 ※承認期日:承認メール送信日時から168時間(7日)後まで
5.ドメイン移管完了
 ※1,2週間前後かかる場合がございます。
うちの場合,「.com」「.net」とかじゃなくて「.jp」で,「.co.jp」とかの「属性型JPドメイン」でもない「汎用型JPドメイン」になるので,次のような手順になる模様.
1.whois情報に誤りがないか,お名前.comの画面で確認・更新する.
→連絡先に誤り(情報が古いなど)があると,移管先との調整に失敗することがある.
2.お名前.comで,Whois情報公開代行を解除する
→移管先のレジストラが情報を確認する為に必要.
3.移管先のゴンベエドメインで,ドメイン移管申請をする.
4.ゴンベエドメインの運営が移管申請を受信後,移管作業を行う.
5.JPドメインを管理するJPRSで調整後,ゴンベエドメインとお名前.comとで作業完了.
6.お名前.comから承認依頼メールが所有者(私)に来る.
7.メール受信後に,承認する.
8.ドメイン移管完了.
調べたところ,お名前.comからゴンベエドメインに移管する際には,「DNS情報は以前のDNS設定がそのまま継承されます。」とあります.DNS設定が何を示すのか,今現在不明ですが,レコード情報は別途把握しておいた方が良いでしょう.
お名前.comには,レコード情報をダウンロードする機能があります.
それと,ここまでやってきて気づいたのだけれど,「指定事業者変更」だと現在のお名前.comで管理しているすべてのドメインが移管されてしまう.1つのドメインだけレジストラを変えたい場合「ドメイン移転」にする必要がありますね.
参考情報
引用:
JPドメインは、指定事業者と呼ばれるJPRS(日本レジストリサービス)が定めたドメイン登録業務を代行する法人を通じて管理されます。
指定事業者変更は、ドメイン登録業務を代行する法人を変更する手続きです。
汎用型・都道府県型JPドメインの移管(指定事業者変更)
https://www.gonbei.jp/trans/hanyou01.html
引用:
指定事業者変更とは(通常はこちらの申請になります)
指定事業者変更手続きは、登録情報をドメイン登録者単位で別の指定事業者からインターリンクへ管理権限移管する手続きです。この手続きを行うことで、その登録者情報の管理権限、その登録者に関連付けられている全てのドメインの管理権限、そのドメイン名をもつネームサーバーホスト情報の管理権限が、変更先指定事業者に与えられます。
指定事業者変更とは さくらインターネット
https://help.sakura.ad.jp/domain/2283/
引用:
汎用JPドメインは、ドメイン単位で指定事業者を移す「移転」手続きと、登録者番号単位で指定事業者を移す「指定事業者変更」手続きの2種類がございます。
「指定事業者変更」で移管(転入)する場合は、登録者番号に登録されている全てのドメインが対象になります。
ドメイン単位での移管(転入)を希望される場合は、「移転」にてお申込みください。
指定事業者制度 - JPRS WHOIS
https://jprs.jp/about/dom-rule/framework/
サービス維持調整費なる勝手に値段が上がる仕組みに酔うって,変動費用になって年度予算をつけづらくなったレレジストラの「お名前.com」ですが,今回仕組みが変わってから初めて請求が来ました.
汎用JPドメイン1つで1万円越え...サービス維持調整費なるものが,1,400+199+61なので1660円.全体の16%アップだ.そもそも,「Whois情報公開代行」も無料だったのに有料にされてどんどん値段が上がっている...
コストを下げる意味で,他のサービスを調べてみた.
[更新料金]
ドメイン名..................:xxxxxxxxxx.jp
.jp 1年更新×1...........:\7,568
Whois情報公開代行×1..:\1,078
Whois情報公開代行メール転送オプション×1:\330
ドメイン更新 サービス維持調整費×1:\1,400
Whois情報公開代行 サービス維持調整費×1:\199
Whois情報公開代行メール転送オプション サービス維持調整費×1:\61
----------------------------------------------------------------------
金額合計(税込)............:\10,636


※記載の料金はすべて税込金額です。

※サービス維持調整費について
 各種価格高騰の情勢に鑑み、誠に不本意ながら2023年2月1日以降サービス
 品質維持のため、対象となる料金に一定割合の「サービス維持調整費」を
 いただきます。なにとぞご理解ご協力をいただきたくお願い申し上げます。
 割引が適用される場合は、割引後価格に基づいてご請求させていただきます。
クレジットカードが無効の場合、以下よりお手続きをお願いいたします。コストを下げる意味で,他のサービスを調べてみた.
インターネットレジストらの,お名前.comから,先月末,値上げの予告があったのだけれど,価格が決まったと連絡が.
2022.12.26 【重要】[お名前.com]「サービス維持調整費」についてのご案内
https://www.onamae.com/news/domain/20221226_1/
18%以上の値上げか.管理業務がたくさんあるとも思えないんだけれど,逃げられない部分を値上げするとは足元見ているな,という感じか.
2022.12.26 【重要】[お名前.com]「サービス維持調整費」についてのご案内
https://www.onamae.com/news/domain/20221226_1/
◆サービス維持調整費
18.25%

◆対象サービス
---------------------------------------
・ドメイン新規登録
・ドメイン契約更新
・ドメイン移管
・Whois情報公開代行設定
・Whois情報公開代行メール転送オプション
・ドメインプロテクション
・DNS追加オプション(メール・URL転送Plus含む)
・SSL証明書
・ドメインモニタリング
・ドメインパーキング
・ドメイン売買サービス
・あんしん廃止
---------------------------------------

上記サービスにおきましては、2023年2月1日より発生するご請求分より、
サービス維持調整費をご請求させていただきます。
置いてみた.
http://humanstxt.org/JA
引用:
何かしら意味があったら,また書こうと思う.
http://humanstxt.org/JA
引用:
humans.txtって何?
ウエブに関与した人たちについての情報が入ったTXTファイルです。
何かしら意味があったら,また書こうと思う.
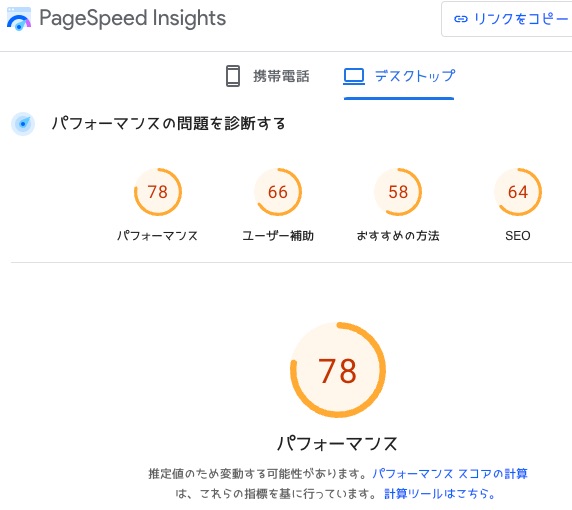
Webサイトの表示が遅いと,広告収入が悪くなると聞いて.
Googleのツールを使って,ページの表示スピードを計測.
PageSpeed Insights
https://developers.google.com/speed/pagespeed/insights/
計測結果.まずはPCサイトとして.
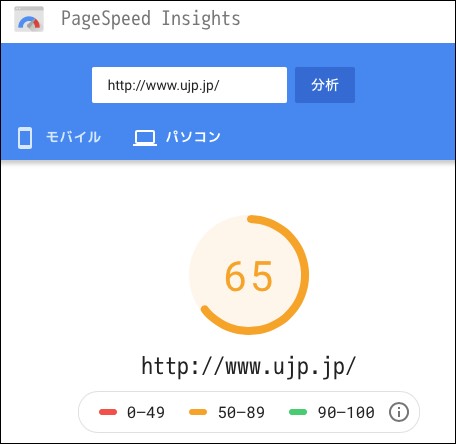
13年前のパソコンで動いているということを考えると,十分じゃないか?どうなんかな.
そしてモバイルサイトとして.
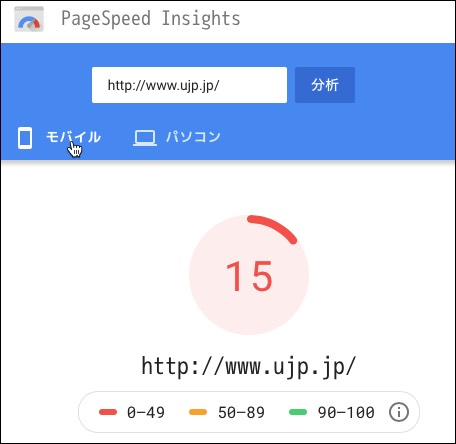
モバイル用のテーマを入れているのだけれど,表示も微妙だし自分じゃカスタマイズできないし,取り外しちゃおうかなぁ. モバイルで参照するのに適している記事なんて,1件もないから.
Googleのツールを使って,ページの表示スピードを計測.
PageSpeed Insights
https://developers.google.com/speed/pagespeed/insights/
計測結果.まずはPCサイトとして.
13年前のパソコンで動いているということを考えると,十分じゃないか?どうなんかな.
そしてモバイルサイトとして.
モバイル用のテーマを入れているのだけれど,表示も微妙だし自分じゃカスタマイズできないし,取り外しちゃおうかなぁ. モバイルで参照するのに適している記事なんて,1件もないから.
Unable to download data from https://rubygems.org/ - SSL_connect returned=1 errno=0 state=SSLv2/v3 read server hello A: tlsv1 alert protocol version
- カテゴリ :
- サイト構築
- ブロガー :
- ujpblog 2018/12/1 2:52
milkodeというツールのインストールを試してみた.
エラーがでる.rubygems.orgにSSLでアクセスできないことが原因.
調べると,gemが古いことが原因の模様.アップデートを実行.
psychがないというエラー.
Operation not Permittedとは別の問題.sudoでpsychをインストール.
インストールに失敗した.ruby 2.2.2の環境が必要だけれど,現在は2.0.0であるという問題.
とりあえずは,指定されたコマンドを実行.
psych−2.2.4はインストールできたけれど,SSLのエラーがやっぱりでる.
rubyをBrewでインストールする.
ruby 2.5.3がインストールされた模様.
環境設定などを行う.
インストールされたrubyを見てみる.
検索パスが設定されているか確認.
デフォルトで入っているruby2.0.0が先に引っかかる模様.
一旦,フルパスを指定してアップデートを実行.
RubyGems 2.7.7になった模様.
では,最初に実行しようとしたmilkodeをインストール.
はっ! milkodeなのにmilkcodeと勘違いしてリポジトリを検索していた模様.そうなるとSSL以前にエラーになるなぁ...
gaia:~ server$ gem install milkcode🆑
ERROR:  Could not find a valid gem 'milkcode' (>= 0), here is why:
          Unable to download data from https://rubygems.org/ - SSL_connect returned=1 errno=0
 state=SSLv2/v3 read server hello A: tlsv1 alert protocol version
 (https://rubygems.org/latest_specs.4.8.gz)
gaia:~ server$
調べると,gemが古いことが原因の模様.アップデートを実行.
gaia:~ server$ sudo gem update --system🆑
Updating rubygems-update
Fetching: rubygems-update-2.7.8.gem (100%)
Successfully installed rubygems-update-2.7.8
Parsing documentation for rubygems-update-2.7.8
Installing ri documentation for rubygems-update-2.7.8
Installing darkfish documentation for rubygems-update-2.7.8
Installing RubyGems 2.7.8
YAML safe loading is not available. Please upgrade psych to a version that supports safe
 loading (>= 2.0).
ERROR:  While executing gem ... (Errno::EPERM)
    Operation not permitted - /System/Library/Frameworks/Ruby.framework/Versions/2.0/usr/bin/gem
gaia:~ server$
Operation not Permittedとは別の問題.sudoでpsychをインストール.
gaia:~ server$ sudo gem install psych🆑
Password:
YAML safe loading is not available. Please upgrade psych to a version that supports safe
 loading (>= 2.0).
Fetching: psych-3.0.3.gem (100%)
ERROR:  Error installing psych:
	The last version of psych (>= 0) to support your Ruby & RubyGems was 2.2.4.
     Try installing it with `gem install psych -v 2.2.4`
	psych requires Ruby version >= 2.2.2. The current ruby version is 2.0.0.
gaia:~ server$
とりあえずは,指定されたコマンドを実行.
gaia:~ server$ sudo gem install psych -v 2.2.4🆑
YAML safe loading is not available. Please upgrade psych to a version that supports
 safe loading (>= 2.0).
Fetching: psych-2.2.4.gem (100%)
Building native extensions. This could take a while...
Successfully installed psych-2.2.4🈁
Parsing documentation for psych-2.2.4
unable to convert "\xCA" from ASCII-8BIT to UTF-8 for /Library/Ruby/Gems/2.0.0/
extensions/universal-darwin-15/2.0.0/psych-2.2.4/psych.bundle, skipping
unable to convert "\xCA" from ASCII-8BIT to UTF-8 for lib/psych.bundle, skipping
Installing ri documentation for psych-2.2.4
WARNING:  Unable to pull data from 'https://rubygems.org/': SSL_connect
 returned=1 errno=0 state=SSLv2/v3 read server hello A: tlsv1 alert protocol🈁
  version (https://api.rubygems.org/specs.4.8.gz)
1 gem installed
gaia:~ server$
rubyをBrewでインストールする.
gaia:~ server$ brew install ruby🆑
==> Installing dependencies for ruby: libyaml and readline
==> Installing ruby dependency: libyaml
==> Downloading https://homebrew.bintray.com/bottles/libyaml-0.2.1.el_capitan.bottle.tar.gz
######################################################################## 100.0%
==> Pouring libyaml-0.2.1.el_capitan.bottle.tar.gz
🍺  /usr/local/Cellar/libyaml/0.2.1: 9 files, 313.4KB
==> Installing ruby dependency: readline
==> Downloading https://homebrew.bintray.com/bottles/readline-7.0.5.el_capitan.bottle.tar.gz
######################################################################## 100.0%
==> Pouring readline-7.0.5.el_capitan.bottle.tar.gz
==> Caveats
readline is keg-only, which means it was not symlinked into /usr/local,
because macOS provides the BSD libedit library, which shadows libreadline.
In order to prevent conflicts when programs look for libreadline we are
defaulting this GNU Readline installation to keg-only.

For compilers to find readline you may need to set:
  export LDFLAGS="-L/usr/local/opt/readline/lib"
  export CPPFLAGS="-I/usr/local/opt/readline/include"

==> Summary
🍺  /usr/local/Cellar/readline/7.0.5: 46 files, 1.5MB
==> Installing ruby
==> Downloading https://cache.ruby-lang.org/pub/ruby/2.5/ruby-2.5.3.tar.xz
######################################################################## 100.0%
==> ./configure --prefix=/usr/local/Cellar/ruby/2.5.3_1 --enable-shared --disable-silent-rules
 --with-sitedir=/usr/local/lib/rub
==> make
==> make install
==> Downloading https://rubygems.org/rubygems/rubygems-2.7.7.tgz
######################################################################## 100.0%
==> /usr/local/Cellar/ruby/2.5.3_1/bin/ruby setup.rb --prefix=/private/tmp/ruby-20181130-17151
-1vsism6/ruby-2.5.3/vendor_gem
==> Caveats
By default, binaries installed by gem will be placed into:
  /usr/local/lib/ruby/gems/2.5.0/bin

You may want to add this to your PATH.

ruby is keg-only, which means it was not symlinked into /usr/local,
because macOS already provides this software and installing another version in
parallel can cause all kinds of trouble.

If you need to have ruby first in your PATH run:
  echo 'export PATH="/usr/local/opt/ruby/bin:$PATH"' >> ~/.bash_profile

For compilers to find ruby you may need to set:
  export LDFLAGS="-L/usr/local/opt/ruby/lib"
  export CPPFLAGS="-I/usr/local/opt/ruby/include"

For pkg-config to find ruby you may need to set:
  export PKG_CONFIG_PATH="/usr/local/opt/ruby/lib/pkgconfig"

==> Summary
🍺  /usr/local/Cellar/ruby/2.5.3_1: 16,228 files, 27.7MB, built in 6 minutes 11 seconds
==> Caveats
==> readline
readline is keg-only, which means it was not symlinked into /usr/local,
because macOS provides the BSD libedit library, which shadows libreadline.
In order to prevent conflicts when programs look for libreadline we are
defaulting this GNU Readline installation to keg-only.

For compilers to find readline you may need to set:
  export LDFLAGS="-L/usr/local/opt/readline/lib"
  export CPPFLAGS="-I/usr/local/opt/readline/include"

==> ruby
By default, binaries installed by gem will be placed into:
  /usr/local/lib/ruby/gems/2.5.0/bin

You may want to add this to your PATH.

ruby is keg-only, which means it was not symlinked into /usr/local,
because macOS already provides this software and installing another version in
parallel can cause all kinds of trouble.

If you need to have ruby first in your PATH run:
  echo 'export PATH="/usr/local/opt/ruby/bin:$PATH"' >> ~/.bash_profile

For compilers to find ruby you may need to set:
  export LDFLAGS="-L/usr/local/opt/ruby/lib"
  export CPPFLAGS="-I/usr/local/opt/ruby/include"

For pkg-config to find ruby you may need to set:
  export PKG_CONFIG_PATH="/usr/local/opt/ruby/lib/pkgconfig"

gaia:~ server$
環境設定などを行う.
gaia:~ server$ export LDFLAGS="-L/usr/local/opt/readline/lib"🆑
gaia:~ server$ export CPPFLAGS="-I/usr/local/opt/readline/include"🆑
gaia:~ server$ echo 'export PATH="/usr/local/opt/ruby/bin:$PATH"' >> ~/.bash_profile🆑
gaia:~ server$ export PKG_CONFIG_PATH="/usr/local/opt/ruby/lib/pkgconfig"🆑
gaia:~ server$
gaia:~ server$ ls -la /usr/local/opt/ruby/bin🆑
total 88
drwxr-xr-x   9 server  admin    306 11 30 00:50 .
drwxr-xr-x  13 server  admin    442 11 30 00:50 ..
-r-xr-xr-x   1 server  admin   4859 11 30 00:50 erb
-r-xr-xr-x   1 server  admin    568 11 30 00:50 gem
-r-xr-xr-x   1 server  admin    212 11 30 00:50 irb
-r-xr-xr-x   1 server  admin    609 11 30 00:50 rake
-r-xr-xr-x   1 server  admin    960 11 30 00:50 rdoc
-r-xr-xr-x   1 server  admin    210 11 30 00:50 ri
-r-xr-xr-x   1 server  admin  12808 11 30 00:49 ruby🈁
gaia:~ server$
gaia:~ server$ which ruby🆑
/usr/bin/ruby🈁
gaia:~ server$
一旦,フルパスを指定してアップデートを実行.
gaia:~ server$ sudo /usr/local/opt/ruby/bin/gem update --system🆑
Password:
Updating rubygems-update
Fetching: rubygems-update-2.7.8.gem (100%)🈁
Successfully installed rubygems-update-2.7.8
Parsing documentation for rubygems-update-2.7.8
Installing ri documentation for rubygems-update-2.7.8
Installing darkfish documentation for rubygems-update-2.7.8
Done installing documentation for rubygems-update after 48 seconds
Parsing documentation for rubygems-update-2.7.8
Done installing documentation for rubygems-update after 0 seconds
Installing RubyGems 2.7.8
Bundler 1.16.6 installed
RubyGems 2.7.8 installed
Regenerating binstubs
Parsing documentation for rubygems-2.7.8
Installing ri documentation for rubygems-2.7.8

=== 2.7.8 / 2018-11-02

Minor enhancements:

* Improve invalid proxy error message. Pull request #2217 by Luis
  Sagastume.
* [Requirement] Treat requirements with == versions as equal. Pull
  request #2230 by Samuel Giddins.
* Fix exec_name documentation. Pull request #2239 by Luis Sagastume.
* [TarHeader] Extract the empty header into a constant. Pull request #2247
  by Samuel Giddins.
* Simplify the code that lets us call the original, non-monkeypatched
  Kernel#require. Pull request #2267 by Leon Miller-Out.
* Support IO.copy_stream. Pull request #2303 by okkez.
* Add error message when trying to open a default gem. Pull request #2307
  by Luis Sagastume.
* Add install alias documentation. Pull request #2320 by ota42y.
* Removed explicitly declaration of thread library. Pull request #2324 by
  SHIBATA Hiroshi.
* [Rakefile] Set bundler build metadata when doing a release. Pull request
  #2335 by Samuel Giddins.
* Speed up globbing relative to given directories. Pull request #2336 by
  Samuel Giddins.
* Backport commits from ruby core . Pull request #2347 by SHIBATA Hiroshi.
* Sign in to the correct host before push. Pull request #2366 by Luis
  Sagastume.
* Bump bundler-1.16.4. Pull request #2381 by SHIBATA Hiroshi.
* Improve bindir flag description. Pull request #2383 by Luis Sagastume.
* Update bundler-1.16.6. Pull request #2423 by SHIBATA Hiroshi.

Bug fixes:

* Frozen string fix - lib/rubygems/bundler_version_finder.rb. Pull request
  #2115 by MSP-Greg.
* Fixed no assignment variables about default gems installation. Pull
  request #2181 by SHIBATA Hiroshi.
* Fix #1470: generate documentation when --install-dir is present. Pull
  request #2229 by Elias Hernandis.
* Validate SPDX license exceptions. Pull request #2257 by Mikit.
* Keep feature names loaded in the block. Pull request #2261 by Nobuyoshi
  Nakada.
* Retry api specification spec with original platform. Pull request #2275
  by Luis Sagastume.
* Fix approximate recommendation with prereleases. Pull request #2345 by
  David Rodríguez.
* Expand symlinks in gem path. Pull request #2352 by Benoit Daloze.
* Gem::Version should handle nil like it used to before. Pull request
  #2363 by Luis Sagastume.
* Fix auto resign expired certificate. Pull request #2380 by Luis
  Sagastume.

=== 2.7.7 / 2018-05-08

Minor enhancements:

* [RequestSet] Only suggest a gem version with an installable platform.
  Pull request #2175 by Samuel Giddins.
* Fixed no assignment variables about default gems installation. Pull
  request #2181 by SHIBATA Hiroshi.
* Backport improvements for test-case from Ruby core. Pull request #2189
  by SHIBATA Hiroshi.
* Fix ruby warnings in test suite. Pull request #2205 by Colby Swandale.
* To use Gem::Specification#bindir of bundler instead of hard coded path.
  Pull request #2208 by SHIBATA Hiroshi.
* Update gem push --help description. Pull request #2215 by Luis
  Sagastume.
* Backport ruby core commits. Pull request #2264 by SHIBATA Hiroshi.

Bug fixes:

* Frozen string fix - lib/rubygems/bundler_version_finder.rb. Pull request
  #2115 by MSP-Greg.
* Fixed tempfile leak for RubyGems 2.7.6. Pull request #2194 by SHIBATA
  Hiroshi.
* Add missing requires. Pull request #2196 by David Rodríguez.
* Fix Gem::Version.correct?. Pull request #2203 by Masato Nakamura.
* Fix verify_entry regex for metadata. Pull request #2212 by Luis
  Sagastume.
* Fix path checks for case insensitive filesystem. Pull request #2211 by
  Lars Kanis.

Compatibility changes:

* Deprecate unused code before removing them at #1524. Pull request #2197
  by SHIBATA Hiroshi.
* Deprecate for rubygems 3. Pull request #2214 by SHIBATA Hiroshi.
* Mark deprecation to `ubygems.rb` for RubyGems 4. Pull request #2269 by
  SHIBATA Hiroshi.
* Update bundler-1.16.2. Pull request #2291 by SHIBATA Hiroshi.


------------------------------------------------------------------------------

RubyGems installed the following executables:
	/usr/local/Cellar/ruby/2.5.3_1/bin/gem
	/usr/local/Cellar/ruby/2.5.3_1/bin/bundle

Ruby Interactive (ri) documentation was installed. ri is kind of like man
pages for Ruby libraries. You may access it like this:
  ri Classname
  ri Classname.class_method
  ri Classname#instance_method
If you do not wish to install this documentation in the future, use the
--no-document flag, or set it as the default in your ~/.gemrc file. See
'gem help env' for details.

RubyGems system software updated
gaia:~ server$
では,最初に実行しようとしたmilkodeをインストール.
gaia:~ server$ sudo /usr/local/opt/ruby/bin/gem install milkcode🆑
ERROR:  Could not find a valid gem 'milkcode' (>= 0) in any repository
ERROR:  Possible alternatives: milkode, eircode, file_mode, isd_code, iso_code
gaia:~ server$
MacOS Xを仮想化させてしまえば楽なんじゃないか,そう思ったのだけれど,一応本職がそういう系統なので 気になったのでライセンスを確認してみた.
VMware FUSION FAQ
https://www.vmware.com/jp/products/fusion/faqs.html
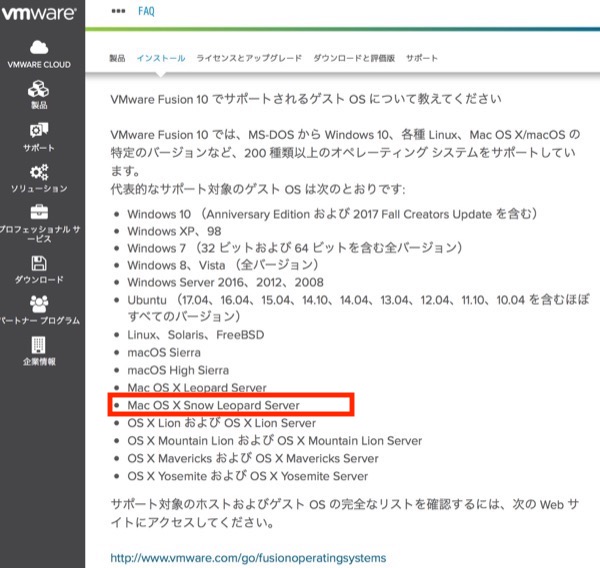
全く問題ない模様.そもそも,Snow Lepoard ServerはMacに付属のものではなくてパッケージ版を買っているのでね.
あとは,脆弱性対策部分かなぁ.
気になったのでライセンスを確認してみた.VMware FUSION FAQ
https://www.vmware.com/jp/products/fusion/faqs.html
全く問題ない模様.そもそも,Snow Lepoard ServerはMacに付属のものではなくてパッケージ版を買っているのでね.
あとは,脆弱性対策部分かなぁ.
某当サイトを運営して居るのは3代目のサーバなのだけれど,もう9年も動いているので,そろそろ交換しなければ・・・と思いながら早4年.
LAMP環境なので汎用的な基盤の上に,当時流行っていたCMSのなかでMovable Typeと比較して,無償だったのでXOOPSを選択.XOOPSは本家から派生したXOOPS Cubeでした.
当初,文字コードがEUCだったので,それまで持っていた性的コンテンツを全てEUCに変換してサイトをオープン.その後,サーバを入れ替えていく中で文字コードをUTF8に変更して各種ソフトウェアやOSをバージョンアップして運用して来ました.
マイナーバージョンアップを経て,Mac OS X v10.6 Snow Leopardの上にパッケージマネージャがMacPort,PHP5.2.17,MySQL 5.4.3でApache 2.2.26という環境でどう出して居るのだけれど,これをバージョンアップしようとするとPHP7.2,MarinaDB 10.1.35でApache/2.4.34という環境となる.
新しい環境で動作させようとしたのだけれど,採用した頃よりはXOOPSは活動が弱くなっていてCMSではWordPressを新規採用して居るサイトが多い訳で,「モジュール」と呼ばれて居る拡張機能もバージョンアップされなくなったり作者サイトが閉鎖されていたり行方不明だったりと千差万別.
動かない部分は自分がプログラムを解析して対応させれば良い,そこがオープンソースのメリットなのだけれど,そういうことにモチベーションがない...
・機械を入れ替えバージョンアップすると動かないアプリがあるので自分で修正する必要がある.
・CMSを最新の,例えばMovable Typeに移行するには,データ変換の手間があり大変そう.
もう面倒なので仮想化しちゃおうかとか,考えて居る今日この頃.検証していたRaspberry Pi 3でも,少しもたつくけれどどうにかなりそうな感触があったので,Webサーバ機能だけにしてしまえば,意外とMacの上にVMware Fusionで仮想環境を整えて仮想サーバを作ってしまえば,十分いけるような気がしている.
別の考え方で,HUGOのような静的サイト生成を行う仕組みを使えば,そもそもバージョンアップに悩まされない.昔,Adobe Page Millで書き物をしていた時のような感じも戻れるかな.
多分先日のOSアップデートからだとおもうけれど,Safariで当サイトに接続するとURL表示欄に一瞬赤色文字で「安全ではありません」と表示されるようになった.
これは,全てのWebサイトとの接続にSSLを推奨している流れがあって,その影響で段階的に環境を変更して行っている途中経過.
たしか,検索サイトも認める不適切サイトにアクセスした際には,Webブラウザに大々的に警告が出るようになっていると思うけれど,そのうちSSLに対応してないサイトには毎回のダイアログ表示か設定変更でユーザの確認がないと接続できなくなるのだろうか.
そろそろ本気でSSL対応を考えないといけないな.
これは,全てのWebサイトとの接続にSSLを推奨している流れがあって,その影響で段階的に環境を変更して行っている途中経過.
たしか,検索サイトも認める不適切サイトにアクセスした際には,Webブラウザに大々的に警告が出るようになっていると思うけれど,そのうちSSLに対応してないサイトには毎回のダイアログ表示か設定変更でユーザの確認がないと接続できなくなるのだろうか.
そろそろ本気でSSL対応を考えないといけないな.
タイトルの通り.brewで色々なパッケージを入れて来たので,たまにはチェックしてみようとした.
brotli,ブロトリ?は,データ圧縮ライブラリでHTTP圧縮目的でChome,Opera,Firefoxが採用しているそうだ.
インストールした覚えはないのだけれど,指示通りにコマンドを実行してみる.
httpdとなっているので,普通にApache HTTP Serverのもの.依存関係を解消するためにインストールを行う.
インストールできたので再度doctorでチェック.
問題が解消されたようだ.
MBP2017:~ ujpadmin$ brew doctor🆑
Please note that these warnings are just used to help the Homebrew maintainers
with debugging if you file an issue. If everything you use Homebrew for is
working fine: please don't worry or file an issue; just ignore this. Thanks!

Warning: Some installed formulae are missing dependencies.
You should `brew install` the missing dependencies:
  brew install brotli🈁

Run `brew missing` for more details.🈁
MBP2017:~ ujpadmin$
インストールした覚えはないのだけれど,指示通りにコマンドを実行してみる.
MBP2017:~ ujpadmin$ brew missing🆑
httpd: brotli🈁
MBP2017:~ ujpadmin$
MBP2017:~ ujpadmin$ brew install brotli🆑
==> Downloading https://homebrew.bintray.com/bottles/brotli-1.0.4.high_sierra.bottle.tar.gz
######################################################################## 100.0%
==> Pouring brotli-1.0.4.high_sierra.bottle.tar.gz
🍺  /usr/local/Cellar/brotli/1.0.4: 25 files, 2.1MB
MBP2017:~ ujpadmin$
MBP2017:~ ujpadmin$ brew doctor🆑
Your system is ready to brew.
MBP2017:~ ujpadmin$
postfix/postfix-script: warning: group or other writable: /Library/Server/Mail/Data/mta/.
- カテゴリ :
- サイト構築
- ブロガー :
- ujpblog 2018/4/13 1:02
postfixの設定ファイルが正しいかチェックする.
ワーニングが.該当のディレクトリが書き込み可能になっているのが問題.確認してみる.
グループ権限で書き込み可能になっている.権限をとって確認する.
再度チェック.
ワーニング無くなりました.
$ sudo postfix check🆑
postfix/postfix-script: warning: group or other writable: /Library/Server/Mail/Data/mta/.
$
$ sudo ls -la /Library/Server/Mail/Data/mta/🆑
total 4
drwxrwx---  3 _postfix mail   96  4 11 01:16 .🈁
drwxr-xr-x 15 root     mail  480  4 11 00:39 ..
-rw-------  1 _postfix wheel  33  4 12 00:07 master.lock
$
$ sudo chmod g-w /Library/Server/Mail/Data/mta🆑
$ sudo ls -la /Library/Server/Mail/Data/mta/🆑
Password:
total 4
drwxr-x---  3 _postfix mail   96  4 11 01:16 .🈁
drwxr-xr-x 15 root     mail  480  4 11 00:39 ..
-rw-------  1 _postfix wheel  33  4 12 00:07 master.lock
$
$ sudo postfix check🆑
$
postfix: To disable backwards compatibility use "postconf compatibility_level=2" and "postfix reload"
- カテゴリ :
- サイト構築
- ブロガー :
- ujpblog 2018/4/12 0:12
postfixのセットアップをしていて,起動したらこんな感じでエラーが出た件.
これはこのメッセージにあるとおり,互換性の設定を追加しておけってことでした.セーフティネットなのだそうで.
http://www.postfix.org/COMPATIBILITY_README.html
記載されている通り,コマンドを実行.
権限がなかったようだ.sudoして実行.
設定が追加されたか確認する.
追加されていた.再度起動してみる.
起動してないことを確認.起動する.
ワーニングが出たけれど,プロセスは起動した模様.とりあえず停止.
まだまだ.
postfix: To disable backwards compatibility use "postconf compatibility_level=2" and "postfix reload"
http://www.postfix.org/COMPATIBILITY_README.html
記載されている通り,コマンドを実行.
$ postconf compatibility_level=2🆑
postconf: fatal: open /etc/postfix/main.cf.tmp: Permission denied
$
$ sudo postconf compatibility_level=2🆑
$
$ tail main.cf🆑
biff = no
mynetworks = 127.0.0.0/8, [::1]/128
smtpd_client_restrictions = permit_mynetworks permit_sasl_authenticated permit
recipient_delimiter = +
smtpd_tls_ciphers = medium
inet_protocols = all
inet_interfaces = loopback-only
#server_config_directory = /Library/Server/Mail/Config/postfix
server_config_directory = /etc/postfix
compatibility_level = 2🈁
$
$ sudo postfix status🆑
Password:🔓
postfix/postfix-script: the Postfix mail system is not running🈁
$
$ sudo postfix start🆑
postfix/postfix-script: warning: group or other writable: /Library/Server/Mail/Data/mta/.
postfix/postfix-script: starting the Postfix mail system
$
$ sudo postfix status🆑
postfix/postfix-script: the Postfix mail system is running: PID: 13531
$ sudo postfix stop🆑
postfix/postfix-script: stopping the Postfix mail system
$
macOS X High Sierraのpostfixの設定値を確認する postconfコマンドを使ってmain.cfを編集
- カテゴリ :
- サイト構築
- ブロガー :
- ujpblog 2018/4/11 1:08
postconfが入っているか確認.
-nオプションをつけて実行.これはデフォルトとは違う設定だけ表示される.
なんだかwarningがでている.
設定ファイルは,次の場所に入っている・・・となっている.
が,これに騙されずに, /etc/postfixのファイルをリストしてみる.
main.cfファイルを編集する.
1つめの「use_sack_cache=yes」という部分を探す.
SACLはシステムアクセス制御リスト.アクセス制御を参照のキャッシュの設定.大量のアカウントを扱うような場合は意味があるかもしれないけれど,今回は200件程度なので不要なのでコメントアウトする.
次は,submit.credというもの.
MAP URL Scheme(IMAPURL)(RFC2192)にURLAUTHは,IMAPクライアントがIMAPサーバに関する限られたメッセージデータにアクセスするために承認をURLを使用できる手段を提供するものらしい.不要なのでコメントアウトする.
編集した後,設定を確認.
設定ファイルの場所も正しいものに変更しておく.
設定ファイルでエラーは出なくなったので,postfixを起動してみる.
残念.また明日...
$ which postconf🆑
/usr/sbin/postconf🈁
$
$ postconf -n🆑
biff = no
command_directory = /usr/sbin
daemon_directory = /usr/libexec/postfix
data_directory = /Library/Server/Mail/Data/mta
debug_peer_level = 2
debugger_command = PATH=/bin:/usr/bin:/usr/local/bin:/usr/X11R6/bin xxgdb
 $daemon_directory/$process_name $process_id & sleep 5
dovecot_destination_recipient_limit = 1
html_directory = /usr/share/doc/postfix/html
inet_interfaces = loopback-only
inet_protocols = all
mail_owner = _postfix
mailbox_size_limit = 0
mailq_path = /usr/bin/mailq
manpage_directory = /usr/share/man
message_size_limit = 10485760
mynetworks = 127.0.0.0/8, [::1]/128
newaliases_path = /usr/bin/newaliases
queue_directory = /Library/Server/Mail/Data/spool
readme_directory = /usr/share/doc/postfix
recipient_delimiter = +
sample_directory = /usr/share/doc/postfix/examples
sendmail_path = /usr/sbin/sendmail
server_config_directory = /Library/Server/Mail/Config/postfix
setgid_group = _postdrop
smtpd_client_restrictions = permit_mynetworks permit_sasl_authenticated permit
smtpd_tls_ciphers = medium
smtpd_tls_exclude_ciphers = SSLv2, aNULL, ADH, eNULL
tls_random_source = dev:/dev/urandom
unknown_local_recipient_reject_code = 550
postconf: warning: /etc/postfix/main.cf: unused parameter: use_sacl_cache=yes🈁
postconf: warning: /etc/postfix/main.cf: unused parameter:
imap_submit_cred_file=/etc/postfix/submit.cred🈁
postconf: warning: /etc/postfix/main.cf: unused parameter: mydomain_fallback=localhost🈁
$
設定ファイルは,次の場所に入っている・・・となっている.
server_config_directory = /Library/Server/Mail/Config/postfix
$ ls -la /etc/postfix🆑
total 220
drwxr-xr-x  35 root wheel  1120  4 11 00:45 .
drwxr-xr-x 129 root wheel  4128  4  7 13:59 ..
-rw-r--r--   1 root wheel 11942  7 26  2017 LICENSE
-rw-r--r--   1 root wheel  1629  7 26  2017 TLS_LICENSE
-rw-r--r--   1 root wheel 20876  1  1  2017 access
-rw-r--r--   1 root wheel 21535  7 26  2017 access~orig
-rw-r--r--   1 root wheel  8829  1  1  2017 aliases
-rw-r--r--   1 root wheel 10086  7 26  2017 aliases~orig
-rw-r--r--   1 root wheel  3547  7 26  2017 bounce.cf.default
-rw-r--r--   1 root wheel 11681  1  1  2017 canonical
-rw-r--r--   1 root wheel 12000  7 26  2017 canonical~orig
-rw-r--r--   1 root wheel    44  7 26  2017 custom_header_checks
-rw-r--r--   1 root wheel 10221  7 26  2017 generic
-rw-r--r--   1 root wheel 21535  1  1  2017 header_checks
-rw-r--r--   1 root wheel 23802  7 26  2017 header_checks~orig
-rw-r--r--   1 root wheel 27413  4 11 00:45 main.cf🈁
-rw-r--r--   1 root wheel 27370  4  6 15:10 main.cf.20180407
-rw-r--r--   1 root wheel 26856  1  1  2017 main.cf.default
-rw-r--r--   1 root wheel 27308  7 26  2017 main.cf.default~orig
-rw-r--r--   1 root wheel 26862  7 26  2017 main.cf.proto
-rw-r--r--   1 root wheel 27308  7 26  2017 main.cf~orig
-rw-r--r--   1 root wheel  4760  7 26  2017 makedefs.out
-rw-r--r--   1 root wheel  7422  1  1  2017 master.cf
-rw-r--r--   1 root wheel  7443  7 26  2017 master.cf.default
-rw-r--r--   1 root wheel  6230  7 26  2017 master.cf.proto
-rw-r--r--   1 root wheel  7443  7 26  2017 master.cf~orig
-rw-r--r--   1 root wheel 18647  1  1  2017 postfix-files
drwxr-xr-x   2 root wheel    64  7 26  2017 postfix-files.d
-rw-r--r--   1 root wheel 20330  7 26  2017 postfix-files~orig
-rw-r--r--   1 root wheel  6816  8  2  2015 relocated
-rw-r--r--   1 root wheel  6929  7 26  2017 relocated~orig
-rw-r--r--   1 root wheel 12549  8  2  2015 transport
-rw-r--r--   1 root wheel 12666  7 26  2017 transport~orig
-rw-r--r--   1 root wheel 12494  1  1  2017 virtual
-rw-r--r--   1 root wheel 12823  7 26  2017 virtual~orig
$
$ sudo vi /etc/postfix/main.cf🆑
Password:🔐
$
# (APPLE) The SACL cache caches the results of Mail Service ACL lookups.
# Tune these to make the cache more responsive to changes in the SACL.
# The cache is only in memory, so bouncing the sacl-cache service clears it.
use_sacl_cache = yes🈁
# sacl_cache_positive_expire_time = 7d
# sacl_cache_negative_expire_time = 1d
# sacl_cache_disabled_expire_time = 1m
# (APPLE) The SACL cache caches the results of Mail Service ACL lookups.
# Tune these to make the cache more responsive to changes in the SACL.
# The cache is only in memory, so bouncing the sacl-cache service clears it.
#use_sacl_cache = yes🆑
# sacl_cache_positive_expire_time = 7d
# sacl_cache_negative_expire_time = 1d
# sacl_cache_disabled_expire_time = 1m
# (APPLE) Credentials for using URLAUTH with IMAP servers.
imap_submit_cred_file = /Library/Server/Mail/Config/postfix/submit.cred🈁
# (APPLE) Credentials for using URLAUTH with IMAP servers.
#imap_submit_cred_file = /Library/Server/Mail/Config/postfix/submit.cred🆑
$ postconf -n🆑
biff = no
command_directory = /usr/sbin
daemon_directory = /usr/libexec/postfix
data_directory = /Library/Server/Mail/Data/mta
debug_peer_level = 2
debugger_command = PATH=/bin:/usr/bin:/usr/local/bin:/usr/X11R6/bin xxgdb
 $daemon_directory/$process_name $process_id & sleep 5
dovecot_destination_recipient_limit = 1
html_directory = /usr/share/doc/postfix/html
inet_interfaces = loopback-only
inet_protocols = all
mail_owner = _postfix
mailbox_size_limit = 0
mailq_path = /usr/bin/mailq
manpage_directory = /usr/share/man
message_size_limit = 10485760
mynetworks = 127.0.0.0/8, [::1]/128
newaliases_path = /usr/bin/newaliases
queue_directory = /Library/Server/Mail/Data/spool
readme_directory = /usr/share/doc/postfix
recipient_delimiter = +
sample_directory = /usr/share/doc/postfix/examples
sendmail_path = /usr/sbin/sendmail
server_config_directory = /Library/Server/Mail/Config/postfix
setgid_group = _postdrop
smtpd_client_restrictions = permit_mynetworks permit_sasl_authenticated permit
smtpd_tls_ciphers = medium
smtpd_tls_exclude_ciphers = SSLv2, aNULL, ADH, eNULL
tls_random_source = dev:/dev/urandom
unknown_local_recipient_reject_code = 550
$
inet_interfaces = loopback-only
#server_config_directory = /Library/Server/Mail/Config/postfix
server_config_directory = /etc/postfix
$ sudo postfix start🆑
postfix: Postfix is running with backwards-compatible default settings
postfix: See http://www.postfix.org/COMPATIBILITY_README.html for details
postfix: To disable backwards compatibility use "postconf compatibility_level=2" and "postfix reload"
postfix/postfix-script: warning: group or other writable: /Library/Server/Mail/Data/mta/.
postfix/postfix-script: starting the Postfix mail system
postfix/postfix-script: fatal: mail system startup failed🈁
$
Jenkinsのサーバにインストールしたマシンとは別のマシンからアクセスしてみる.
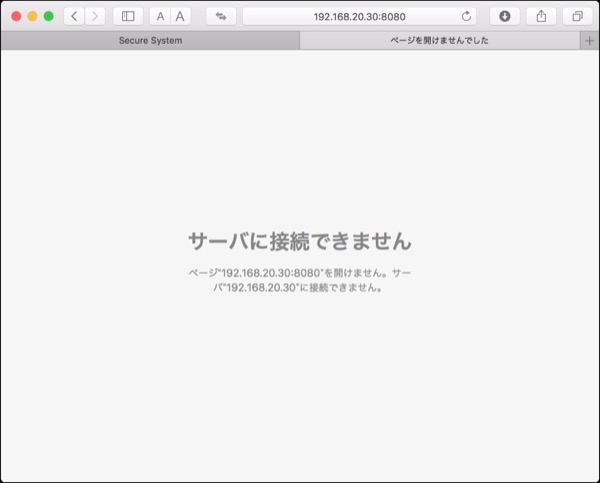
残念ながらアクセスできない.これは,初期設定時にローカルホストからのみ接続できる設定となっているから.
設定を確認して,制限を削除する.
Jenkinsが起動していたら停止し,httpListenAddressを削除する.
これでアクセスしてみる.
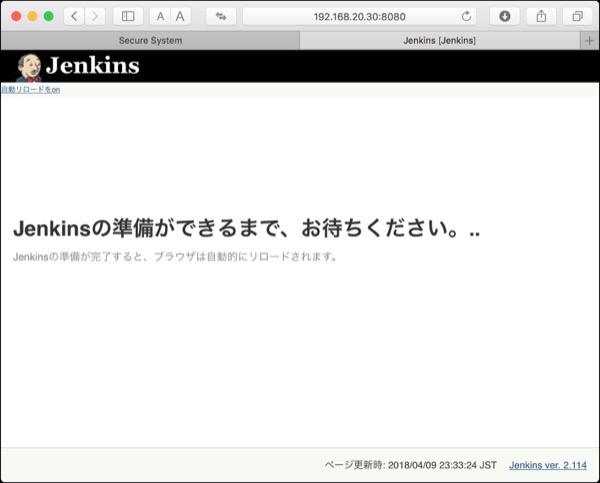
アクセスできました.
残念ながらアクセスできない.これは,初期設定時にローカルホストからのみ接続できる設定となっているから.
設定を確認して,制限を削除する.
$ cd /usr/local/Cellar/Jenkins/2.114/🆑
$ ls -la🆑
total 8
drwxr-xr-x 7 ujpadmin admin 224  4  8 03:02 .
drwxr-xr-x 3 ujpadmin admin  96  4  7 20:50 ..
drwxr-xr-x 3 ujpadmin admin  96  4  7 20:50 .brew
-rw-r--r-- 1 ujpadmin admin 588  4  7 20:50 INSTALL_RECEIPT.json
drwxr-xr-x 4 ujpadmin admin 128  4  7 20:50 bin
-rw-r--r-- 1 ujpadmin admin 749  4  7 20:50 homebrew.mxcl.jenkins.plist🈁
drwxr-xr-x 4 ujpadmin admin 128  4  7 20:50 libexec
$ cat homebrew.mxcl.jenkins.plist🆑
<?xml version="1.0" encoding="UTF-8"?>
<?xml version="1.0" encoding="UTF-8"?>
<!DOCTYPE plist PUBLIC "-//Apple//DTD PLIST 1.0//EN" "http://www.apple.com/DTDs/PropertyList-1.0.dtd">
<plist version="1.0">
  <dict>
    <key>Label</key>
    <string>homebrew.mxcl.jenkins</string>
    <key>ProgramArguments</key>
    <array>
      <string>/usr/libexec/java_home</string>
      <string>-v</string>
      <string>1.8</string>
      <string>--exec</string>
      <string>java</string>
      <string>-Dmail.smtp.starttls.enable=true</string>
      <string>-jar</string>
      <string>/usr/local/opt/jenkins/libexec/jenkins.war</string>
      <string>--httpListenAddress=127.0.0.1</string>🈁
      <string>--httpPort=8080</string>
    </array>
    <key>RunAtLoad</key>
    <true/>
  </dict>
</plist>
$
$ brew services stop jenkins🆑
Stopping `jenkins`... (might take a while)
==> Successfully stopped `jenkins` (label: homebrew.mxcl.jenkins)

$ cp homebrew.mxcl.jenkins.plist homebrew.mxcl.jenkins.plist.org🆑
$ diff homebrew.mxcl.jenkins.plist.org homebrew.mxcl.jenkins.plist🆑
17d16
<       <string>--httpListenAddress=127.0.0.1</string>
$
$ brew services start jenkins🆑
==> Successfully started `jenkins` (label: homebrew.mxcl.jenkins)
$
アクセスできました.
Jenkinsをセットアップするのは,ローカルホストで8080ポートに接続する.
http://localhost:8080/
次のような画面が表示される.
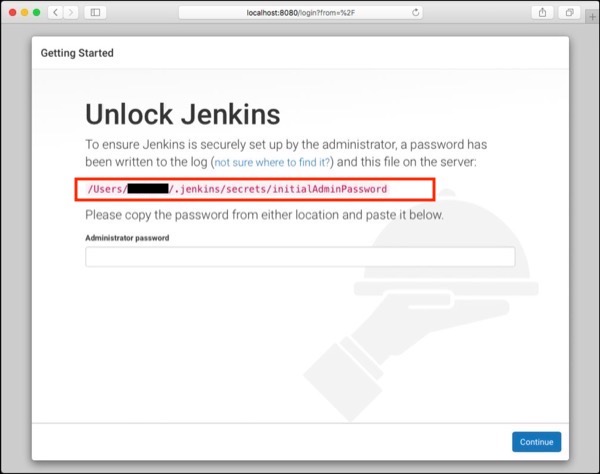
ここにある通り,初期パスワードはファイルに記載されているので,ファイルの中身をcatしてログインする.
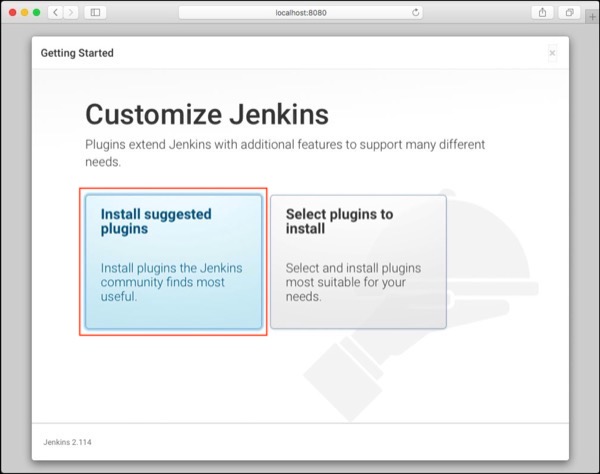
Jenkinsに,いい感じでプラグインを選択してもらう.
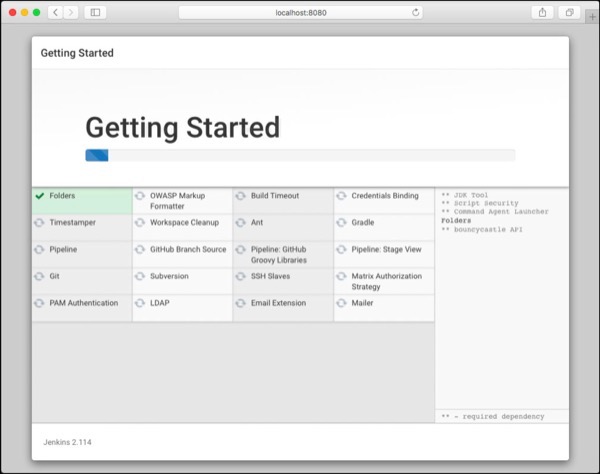
あとはしばらく待つ.
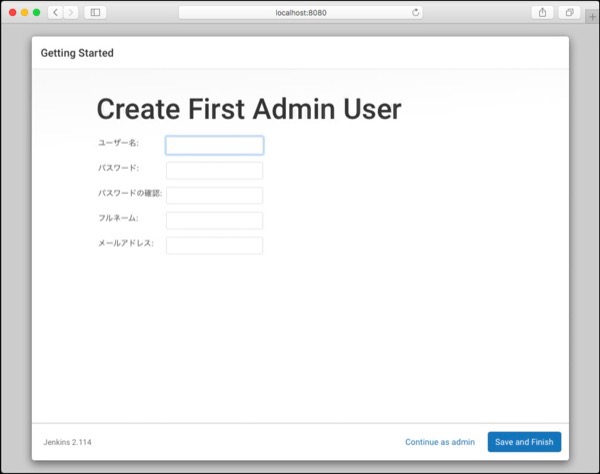
管理者アカウントを作成.
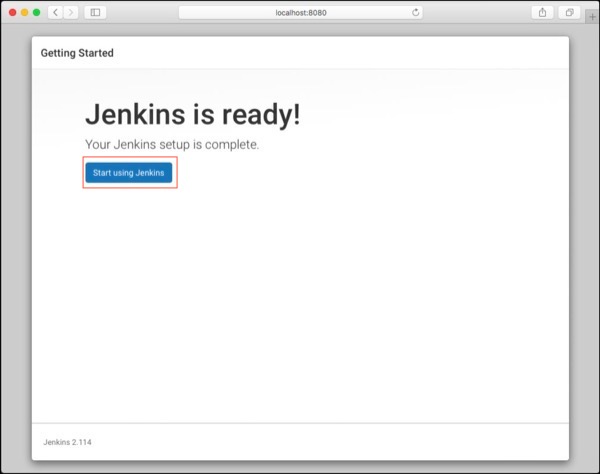
問題なく再生できたらこの画面.
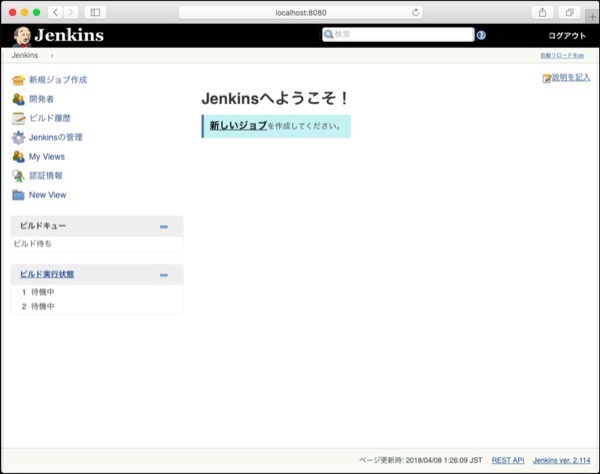
最終的にこの画面が表示されたら完了.
http://localhost:8080/
次のような画面が表示される.
ここにある通り,初期パスワードはファイルに記載されているので,ファイルの中身をcatしてログインする.
Jenkinsに,いい感じでプラグインを選択してもらう.
あとはしばらく待つ.
管理者アカウントを作成.
問題なく再生できたらこの画面.
最終的にこの画面が表示されたら完了.
Jenkinsをインストールする.主な目的は,バッチ処理をさせるだけなので大げさだけれど.
まずはJenkinsのパッケージを確認.
デフォルトでは8080ポートで動作するとのこと.インストールする.
Java 1.8が必要と記載してあるが,一層の事,最新の1.9を入れてみる.
インストールが成功した模様.正しくインストールされたか確認する,
・ファイルパスの確認
・バージョンの確認
・インストールされている全てのJavaのバージョン確認.
環境変数を設定し,確認する.
Jenkinsをインストールする.
やっぱりJava8が必要な模様.なのでインストールする.
無事インストールできた模様
早速起動してプロセスを確認.
起動していることが確認できました.
まずはJenkinsのパッケージを確認.
$ brew info jenkins🆑
jenkins: stable 2.114, HEAD
Extendable open source continuous integration server
https://jenkins.io/
Not installed
From: https://github.com/Homebrew/homebrew-core/blob/master/Formula/jenkins.rb
==> Requirements
Required: java = 1.8 ✘
==> Options
--HEAD
	Install HEAD version
==> Caveats
Note: When using launchctl the port will be 8080.🈁

To have launchd start jenkins now and restart at login:
  brew services start jenkins
Or, if you don't want/need a background service you can just run:
  jenkins
$
$ brew install jenkins🆑
jenkins: Java 1.8 is required to install this formula.
JavaRequirement unsatisfied!
You can install with Homebrew-Cask:
 brew cask install caskroom/versions/java8🈁
You can download from:
 https://www.oracle.com/technetwork/java/javase/downloads/index.html
Error: An unsatisfied requirement failed this build.
$
$ brew cask install caskroom/versions/java9🆑
==> Caveats
This Cask makes minor modifications to the JRE to prevent issues with
packaged applications, as discussed here:

  https://bugs.eclipse.org/bugs/show_bug.cgi?id=411361

If your Java application still asks for JRE installation, you might need
to reboot or logout/login.

Installing this Cask means you have AGREED to the Oracle Binary Code
License Agreement for Java SE at

  https://www.oracle.com/technetwork/java/javase/terms/license/index.html

==> Satisfying dependencies
==> Downloading http://download.oracle.com/otn-pub/java/jdk/9.0.4+11/c25
14751926b4512b076cc82f959763f/jdk-9.0.4_osx-x64_bin.dmg
####################################################### 100.0%
==> Verifying checksum for Cask java9
==> Installing Cask java9
==> Running installer for java9; your password may be necessary.
==> Package installers may write to any location; options such as --appdir are ignored.
Password:
==> installer: Package name is JDK 9.0.4
==> installer: Upgrading at base path /
==> installer: The upgrade was successful.
🍺  java9 was successfully installed!
$
・ファイルパスの確認
・バージョンの確認
・インストールされている全てのJavaのバージョン確認.
$ which java🆑
/usr/bin/java
$
$ /usr/bin/java -version🆑
java version "9.0.4"
Java(TM) SE Runtime Environment (build 9.0.4+11)
Java HotSpot(TM) 64-Bit Server VM (build 9.0.4+11, mixed mode)
$
$ /usr/libexec/java_home -V🆑
Matching Java Virtual Machines (1):
    9.0.4, x86_64:	"Java SE 9.0.4"	/Library/Java/JavaVirtualMachines/jdk-9.0.4.jdk/Contents/Home

/Library/Java/JavaVirtualMachines/jdk-9.0.4.jdk/Contents/Home
$
$ export JAVA_HOME=`/usr/libexec/java_home -v 9`🆑
$ echo $JAVA_HOME🆑
/Library/Java/JavaVirtualMachines/jdk-9.0.4.jdk/Contents/Home
$
$ brew install jenkins🆑
Updating Homebrew...
==> Auto-updated Homebrew!
Updated 2 taps (homebrew/core, caskroom/cask).
==> Updated Formulae
jenkins-job-builder                                                        jhipster
==> Deleted Formulae
arm

jenkins: Java 1.8 is required to install this formula.🈁
JavaRequirement unsatisfied!
You can install with Homebrew-Cask:
 brew cask install caskroom/versions/java8
You can download from:
 https://www.oracle.com/technetwork/java/javase/downloads/index.html
Error: An unsatisfied requirement failed this build.
$ brew cask install caskroom/versions/java8🆑
==> Caveats
This Cask makes minor modifications to the JRE to prevent issues with
packaged applications, as discussed here:

  https://bugs.eclipse.org/bugs/show_bug.cgi?id=411361

If your Java application still asks for JRE installation, you might need
to reboot or logout/login.

Installing this Cask means you have AGREED to the Oracle Binary Code
License Agreement for Java SE at

  https://www.oracle.com/technetwork/java/javase/terms/license/index.html

==> Satisfying dependencies
==> Downloading http://download.oracle.com/otn-pub/java/jdk/8u162-
b12/0da788060d494f5095bf8624735fa2f1/jdk-8u162-macosx-x64.dmg
#########################################################
############### 100.0%
==> Verifying checksum for Cask java8
==> Installing Cask java8
==> Running installer for java8; your password may be necessary.
==> Package installers may write to any location; options such as --appdir are ignored.
Password:🔑
==> installer: Package name is JDK 8 Update 162
==> installer: Installing at base path /
==> installer: The install was successful.
🍺  java8 was successfully installed!🈁
$
早速起動してプロセスを確認.
$ brew services start jenkins🆑
==> Successfully started `jenkins` (label: homebrew.mxcl.jenkins)
$
$ ps -ef|grep jenkins🆑
  501 26259     1   0 12:37AM ??         0:43.92 /Library/Java/JavaVirtualMachines
/jdk1.8.0_162.jdk/Contents/Home/bin/java -Dmail.smtp.starttls.enable=true -jar
 /usr/local/opt/jenkins/libexec/jenkins.war --httpListenAddress=127.0.0.1
 --httpPort=8080
  501 27042 25896   0 12:38AM ttys000    0:00.01 grep jenkins
$
dovecot.confファイルの修正
10-auth.confファイルの修正
10-logging.confファイルの修正
10-mail.confファイルの修正
10-ssl.confファイルの修正
10-master.confファイルの修正
$ cp dovecot.conf devecot.conf.org
$ vi dovecot.conf
$ diff devecot.conf.org dovecot.conf
24a25
> protocols = imap pop3
33a35
> base_dir = /var/run/dovecot/
$
10-auth.confファイルの修正
# See also ssl=required setting.
#disable_plaintext_auth = yes
#20170406
disable_plaintext_auth = no
10-logging.confファイルの修正
#log_path = syslog
#20180406
log_path = syslog

#syslog_facility = mail
#20180406
syslog_facility = mail
10-mail.confファイルの修正
#mail_location =
#20180406
mail_location = maildir:~/Maildir
10-ssl.confファイルの修正
# SSL/TLS support: yes, no, required. <doc/wiki/SSL.txt>
#ssl = yes
ssl = no
10-master.confファイルの修正
#default_login_user = dovenull
#20180404
default_login_user = dovenull

#default_internal_user = dovecot
#20180406
default_internal_user = dovecot

service imap-login {
  inet_listener imap {
    #port = 143
#20180406
    port = 143

    service pop3-login {
  inet_listener pop3 {
    #port = 110
#20180406
    port = 110
  }

service submission-login {
  inet_listener submission {
    #port = 587
#20180406
    port = 587
  }
}
dovecotをインストール
IMAPとPOP3サーバのdovecot(ダヴコット)をインストール.まずは情報確認.
dovecotユーザの作成が必要とのこと.インストールする.
dovecotの起動と終了
とりあえずユーザ作成せずにdevecotサービスを起動してみる.
サービスのリストを取得.
rootユーザで起動していることが確認.
停止する.
アカウントの確認
インストールの際にアカウントが必要と出ていたが,現在存在しているのか確認.
デフォルトで用意されているこのアカウントを利用することとする.
設定ファイルの準備
devcotの設定ファイルを確認.
何も無い.READMEファイルを確認してみる.
指定された通りサンプルファイルの場所を確認.
設定ファイルのサンプルをコピーする.
コピーされたか確認する.
設定ファイルを複製したところまでで終了.
IMAPとPOP3サーバのdovecot(ダヴコット)をインストール.まずは情報確認.
$ brew info dovecot🆑
dovecot: stable 2.3.1 (bottled)
IMAP/POP3 server
https://dovecot.org/
Not installed
From: https://github.com/Homebrew/homebrew-core/blob/master/Formula/dovecot.rb
==> Dependencies
Required: openssl ✔
Optional: clucene ✘
==> Options
--with-clucene
	Build with clucene support
--with-pam
	Build with PAM support
--with-pigeonhole
	Add Sieve addon for Dovecot mailserver
--with-pigeonhole-unfinished-features
	Build unfinished new Sieve addon features/extensions
--with-stemmer
	Build with libstemmer support
==> Caveats
For Dovecot to work, you may need to create a dovecot user
and group depending on your configuration file options.

To have launchd start dovecot now and restart at startup:
  sudo brew services start dovecot
$
$ brew install  dovecot🆑
Updating Homebrew...
==> Auto-updated Homebrew!
Updated 1 tap (caskroom/cask).
No changes to formulae.

==> Downloading https://homebrew.bintray.com/bottles/dovecot-2.3.1.high_sierra.bottle.tar.gz
######################################################################## 100.0%
==> Pouring dovecot-2.3.1.high_sierra.bottle.tar.gz
==> Caveats
For Dovecot to work, you may need to create a dovecot user
and group depending on your configuration file options.

To have launchd start dovecot now and restart at startup:
  sudo brew services start dovecot
==> Summary
🍺  /usr/local/Cellar/dovecot/2.3.1: 1,098 files, 20MB
$
とりあえずユーザ作成せずにdevecotサービスを起動してみる.
$ sudo brew services start dovecot🆑
Password:
==> Successfully started `dovecot` (label: homebrew.mxcl.dovecot)
[zeus:ujpadmin 19:32:08 ~ ]
$
$ brew services list🆑
Name    Status  User    Plist
dovecot started root    /Library/LaunchDaemons/homebrew.mxcl.dovecot.plist
php     stopped
emacs   stopped
httpd   stopped
mysql   started ujpadmin /Users/ujpadmin/Library/LaunchAgents/homebrew.mxcl.mysql.plist
$
停止する.
$ sudo brew services stop dovecot🆑
Password:
Stopping `dovecot`... (might take a while)
==> Successfully stopped `dovecot` (label: homebrew.mxcl.dovecot)
$
アカウントの確認
インストールの際にアカウントが必要と出ていたが,現在存在しているのか確認.
$ dscl . -list /Users|grep dove🆑
_dovecot
_dovenull
$
設定ファイルの準備
devcotの設定ファイルを確認.
$ ls -la /usr/local/etc/dovecot/🆑
total 4
drwxr-xr-x  3 ujpadmin admin  96  4  6 18:15 .
drwxrwxr-x 17 ujpadmin admin 544  4  6 18:15 ..
-rw-r--r--  1 ujpadmin admin 143  4  6 18:15 README
$
$ cat /usr/local/etc/dovecot/README🆑
Configuration files go to this directory. See example configuration files in
/usr/local/Cellar/dovecot/2.3.1/share/doc/dovecot/example-config/
$
指定された通りサンプルファイルの場所を確認.
$ ls -laR /usr/local/Cellar/dovecot/2.3.1/share/doc/dovecot/example-config🆑
/usr/local/Cellar/dovecot/2.3.1/share/doc/dovecot/example-config:
total 32
drwxr-xr-x  8 ujpadmin admin  256  3 28 01:56 .
drwxr-xr-x 10 ujpadmin admin  320  3 28 01:56 ..
drwxr-xr-x 27 ujpadmin admin  864  4  6 18:15 conf.d
-rw-r--r--  1 ujpadmin admin 1507  3 28 01:56 dovecot-dict-auth.conf.ext
-rw-r--r--  1 ujpadmin admin  852  3 28 01:56 dovecot-dict-sql.conf.ext
-rw-r--r--  1 ujpadmin admin 5733  3 28 01:56 dovecot-ldap.conf.ext
-rw-r--r--  1 ujpadmin admin 5824  3 28 01:56 dovecot-sql.conf.ext
-rw-r--r--  1 ujpadmin admin 4391  3 28 01:56 dovecot.conf

/usr/local/Cellar/dovecot/2.3.1/share/doc/dovecot/example-config/conf.d:
total 124
drwxr-xr-x 27 ujpadmin admin   864  4  6 18:15 .
drwxr-xr-x  8 ujpadmin admin   256  3 28 01:56 ..
-rw-r--r--  1 ujpadmin admin  5296  3 28 01:56 10-auth.conf
-rw-r--r--  1 ujpadmin admin  1781  3 28 01:56 10-director.conf
-rw-r--r--  1 ujpadmin admin  3082  3 28 01:56 10-logging.conf
-rw-r--r--  1 ujpadmin admin 17732  3 28 01:56 10-mail.conf
-rw-r--r--  1 ujpadmin admin  3569  3 28 01:56 10-master.conf
-rw-r--r--  1 ujpadmin admin  3056  3 28 01:56 10-ssl.conf
-rw-r--r--  1 ujpadmin admin  1657  3 28 01:56 15-lda.conf
-rw-r--r--  1 ujpadmin admin  2808  3 28 01:56 15-mailboxes.conf
-rw-r--r--  1 ujpadmin admin  4508  3 28 01:56 20-imap.conf
-rw-r--r--  1 ujpadmin admin   936  3 28 01:56 20-lmtp.conf
-rw-r--r--  1 ujpadmin admin  4066  3 28 01:56 20-pop3.conf
-rw-r--r--  1 ujpadmin admin  2704  3 28 01:56 20-submission.conf
-rw-r--r--  1 ujpadmin admin   676  3 28 01:56 90-acl.conf
-rw-r--r--  1 ujpadmin admin   292  3 28 01:56 90-plugin.conf
-rw-r--r--  1 ujpadmin admin  2596  4  6 18:15 90-quota.conf
-rw-r--r--  1 ujpadmin admin   499  3 28 01:56 auth-checkpassword.conf.ext
-rw-r--r--  1 ujpadmin admin   489  3 28 01:56 auth-deny.conf.ext
-rw-r--r--  1 ujpadmin admin   343  3 28 01:56 auth-dict.conf.ext
-rw-r--r--  1 ujpadmin admin   924  3 28 01:56 auth-ldap.conf.ext
-rw-r--r--  1 ujpadmin admin   561  3 28 01:56 auth-master.conf.ext
-rw-r--r--  1 ujpadmin admin   515  3 28 01:56 auth-passwdfile.conf.ext
-rw-r--r--  1 ujpadmin admin   788  3 28 01:56 auth-sql.conf.ext
-rw-r--r--  1 ujpadmin admin   611  3 28 01:56 auth-static.conf.ext
-rw-r--r--  1 ujpadmin admin  2182  3 28 01:56 auth-system.conf.ext
-rw-r--r--  1 ujpadmin admin   330  3 28 01:56 auth-vpopmail.conf.ext
$
$ cp -pR /usr/local/Cellar/dovecot/2.3.1/share/doc/dovecot/example-config/* /usr/local/etc/dovecot/.🆑
$
$ ls -laR /usr/local/etc/dovecot/🆑
/usr/local/etc/dovecot/:
total 36
drwxr-xr-x  9 ujpadmin admin  288  4  6 20:16 .
drwxrwxr-x 17 ujpadmin admin  544  4  6 18:15 ..
-rw-r--r--  1 ujpadmin admin  143  4  6 18:15 README
drwxr-xr-x 27 ujpadmin admin  864  4  6 18:15 conf.d
-rw-r--r--  1 ujpadmin admin 1507  3 28 01:56 dovecot-dict-auth.conf.ext
-rw-r--r--  1 ujpadmin admin  852  3 28 01:56 dovecot-dict-sql.conf.ext
-rw-r--r--  1 ujpadmin admin 5733  3 28 01:56 dovecot-ldap.conf.ext
-rw-r--r--  1 ujpadmin admin 5824  3 28 01:56 dovecot-sql.conf.ext
-rw-r--r--  1 ujpadmin admin 4391  3 28 01:56 dovecot.conf

/usr/local/etc/dovecot/conf.d:
total 124
drwxr-xr-x 27 ujpadmin admin   864  4  6 18:15 .
drwxr-xr-x  9 ujpadmin admin   288  4  6 20:16 ..
-rw-r--r--  1 ujpadmin admin  5296  3 28 01:56 10-auth.conf
-rw-r--r--  1 ujpadmin admin  1781  3 28 01:56 10-director.conf
-rw-r--r--  1 ujpadmin admin  3082  3 28 01:56 10-logging.conf
-rw-r--r--  1 ujpadmin admin 17732  3 28 01:56 10-mail.conf
-rw-r--r--  1 ujpadmin admin  3569  3 28 01:56 10-master.conf
-rw-r--r--  1 ujpadmin admin  3056  3 28 01:56 10-ssl.conf
-rw-r--r--  1 ujpadmin admin  1657  3 28 01:56 15-lda.conf
-rw-r--r--  1 ujpadmin admin  2808  3 28 01:56 15-mailboxes.conf
-rw-r--r--  1 ujpadmin admin  4508  3 28 01:56 20-imap.conf
-rw-r--r--  1 ujpadmin admin   936  3 28 01:56 20-lmtp.conf
-rw-r--r--  1 ujpadmin admin  4066  3 28 01:56 20-pop3.conf
-rw-r--r--  1 ujpadmin admin  2704  3 28 01:56 20-submission.conf
-rw-r--r--  1 ujpadmin admin   676  3 28 01:56 90-acl.conf
-rw-r--r--  1 ujpadmin admin   292  3 28 01:56 90-plugin.conf
-rw-r--r--  1 ujpadmin admin  2596  4  6 18:15 90-quota.conf
-rw-r--r--  1 ujpadmin admin   499  3 28 01:56 auth-checkpassword.conf.ext
-rw-r--r--  1 ujpadmin admin   489  3 28 01:56 auth-deny.conf.ext
-rw-r--r--  1 ujpadmin admin   343  3 28 01:56 auth-dict.conf.ext
-rw-r--r--  1 ujpadmin admin   924  3 28 01:56 auth-ldap.conf.ext
-rw-r--r--  1 ujpadmin admin   561  3 28 01:56 auth-master.conf.ext
-rw-r--r--  1 ujpadmin admin   515  3 28 01:56 auth-passwdfile.conf.ext
-rw-r--r--  1 ujpadmin admin   788  3 28 01:56 auth-sql.conf.ext
-rw-r--r--  1 ujpadmin admin   611  3 28 01:56 auth-static.conf.ext
-rw-r--r--  1 ujpadmin admin  2182  3 28 01:56 auth-system.conf.ext
-rw-r--r--  1 ujpadmin admin   330  3 28 01:56 auth-vpopmail.conf.ext
$
ERROR 1819 (HY000): Your password does not satisfy the current policy requirements
- カテゴリ :
- サイト構築
- ブロガー :
- ujpblog 2018/4/6 17:21
MySQL 5.7で,パスワードを変更しようとしたら,ERROR 1819 (HY000): Your password does not satisfy the current policy requirementsというエラーがでた.
これは以前実行したmysql_secure_installationの影響だけれど,今回もうちょっと踏み込んで?みる.
まずは現在設定を確認.
それぞれの意味は次の通り.
validate_password_check_user_name
ユーザIDがパスワードに使われているかチェック.
validate_password_dictionary_file
パスワードとして使ってはいけない文字列の除外リストファイルの場所.
validate_password_length
パスワードに必要な総文字数.
validate_password_mixed_case_count
パスワードに含まれる大文字小文字の数.
validate_password_number_count
パスワードに必要な数値文字の数.
validate_password_policy
パスワードポリシー.LOWだとパスワード長のみ.
validate_password_special_char_count
パスワードに含まれる記号の数.
パスワードポリシーを変更したい場合は,次のようにSET命令で定義する.
ひどくゆるゆるに設定したのはこれ.
パスワードを変更してみる.
簡単なパスワードでも設定できました.ちなみに,このvalidate_password_は,MySQLサーバを再起動しても設定はリセットされません.
これは以前実行したmysql_secure_installationの影響だけれど,今回もうちょっと踏み込んで?みる.
まずは現在設定を確認.
mysql> SHOW VARIABLES LIKE 'validate_password%'🆑
    -> ;
+--------------------------------------+--------+
| Variable_name                        | Value  |
+--------------------------------------+--------+
| validate_password_check_user_name    | OFF    |
| validate_password_dictionary_file    |        |
| validate_password_length             | 8      |
| validate_password_mixed_case_count   | 1      |
| validate_password_number_count       | 1      |
| validate_password_policy             | MEDIUM |
| validate_password_special_char_count | 1      |
+--------------------------------------+--------+
7 rows in set (0.00 sec)

mysql>
validate_password_check_user_name
ユーザIDがパスワードに使われているかチェック.
validate_password_dictionary_file
パスワードとして使ってはいけない文字列の除外リストファイルの場所.
validate_password_length
パスワードに必要な総文字数.
validate_password_mixed_case_count
パスワードに含まれる大文字小文字の数.
validate_password_number_count
パスワードに必要な数値文字の数.
validate_password_policy
パスワードポリシー.LOWだとパスワード長のみ.
validate_password_special_char_count
パスワードに含まれる記号の数.
パスワードポリシーを変更したい場合は,次のようにSET命令で定義する.
mysql> SET GLOBAL validate_password_mixed_case_count=0;🆑
Query OK, 0 rows affected (0.00 sec)

mysql>
mysql> SHOW VARIABLES LIKE 'validate_password%';🆑
+--------------------------------------+-------+
| Variable_name                        | Value |
+--------------------------------------+-------+
| validate_password_check_user_name    | OFF   |
| validate_password_dictionary_file    |       |
| validate_password_length             | 8     |
| validate_password_mixed_case_count   | 0     |
| validate_password_number_count       | 0     |
| validate_password_policy             | LOW   |
| validate_password_special_char_count | 0     |
+--------------------------------------+-------+
7 rows in set (0.01 sec)

mysql>
mysql> set password for 'ujpadmin'@'localhost' = password('yuruipass');
Query OK, 0 rows affected, 1 warning (0.01 sec)

mysql>
サーバ全体のユーザのbashrcを設定するために,テンプレートファイルを編集する.
環境設定ファイルをバックアップする.
環境設定ファイルの中身を確認.
これをみるとetc/bashrc_にファイルがある模様.
次のように追加.
さて.リモートからログインしてみる.
でました.
環境設定ファイルをバックアップする.
zeus:~ ujpadmin$ ls -la /etc/bashrc🆑
-r--r--r--  1 root  wheel  265  7 16  2017 /etc/bashrc
zeus:~ ujpadmin$
zeus:~ ujpadmin$ sudo cp -p /etc/bashrc /etc/bashrc.20180403🆑
Password:
zeus:~ ujpadmin$
zeus:~ ujpadmin$ ls -la /etc/bashrc🆑
-r--r--r--  1 root  wheel  265  7 16  2017 /etc/bashrc
zeus:~ ujpadmin$
zeus:~ ujpadmin$ ls -la /etc/bashrc.20180403🆑
-r--r--r--  1 root  wheel  265  7 16  2017 /etc/bashrc.20180403
zeus:~ ujpadmin$
zeus:~ ujpadmin$ diff /etc/bashrc /etc/bashrc.20180403🆑
zeus:~ ujpadmin$
zeus:~ ujpadmin$ cat /etc/bashrc🆑
# System-wide .bashrc file for interactive bash(1) shells.
if [ -z "$PS1" ]; then
   return
fi

PS1='\h:\W \u\$ '
# Make bash check its window size after a process completes
shopt -s checkwinsize

[ -r "/etc/bashrc_$TERM_PROGRAM" ] && . "/etc/bashrc_$TERM_PROGRAM"
zeus:~ ujpadmin$
zeus:~ ujpadmin$ ls -la /etc/bashrc.*🆑
-r--r--r--  1 root  wheel  265  7 16  2017 /etc/bashrc.20180403
zeus:~ ujpadmin$ ls -la /etc/bashrc*🆑
-r--r--r--  1 root  wheel   265  7 16  2017 /etc/bashrc
-r--r--r--  1 root  wheel   265  7 16  2017 /etc/bashrc.20180403
-rw-r--r--  1 root  wheel  9192 10 11 09:48 /etc/bashrc_Apple_Terminal
-r--r--r--  1 root  wheel   265  8  2  2015 /etc/bashrc~previous
zeus:~ ujpadmin$
# System-wide .bashrc file for interactive bash(1) shells.
if [ -z "$PS1" ]; then
   return
fi

PS1='\h:\W \u\$ '
# Make bash check its window size after a process completes
shopt -s checkwinsize

[ -r "/etc/bashrc_$TERM_PROGRAM" ] && . "/etc/bashrc_$TERM_PROGRAM"

🈁
#PATH 20180131
export PATH="/usr/local/opt/openssl/bin:$PATH"
export PATH="/usr/local/opt/gnu-sed/libexec/gnubin:$PATH"
export PATH="/usr/local/opt/coreutils/libexec/gnubin:$PATH"
export PATH="/usr/local/opt/apr-util/bin:$PATH"
export PATH="/usr/local/opt/apr/bin:$PATH"
export PATH="/usr/local/opt/openssl/bin:$PATH"
export PATH="/usr/local/opt/gettext/bin:$PATH"
export PATH="/usr/local/opt/curl/bin:$PATH"

#man 20180131
export MANPATH="/usr/local/opt/gnu-sed/libexec/gnuman:$MANPATH"
export MANPATH="/usr/local/opt/coreutils/libexec/gnuman:$MANPATH"
export MANPATH="/usr/local/opt/gnu-tar/libexec/gnuman:$MANPATH"

#Prompt
PS1='\h:\u \t \w \n\$ '
export COWPATH=/usr/local/Cellar/cowsay/3.04/share/cows
cowsay -f bud-frogs `hostname`
🈁
MBP2017:~ ujpadmin$ ssh ujpadmin@zeus.local🆑
Password:
Last login: Tue Apr  3 15:56:11 2018 from c2%en3
 ____________
< zeus.local >
 ------------
     \
      \
          oO)-.                       .-(Oo
         /__  _\                     /_  __\
         \  \(  |     ()~()         |  )/  /
          \__|\ |    (-___-)        | /|__/
          '  '--'    ==`-'==        '--'  '
zeus:ujpadmin 16:40:17 ~
$
cowsayコマンドは,私の中ではslコマンド,yesコマンドの次の3番目に感銘を受けたコマンドでした.今回対象はmacOSなので,brewでインストールします.
確認できたのでインストール.
ファイルパスを確認.
実行してみる.
echoコマンドのように,Helloとしゃべっている.牛だけじゃなくて,色々なアスキーアートが含まれている.そのリストは次の通り.
-fオプションを使ってアスキーアートを指定する例.
結構な対策だ....cowsayにコマンドの実行結果を喋らせてみる.
サーバ毎に別のキャラクタを表示するように設定すれば,サーバの誤認に使えるのだろうと思う.
$ brew info cowsay
cowsay: stable 3.04 (bottled)
Configurable talking characters in ASCII art
https://github.com/tnalpgge/rank-amateur-cowsay
Not installed
From: https://github.com/Homebrew/homebrew-core/blob/master/Formula/cowsay.rb
$
$ brew install cowsay
Updating Homebrew...
==> Auto-updated Homebrew!
Updated 1 tap (caskroom/cask).
No changes to formulae.

==> Downloading https://homebrew.bintray.com/bottles/cowsay-3.04.high_sierra.bottle.tar.gz
######################################################################## 100.0%
==> Pouring cowsay-3.04.high_sierra.bottle.tar.gz
🍺  /usr/local/Cellar/cowsay/3.04: 65 files, 82.9KB
$
$ which cowsay
/usr/local/bin/cowsay
$
$ cowsay Hello
 _______
< Hello >
 -------
        \   ^__^
         \  (oo)\_______
            (__)\       )\/\
                ||----w |
                ||     ||
$
$ cowsay -l
Cow files in /usr/local/Cellar/cowsay/3.04/share/cows:
beavis.zen blowfish bong bud-frogs bunny cheese cower daemon default dragon
dragon-and-cow elephant elephant-in-snake eyes flaming-sheep ghostbusters
head-in hellokitty kiss kitty koala kosh luke-koala meow milk moofasa moose
mutilated ren satanic sheep skeleton small sodomized stegosaurus stimpy
supermilker surgery telebears three-eyes turkey turtle tux udder vader
vader-koala www
$
$ cowsay -f dragon-and-cow Hello
 _______
< Hello >
 -------
                       \                    ^    /^
                        \                  / \  // \
                         \   |\___/|      /   \//  .\
                          \  /O  O  \__  /    //  | \ \           *----*
                            /     /  \/_/    //   |  \  \          \   |
                            @___@`    \/_   //    |   \   \         \/\ \
                           0/0/|       \/_ //     |    \    \         \  \
                       0/0/0/0/|        \///      |     \     \       |  |
                    0/0/0/0/0/_|_ /   (  //       |      \     _\     |  /
                 0/0/0/0/0/0/`/,_ _ _/  ) ; -.    |    _ _\.-~       /   /
                             ,-}        _      *-.|.-~-.           .~    ~
            \     \__/        `/\      /                 ~-. _ .-~      /
             \____(oo)           *.   }            {                   /
             (    (--)          .----~-.\        \-`                 .~
             //__\\  \__ Ack!   ///.----..<        \             _ -~
            //    \\               ///-._ _ _ _ _ _ _{^ - - - - ~
$
$ cowsay -f bud-frogs `hostname`
 ____________
< zeus.local >
 ------------
     \
      \
          oO)-.                       .-(Oo
         /__  _\                     /_  __\
         \  \(  |     ()~()         |  )/  /
          \__|\ |    (-___-)        | /|__/
          '  '--'    ==`-'==        '--'  '
$
macOSにApp StoreでSeverを購入して入れるとGUIのサーバソフトの管理ツールがついていて,構築と管理が楽だけれどちょっと方言のあるサーバをお手軽に運用できるのだけれど,選択と集中を進めている模様.
Prepare for changes to macOS Server
https://support.apple.com/en-us/HT208312
メールサーバとWebサーバを新しくしようと企んでいたのだけれど,計画を練り直すかな..
Prepare for changes to macOS Server
https://support.apple.com/en-us/HT208312
メールサーバとWebサーバを新しくしようと企んでいたのだけれど,計画を練り直すかな..
新規にHigh Sierraをインストールしたマシンに,macOS serverをインストール.
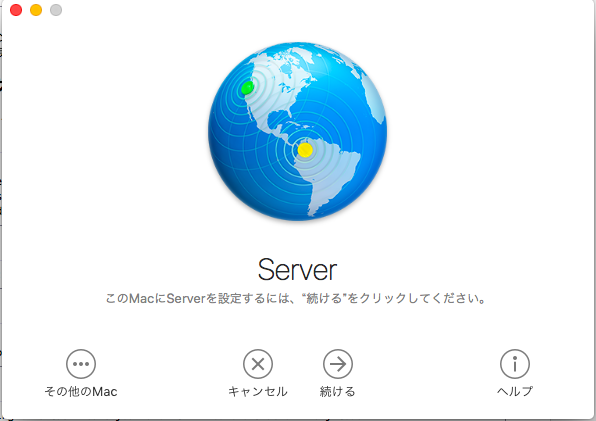
ここで「続ける」ボタンを押すと次のようなエラーが...
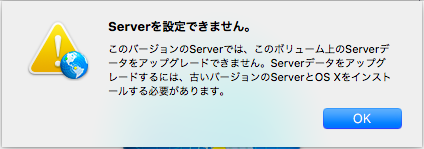
これは,なんか化のきっかけで作られた/Library/Serverフォルダがあることで,バージョンアップをしようとしてエラーになっている模様.このフォルダを削除すれば良い.品質が悪いなぁ.
ここで「続ける」ボタンを押すと次のようなエラーが...
これは,なんか化のきっかけで作られた/Library/Serverフォルダがあることで,バージョンアップをしようとしてエラーになっている模様.このフォルダを削除すれば良い.品質が悪いなぁ.
macOSにインストールされているtarコマンドはbsdtarなのでLinuxのGNU tarと互換性がないようなので,Home BrewでGNU tarをインストールする.
インストールしたバージョンを確認.
.bashrcにパスを追加.
設定したパスを有効化.
パス設定が効いているか確認.
完了.
MBA13:~ ujpadmin$ brew install gnu-tar🆑
==> Pouring portable-ruby-2.3.3.leopard_64.bottle.1.tar.gz
==> Downloading https://homebrew.bintray.com/bottles/gnu-tar-1.29_1.sier
ra.bottle.tar.gz
######################################################################## 100.0%
==> Pouring gnu-tar-1.29_1.sierra.bottle.tar.gz
==> Caveats
gnu-tar has been installed as "gtar".

If you really need to use it as "tar", you can add a "gnubin" directory
to your PATH from your bashrc like:

    PATH="/usr/local/opt/gnu-tar/libexec/gnubin:$PATH"🈁

Additionally, you can access their man pages with normal names if you add
the "gnuman" directory to your MANPATH from your bashrc as well:

    MANPATH="/usr/local/opt/gnu-tar/libexec/gnuman:$MANPATH"

==> Summary
🍺  /usr/local/Cellar/gnu-tar/1.29_1: 15 files, 1.7MB
MBA13:~ ujpadmin$
MBA13:~ ujpadmin $ /usr/local/opt/gnu-tar/libexec/gnubin/tar --version🆑
tar (GNU tar) 1.29🈁
Copyright (C) 2015 Free Software Foundation, Inc.
License GPLv3+: GNU GPL version 3 or later <http://gnu.org/licenses/gpl.html>.
This is free software: you are free to change and redistribute it.
There is NO WARRANTY, to the extent permitted by law.

Written by John Gilmore and Jay Fenlason.
MBA13:~ ujpadmin$
MBA13:~ ujpadmin$ echo '#for GNU tar' >> ~/.bashrc🆑
MBA13:~ ujpadmin$ echo 'PATH="/usr/local/opt/gnu-tar/libexec/gn
ubin:$PATH"' >> ~/.bashrc🆑
MBA13:~ ujpadmin$ echo 'MANPATH="/usr/local/opt/gnu-tar/libexe
c/gnuman:$MANPATH"' >> ~/.bashrc🆑
MBA13:~ ujpadmin$
MBA13:~ ujpadmin $ source ~/.bashrc🆑
MBA13:~ ujpadmin $
MBA13:~ ujpadmin $ which tar🆑
/usr/local/opt/gnu-tar/libexec/gnubin/tar
MBA13:~ ujpadmin $
MacOS X 10.6 ServerでtarしてGZIPしたファイルをRaspberry Pi3上のRaspbianで展開しようとすると次のようなことに.
これは,MacがBSD系のtar,RaspbianがGNU tarであることによる差異らしい.tarのバージョンを調べてみる.
まずは,アーカイブを作成したMacOS X 10.6サーバのtar.
ちなみにmacOS Sierra 10.12.6のtarバージョン.
tarコマンドの場所を調べてバージョンを調査.
バージョン番号はまったく違う模様.
pi@commet:/www $ tar xfz data.tar.gz🆑
tar: 未知の拡張ヘッダキーワード 'SCHILY.dev' を無視🈁
tar: 未知の拡張ヘッダキーワード 'SCHILY.ino' を無視🈁
tar: 未知の拡張ヘッダキーワード 'SCHILY.nlink' を無視🈁
pi@commet:/www $
まずは,アーカイブを作成したMacOS X 10.6サーバのtar.
ujp:~ ujpadmin$ /usr/bin/tar --help|grep bsd🆑
tar(bsdtar): manipulate archive files
bsdtar 2.6.2 - libarchive 2.6.2🈁
ujp:~ ujpadminr$
MBA13:~ ujpadmin$ /usr/bin/tar --help|grep bsd🆑
tar(bsdtar): manipulate archive files
bsdtar 2.8.3 - libarchive 2.8.3🈁
MBA13:~ ujpadmin$
pi@commet:/www $ which tar🆑
/bin/tar🈁
pi@commet:/www $ tar --version|grep tar🆑
tar (GNU tar) 1.27.1🈁
pi@commet:/www $
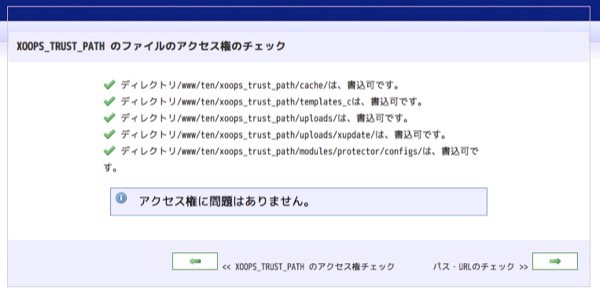
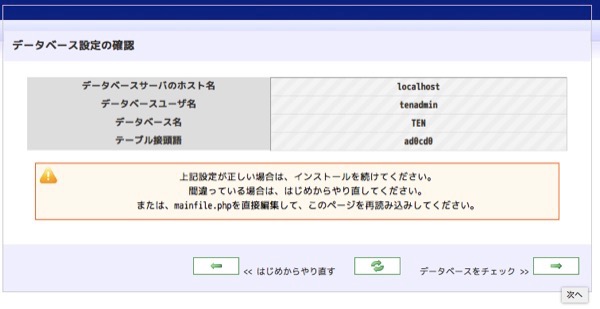
XOOPS_TRUST_PATH関連のファイルパーミッションの確認完了.
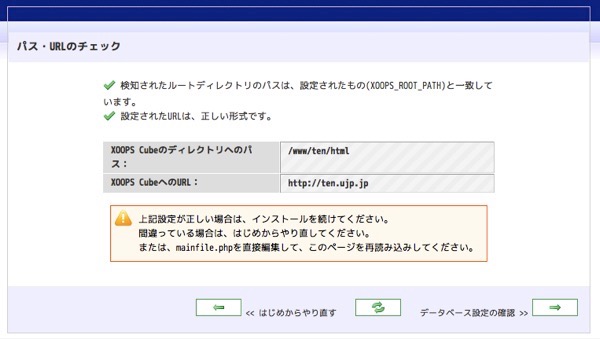
実際にはこのten.ujp.jpというドメインを事前に登録しておかなければいけないけれど,今回/etc/hostsファイルを編集して対応しているので架空ですw
いよいよデータベースへテーブル作成.
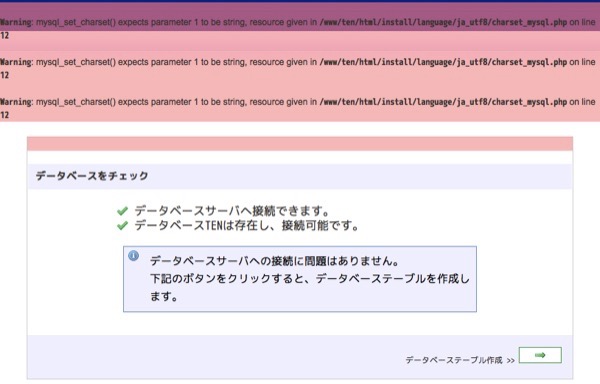
あー,なにかcharaset関連でエラーがでてる...
続いてデータベース関連の設定.
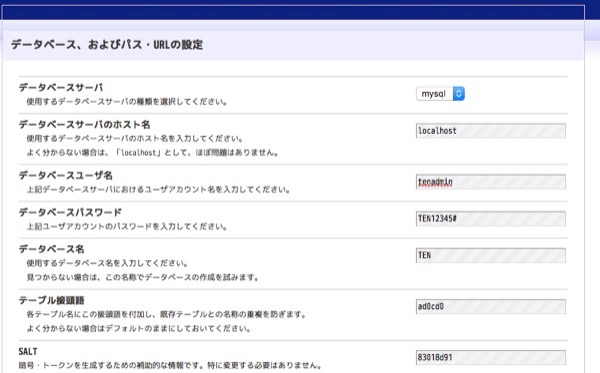
ここで分かりづらいのはテーブル接頭語.XOOPSで固定のテーブル名を持っているけれど,重複しないように接頭語をつけてテーブル名をつけることになる.この場合,接頭語にad0cd0が設定してあるので,テーブル名はad0cd0_avatarというようなルールとなる.
そしてSALT.これはパスワードとかを推測不能にするためにキーワードに付加する文字列のこと.
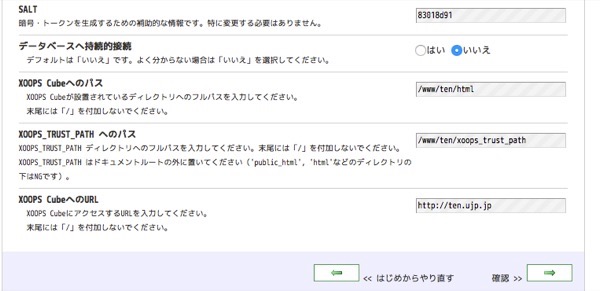
そのほかはXOOPS_TRUST_PATHの設定などがあるけれど,そのまま進めれば良いと思います.
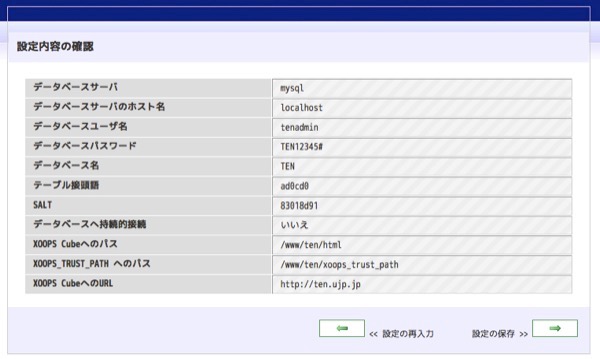
設定内容を確認.
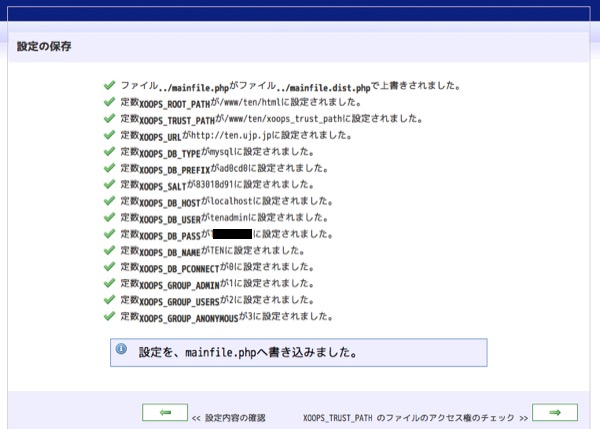
実行結果.
ここで分かりづらいのはテーブル接頭語.XOOPSで固定のテーブル名を持っているけれど,重複しないように接頭語をつけてテーブル名をつけることになる.この場合,接頭語にad0cd0が設定してあるので,テーブル名はad0cd0_avatarというようなルールとなる.
そしてSALT.これはパスワードとかを推測不能にするためにキーワードに付加する文字列のこと.
そのほかはXOOPS_TRUST_PATHの設定などがあるけれど,そのまま進めれば良いと思います.
設定内容を確認.
実行結果.
ブラウザでインストール用URLにアクセス.
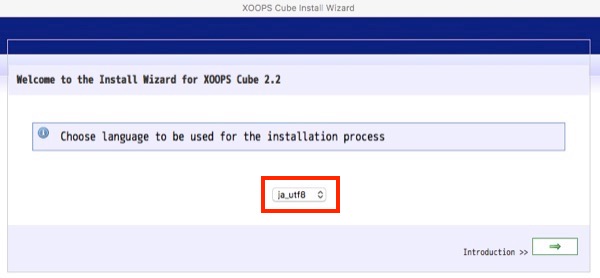
choose language to be used for the installation processとあるのでja_utf8を選択.
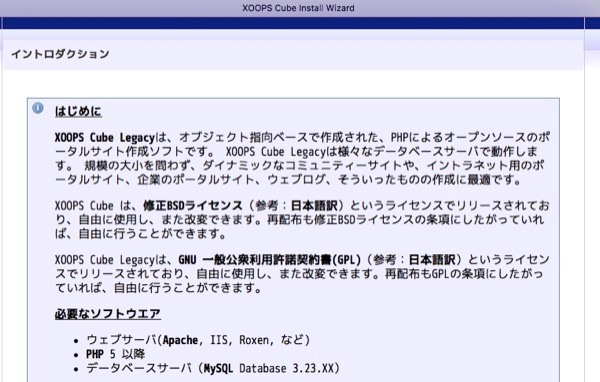
要件について記載.

ファイルのアクセス権限を設定しろと記載があるので,それに従う.
書き込み権限を設定したら,右下の矢印を押下.
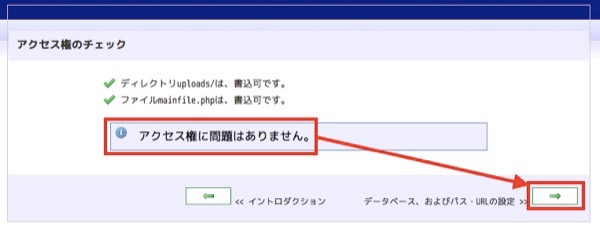
アクセス権限に問題ない模様.
http://localhost/install/index.php
choose language to be used for the installation processとあるのでja_utf8を選択.
要件について記載.
ファイルのアクセス権限を設定しろと記載があるので,それに従う.
root@commet:/www/ten/html# chmod ogu+w uploads🆑
root@commet:/www/ten/html# chmod ogu+w ../xoops_trust_path/cache🆑
root@commet:/www/ten/html# chmod ogu+w ../xoops_trust_path/templates_c🆑
root@commet:/www/ten/html# chmod ogu+w mainfile.php🆑
root@commet:/www/ten/html#
アクセス権限に問題ない模様.
mysql_upgradeを実行した後に,ユーザを作成する.
エラー出なかった.grantで与えた権限を反映させてMySQLモニターから抜ける.
終わり.
pi@commet:/www/ten/class/database $ mysql -uroot -p🆑
Enter password:🆑
Welcome to the MySQL monitor.  Commands end with ; or \g.
Your MySQL connection id is 113
Server version: 5.5.57-0+deb8u1 (Raspbian)

Copyright (c) 2000, 2017, Oracle and/or its affiliates. All rights reserved.

Oracle is a registered trademark of Oracle Corporation and/or its
affiliates. Other names may be trademarks of their respective
owners.

Type 'help;' or '\h' for help. Type '\c' to clear the current input statement.

mysql> GRANT ALL ON TEN.* TO tenadmin@localhost IDENTIFIED BY 'TEN12345#';🆑
Query OK, 0 rows affected (0.00 sec)

mysql>
mysql> flush privileges;🆑
Query OK, 0 rows affected (0.00 sec)

mysql> exit🆑
Bye
pi@commet:/www/ten/class/database $
ERROR 1547 (HY000): Column count of mysql.user is wrong. Expected 42,
 found 31. The table is probably corrupted
- カテゴリ :
- サイト構築
- ブロガー :
- ujpblog 2017/10/19 22:23
MySQLにユーザを作成しようとしたらこんなエラーが.
The table is probably corrupted! テーブルが破損している可能性があります!とでていますが,データベース上のデータで古いバージョンから移行したものがあって,その関係でアップグレードをしなければならないそうです.
mysql_upgradeを実行します.
最後にエラーがでているのは権限がなくて結果を書き出せなかったということです...
ERROR 1547 (HY000): Column count of mysql.user is wrong. Expected 42,
found 31. The table is probably corrupted
mysql_upgradeを実行します.
pi@commet:/www/ten/class/database $ mysql_upgrade -u root -p🆑
Enter password:🆑
Looking for 'mysql' as: mysql
Looking for 'mysqlcheck' as: mysqlcheck
Running 'mysqlcheck' with connection arguments: '--port=3306' '--so
cket=/var/run/mysqld/mysqld.sock'
Running 'mysqlcheck' with connection arguments: '--port=3306' '--so
cket=/var/run/mysqld/mysqld.sock'
mysql.columns_priv                                 OK
mysql.db                                           OK
mysql.event                                        OK
mysql.func                                         OK
mysql.general_log                                  OK
mysql.help_category                                OK
mysql.help_keyword                                 OK
mysql.help_relation                                OK
mysql.help_topic                                   OK
mysql.host                                         OK
mysql.ndb_binlog_index                             OK
mysql.plugin                                       OK
mysql.proc                                         OK
mysql.procs_priv                                   OK
mysql.proxies_priv                                 OK
mysql.servers                                      OK
mysql.slow_log                                     OK
mysql.tables_priv                                  OK
mysql.time_zone                                    OK
mysql.time_zone_leap_second                        OK
mysql.time_zone_name                               OK
mysql.time_zone_transition                         OK
mysql.time_zone_transition_type                    OK
mysql.user                                         OK
mysql.user_info                                    OK
Running 'mysql_fix_privilege_tables'...
OK
Could not create the upgrade info file '/var/lib/mysql/mysql_upgrade_info'
 in the MySQL Servers datadir, errno: 13
pi@commet:/www/ten/class/database $
XOOPS tenようにデータベースとユーザを作成する.
先ずはデータベース.
データベースを作成.
ユーザを作成.
なんだかエラーがでた.一旦終了.
エラーは別途調べる.
先ずはデータベース.
pi@commet:/www/ten/class/database $ mysql -uroot -p🆑
Enter password:🆑
Welcome to the MySQL monitor.  Commands end with ; or \g.
Your MySQL connection id is 106
Server version: 5.5.57-0+deb8u1 (Raspbian)

Copyright (c) 2000, 2017, Oracle and/or its affiliates. All rights reserved.

Oracle is a registered trademark of Oracle Corporation and/or its
affiliates. Other names may be trademarks of their respective
owners.

Type 'help;' or '\h' for help. Type '\c' to clear the current input statement.

mysql>
mysql> CREATE DATABASE TEN;🆑
Query OK, 1 row affected (0.00 sec)

mysql>
mysql> GRANT ALL ON TEN.* TO tenadmin@localhost IDENTIFIED BY 'TEN12345#';🆑
ERROR 1547 (HY000): Column count of mysql.user is wrong. Expected 42,
 found 31. The table is probably corrupted
mysql>
mysql> quit🆑
Bye
pi@commet:/www/ten/class/database $
MySQLのデフォルトデータベースエンジンがInnoDBなので,XOOPS tenで使う場合はMyISAMに変更するための設定を入れる.
sqlutility.phpファイルを探す.
作業前にバックアップ.
sqlutility.phpファイルを探す.
pi@commet:/www/ten $ cd class/database/🆑
pi@commet:/www/ten/class/database $ ls -la🆑
合計 64
drwxr-xr-x 2 pi pi  4096 10月 19 17:01 .
drwxr-xr-x 7 pi pi  4096 10月 19 17:01 ..
-rw-r--r-- 1 pi pi  4412 10月 19 17:01 database.php
-rw-r--r-- 1 pi pi  2257 10月 19 17:01 databasefactory.php
-rw-r--r-- 1 pi pi    33 10月 19 17:01 index.html
-rw-r--r-- 1 pi pi 14314 10月 19 17:01 mysqldatabase.php
-rw-r--r-- 1 pi pi 14866 10月 19 17:01 mysqlidatabase.php
-rw-r--r-- 1 pi pi  6314 10月 19 17:01 sqlutility.php🈁
pi@commet:/www/ten/class/database $
モジュールを入手.
http://xoopscube.jp/
ファイルを展開.
展開されたディレクトリを確認.
ここでインストールコマンドを実行.
http://xoopscube.jp/
ファイルを展開.
pi@commet:/www/ten $ unzip legacy-stable.zip🆑
pi@commet:/www/ten $
pi@commet:/www/ten $ ls -la🆑
合計 36
drwxr-xr-x  6 pi   pi   4096 10月 19 16:52 .
drwxrwxrwx  6 root root 4096 10月 19 16:52 ..
-rw-r--r--  1 pi   pi   8364  3月 28  2017 README.md
drwxr-xr-x  4 pi   pi   4096  3月 28  2017 docs
drwxr-xr-x 11 pi   pi   4096  3月 28  2017 extras
drwxr-xr-x 14 pi   pi   4096  3月 28  2017 html
drwxr-xr-x 10 pi   pi   4096  3月 28  2017 xoops_trust_path
pi@commet:/www/ten $
You have an error in your SQL syntax; check the manual that corresponds
to your MySQL server version for the right syntax to use near 'TYPE=MyISAM'
- カテゴリ :
- サイト構築
- ブロガー :
- ujpblog 2017/10/18 21:29
XOOPSでモジュールをインストールしようとすると,次のようなエラーが.
直訳すると「SQL構文にエラーがあります。対応するマニュアルを確認してくださいTYPE = MyISAM 'の近くで正しい構文を使用するには、MySQLサーバーのバージョンに合わせてください」とある.
CREATE TABLE時にエンジンを指定するわけだけれど,'TYPE=MyISAM'というのはMySQL 4.0.2以前の記述方法で,最近ではENGINE=MyISAMと記載するそうだ.
古いモジュールのインストールをする際には,これを全て書き換える必要があるって事だ.
You have an error in your SQL syntax; check the manual that corresponds
to your MySQL server version for the right syntax to use near 'TYPE=MyISAM'
CREATE TABLE時にエンジンを指定するわけだけれど,'TYPE=MyISAM'というのはMySQL 4.0.2以前の記述方法で,最近ではENGINE=MyISAMと記載するそうだ.
古いモジュールのインストールをする際には,これを全て書き換える必要があるって事だ.
サーバのデータ移行しようとtarで固めていたらこんなエラーがでてtarコマンドが停止.
ファイルの権限がなかったようで,面倒なのでrootで実行して解決しました!
tar: Error exit delayed from previous errors.
MySQLサーバを停止して見る.
停止した.プロセスを確認する.
起動してないことが確認できた.
macOS SierraでOSが起動した時に自動的にMySQLサーバが起動する設定となっているか,確認する.launchctlで管理している.
登録されている.あとはOSを再起動してmysqldが起動するか確認すれば良い.
zeus:~ server$ brew services stop mysql
Stopping `mysql`... (might take a while)
==> Successfully stopped `mysql` (label: homebrew.mxcl.mysql)
zeus:~ server$
zeus:~ server$ ps -ef|grep mysqld
  501  9055  5640   0  6:37PM ttys003    0:00.00 grep mysqld
zeus:~ server$
macOS SierraでOSが起動した時に自動的にMySQLサーバが起動する設定となっているか,確認する.launchctlで管理している.
zeus:~ server$ launchctl list|grep mysql
8392	0	homebrew.mxcl.mysql
zeus:~ server$
インストール時にmysql_secure_installationを実行と記載されている.MySQLのインストールしてデフォルトのままだとセキュリティが弱い部分を強化する為につくられたものかな.
いつものようにパスを確認.
実行する.
VALIDATE PASSWORD pluginをセットアップするかと訊かれているのでyesで答える.
いつものようにパスを確認.
zeus:~ server$ 🆑which mysql_secure_installation
/usr/local/bin/mysql_secure_installation🈁
zeus:~ server$
zeus:~ server$ 🆑mysql_secure_installation

Securing the MySQL server deployment.

Connecting to MySQL using a blank password.

VALIDATE PASSWORD PLUGIN can be used to test passwords
and improve security. It checks the strength of password
and allows the users to set only those passwords which are
secure enough. Would you like to setup VALIDATE PASSWORD plugin?

Press y|Y for Yes, any other key for No:
コマンドラインツールのmysqlで接続して見る.インストール直後に用意されているrootユーザで接続する.
切断する.
今更だけれど,パスを確認.
zeus:~ server$ 🆑mysql -uroot
Welcome to the MySQL monitor.  Commands end with ; or \g.
Your MySQL connection id is 3
Server version: 5.7.18 Homebrew

Copyright (c) 2000, 2017, Oracle and/or its affiliates. All rights reserved.

Oracle is a registered trademark of Oracle Corporation and/or its
affiliates. Other names may be trademarks of their respective
owners.

Type 'help;' or '\h' for help. Type '\c' to clear the current input statement.

mysql>
mysql> quit
Bye
zeus:~ server$
zeus:~ server$ which mysql
/usr/local/bin/mysql
zeus:~ server$
インストール直後にMySQLが起動してないことを確認.
インストール時に案内があったとおり,Brewのコマンドから実行する.
プロセスが起動していることを確認.
問題なく起動完了.
zeus:~ server$ 🆑ps -ef|grep mysqld
  501  8258  5640   0  5:38PM ttys003    0:00.00 grep mysqld
zeus:~ server$
zeus:~ server$ 🆑brew services start mysql
==> Successfully started `mysql` (label: homebrew.mxcl.mysql)
zeus:~ server$
zeus:~ server$ 🆑ps -ef|grep mysqld
  501  8392     1   0  5:39PM ??         0:00.08 /bin/sh /usr/local/opt/mysql/bin/mysqld_safe --datadir=/usr/local/var/mysql
  501  8479  8392   0  5:39PM ??         0:02.82 /usr/local/opt/mysql/bin/mysqld --basedir=/usr/local/opt/mysql
 --datadir=/usr/local/var/mysql --plugin-dir=/usr/local/opt/mysql/lib/plugin
 --log-error=/usr/local/var/mysql/zeus.local.err --pid-file=/usr/local/var/mysql/zeus.local.pid
  501  8484  5640   0  5:39PM ttys003    0:00.00 grep mysqld
zeus:~ server$
