


ブログ - 2008 lateカテゴリのエントリ
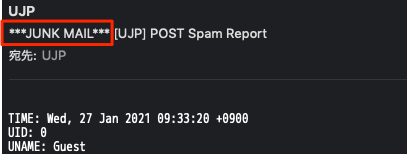
サイトは動いているけど,ログインができなくなった.こんなメッセージが表示される.
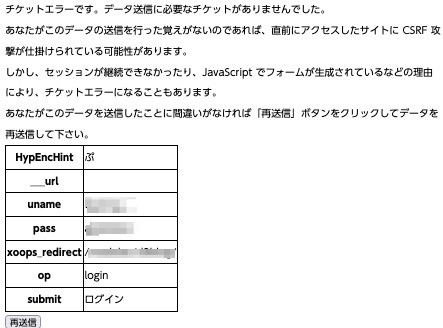
これhXOOPSCubeのセキュリティプラグインProtectorに関するもの.
昨晩大量のSQLインジェクションなどを受けたのでクロスサイトスクリプティングも受けていただろう...DDoSには少し弱いかもしれない.
セッションデーブルを確認.
やはりユーザセッションを管理するテーブルが壊れていた模様.
修復する.
これでログインができるようになった.
これhXOOPSCubeのセキュリティプラグインProtectorに関するもの.
昨晩大量のSQLインジェクションなどを受けたのでクロスサイトスクリプティングも受けていただろう...DDoSには少し弱いかもしれない.
セッションデーブルを確認.
mysql> select count from XOOPSDB__session;🆑
ERROR 145 (HY000): Table './XOOPSDB/XOOPSDB__session' is marked as crashed and should be repaired
mysql>
修復する.
mysql> REPAIR TABLE XOOPSDB__session;🆑
+------------------------+--------+----------+----------+
| Table                  | Op     | Msg_type | Msg_text |
+------------------------+--------+----------+----------+
| xoops.xoopsdb__session | repair | status   | OK       |
+------------------------+--------+----------+----------+
1 row in set (0.09 sec)

mysql>
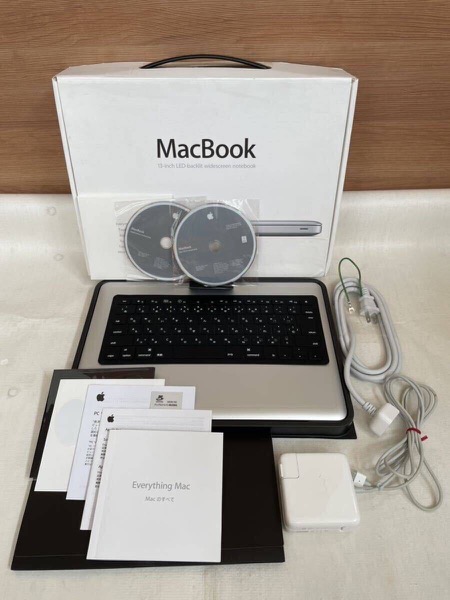
2009年10に2台買った整備調整品のMacBook late 2008ですが,その時DVDドライブに初期不良のあったのが2号機.その後,カミさんのメインPCとしたけど使われず,寝ていた期間が長かったけど,気がついたら起動しなくなってました.
そして代替え機として2024年9月にヤフオクで予備機の代替機を購入.
商品説明にはこう買いてあった.
引用:
元箱も完備で本体は綺麗.しかしタッチパッドがクリックできない.この機種,裏返してバッテリを外すとタッチパッドのクリックをネジで調整する機能があるけど,それをしても調整できない.どうも持病として不具合があった模様.
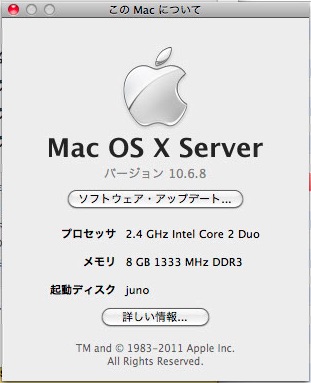
早速2号機からメモリとSSDを移植して起動してよくみたら,MacBook 2008 lateの中の上位CPU版のIntel Core 2 Duo 2.4GHz版でした.
意図せず20%の性能アップ.
そこまで準備して放置していたのだけど,最近,1号機が不定期にダウンする.稼働中も冷却ファンからの異音が...
初期不良の修理から戻ってきたのが2009年10月17日なので,そこから計算したらこんな感じでした.
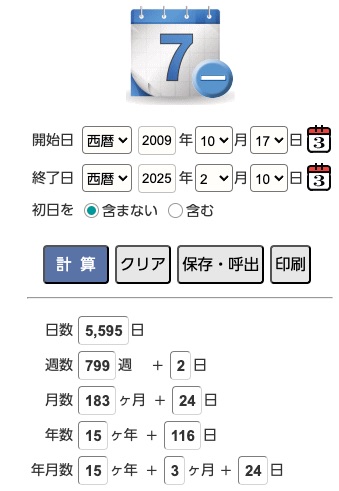
ほぼ15年4ヶ月.ハードもソフトも,色々とカスタマイズしたので新しいサーバへの移行はとても難しい...
そして新たな予備機の準備が必要...
追記2025/02/13
1号機から3号機に交換して,CPUスペックが上昇したけど,それによりCPU温度が下がった事が確認できた.
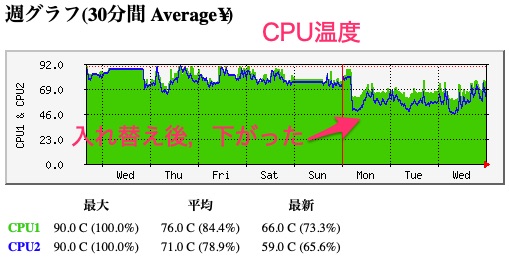
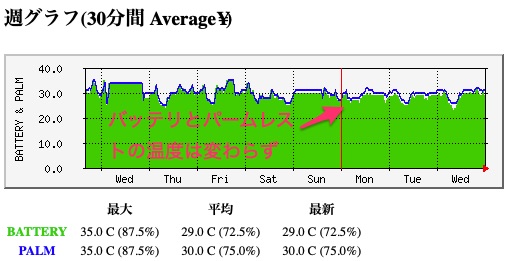
CPU温度が下がっているけど,その他のパームレストやバッテリ温度は変化がない感じ.CPU性能がアップしたことで改善した事が確認できた.
そして代替え機として2024年9月にヤフオクで予備機の代替機を購入.
落札金額:4,400円
送料:910円
支払金額:5,310円
商品説明にはこう買いてあった.
引用:
商品は譲渡頂いたお品で本体、電源コード、キーボード保護カバー他画像にある物だけになり、本体は小さなスリキズ等は確認できるものの、表面、裏面、タッチパッドには保護フィルムが付いたままで、私感ですが極上の美品中古の部類ではないかと思います。
しかしながら、バッテリーが経年劣化で使えない、本体に認識されていない商品になります。(画像9参照)
電源コードは汚れや何かしらの色の付着がございます。
通電と一部動作確認済(ネット通信、CD・DVDの再生読み込み)。画像7、8参照
ネット通信はOSやブラウザが古いので展開はできませんでした。
タッチパッドには保護フィルムが付いたままですので動作確認時の反応は悪く、剥がしておりませんので本来の状態は確認できていない現状となります。
元箱も完備で本体は綺麗.しかしタッチパッドがクリックできない.この機種,裏返してバッテリを外すとタッチパッドのクリックをネジで調整する機能があるけど,それをしても調整できない.どうも持病として不具合があった模様.
早速2号機からメモリとSSDを移植して起動してよくみたら,MacBook 2008 lateの中の上位CPU版のIntel Core 2 Duo 2.4GHz版でした.
意図せず20%の性能アップ.
そこまで準備して放置していたのだけど,最近,1号機が不定期にダウンする.稼働中も冷却ファンからの異音が...
初期不良の修理から戻ってきたのが2009年10月17日なので,そこから計算したらこんな感じでした.
ほぼ15年4ヶ月.ハードもソフトも,色々とカスタマイズしたので新しいサーバへの移行はとても難しい...
そして新たな予備機の準備が必要...
追記2025/02/13
1号機から3号機に交換して,CPUスペックが上昇したけど,それによりCPU温度が下がった事が確認できた.
CPU温度が下がっているけど,その他のパームレストやバッテリ温度は変化がない感じ.CPU性能がアップしたことで改善した事が確認できた.
(1号機) mysqldump: Got error: 145: Table './WEBDB/WEBDB__session' is marked as crashed and should be repaired when using LOCK TABLES
- ブロガー :
- ujpblog 2025/2/4 13:37
crontabで定期実行しているMySQLのバックアップが失敗している.失敗というかダンプファイルが肥大化しでディスクフルになった...
手動で実行してみたら,こんなエラーだった.
これはWebアクセスのセッションテーブルが壊れている模様.DDoS攻撃を受けた結果,被害が出たと推察.
まずは壊れたテーブルを確認.
haven't closed the table properly(適切に閉じてない).delete-link-chainが壊れているとのこと.
delete-link-chainはMyISAMで,削除されたレコードを管理する仕組みで,これが壊れているということになる.
リペアを実行して再度チェックして修復できたことを確認.
手動で実行してみたら,こんなエラーだった.
sh-3.2# DBbackup.sh
mysqldump: Got error: 145: Table './WEBDB/WEBDB__session' is marked as crashed and should be repaired when using LOCK TABLES
sh-3.2#
これはWebアクセスのセッションテーブルが壊れている模様.DDoS攻撃を受けた結果,被害が出たと推察.
まずは壊れたテーブルを確認.
mysql> check table WEBDB__session;🆑
+------------------------+-------+----------+-------------------------------------------------------------------------------------------+
| Table                  | Op    | Msg_type | Msg_text                                                                                  |
+------------------------+-------+----------+-------------------------------------------------------------------------------------------+
| WEBDB.WEBDB__session | check | warning  | Table is marked as crashed                                                                |
| WEBDB.WEBDB__session | check | warning  | 13 clients are using or haven't closed the table properly                                 |
| WEBDB.WEBDB__session | check | warning  | Size of indexfile is: 913408      Should be: 659456                                       |
| WEBDB.WEBDB__session | check | error    | Invalid key block position: 270216091030151533  key block size: 1024  file_length: 659456 |
| WEBDB.WEBDB__session | check | error    | key delete-link-chain corrupted                                                           |
| WEBDB.WEBDB__session | check | error    | Corrupt                                                                                   |
+------------------------+-------+----------+-------------------------------------------------------------------------------------------+
6 rows in set (2.97 sec)

mysql>delete-link-chainはMyISAMで,削除されたレコードを管理する仕組みで,これが壊れているということになる.
リペアを実行して再度チェックして修復できたことを確認.
mysql> repair table WEBDB__session;🆑
+------------------------+--------+----------+------------------------------------------+
| Table                  | Op     | Msg_type | Msg_text                                 |
+------------------------+--------+----------+------------------------------------------+
| WEBDB.WEBDB__session | repair | warning  | Number of rows changed from 1800 to 1797 |
| WEBDB.WEBDB__session | repair | status   | OK                                       |
+------------------------+--------+----------+------------------------------------------+
2 rows in set (0.29 sec)

mysql>

mysql> check table WEBDB__session;🆑
+------------------------+-------+----------+----------+
| Table                  | Op    | Msg_type | Msg_text |
+------------------------+-------+----------+----------+
| WEBDB.WEBDB__session | check | status   | OK       |
+------------------------+-------+----------+----------+
1 row in set (0.01 sec)
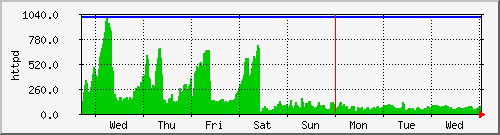
mysql>(1号機) Apacheの定期再起動はパフォーマンス改善に効果がある
- ブロガー :
- ujpblog 2023/11/18 9:28
某サーバのuptimeを確認.
以前542日と言うのがあったけど,それを更新していた模様.
665日前と言うと,2022年1月22日か.体温計を買ったりしていたようで,どうして再起動したのかは覚えてないなぁ...
ふと気づいたのだけど.
先週,ログ出力タイミングを変更するために,Apache httpdを再起動(apachectrl stop;apachectrl start)したんだけど,そうするとCPU timeが減りました.
そして,もっと長い目で見ると長期間動作したまま運用していると,httpdのCPUタイムがどんどん増えていることが確認できました.
これは興味深い.
ちなみに,Apache 1.3脳なのでMPMはpreforkで設定してあります.
MPMの詳細はこれ.
つまり5000リクエスト処理したらプロセスが死滅するようにしているので,メモリリークとかがあってもサーバOSダウンにならないよう制御しているのですが,親プロセスか何かが長期間運用しているとゴミ?が溜まって動作が重くなって非効率化し,CPUタイムをたくさん消費する状態になっていると言うことのよう.
それを解消するには,OSの再起動までいかなくても,Apache httpdを再起動で効果が出る模様.
実際,その某サーバのWebページにアクセスすると,レスポンスがとても速い.やっぱり定期再起動を入れておくのが良いのかな.
そして今回は,DirectoryServiceの再起動を兼ねてOS再起動を実施したのでまた色々とリセットされたのだけど,Apache httpdだけ定期再起動にしてみよう.
juno:$ uptime🆑
 2:59  up 665 days,  9:28, 2 users, load averages: 0.18 0.30 0.31
juno:$
665日前と言うと,2022年1月22日か.体温計を買ったりしていたようで,どうして再起動したのかは覚えてないなぁ...
ふと気づいたのだけど.
先週,ログ出力タイミングを変更するために,Apache httpdを再起動(apachectrl stop;apachectrl start)したんだけど,そうするとCPU timeが減りました.
そして,もっと長い目で見ると長期間動作したまま運用していると,httpdのCPUタイムがどんどん増えていることが確認できました.
これは興味深い.
ちなみに,Apache 1.3脳なのでMPMはpreforkで設定してあります.
juno$ /opt/local/apache2/bin/apachectl -V|grep MPM🆑
Server MPM:     Prefork
 -D APACHE_MPM_DIR="server/mpm/prefork"
juno$
juno$ cat /opt/local/apache2/conf/extra/httpd-mpm.conf🆑
# worker MPM
<IfModule mpm_worker_module>
    StartServers          2
    MaxClients          200
    MinSpareThreads      25
    MaxSpareThreads      75
    ThreadsPerChild      25
    MaxRequestsPerChild   5000
</IfModule>
それを解消するには,OSの再起動までいかなくても,Apache httpdを再起動で効果が出る模様.
実際,その某サーバのWebページにアクセスすると,レスポンスがとても速い.やっぱり定期再起動を入れておくのが良いのかな.
そして今回は,DirectoryServiceの再起動を兼ねてOS再起動を実施したのでまた色々とリセットされたのだけど,Apache httpdだけ定期再起動にしてみよう.
(2号機) バッテリの交換修理 その5 メールサーバ引退,バッテリ消耗
- ブロガー :
- ujpblog 2022/4/12 10:54
1年,メールサーバ専用機として稼働してもらったけれど,その地位はmac mini 2010に譲って引退.
ネットワークから外し,しばらく放置していたら,なんだか熱い.電源を入れてみようと思ったら電源が入らない!
流石に購入して13年くらいになるので壊れたかな?と思ったら,バッテリ不良でした.
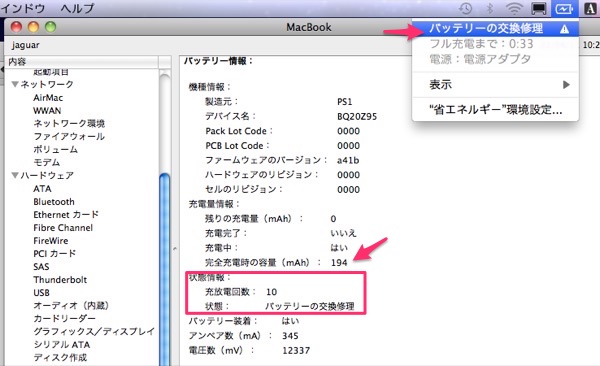
容量が194mAhだなんて.新しくバッテリを買いますかね.
1号機も今年の初めに交換していますね.前回この2号機のバッテリを変えたのはいつだったか...
ちなみに,うちの行政だと,パソコンのバッテリはリチウムイオンなのでモバイルバッテリと同じ捨て方で回収してくれました.
ネットワークから外し,しばらく放置していたら,なんだか熱い.電源を入れてみようと思ったら電源が入らない!
流石に購入して13年くらいになるので壊れたかな?と思ったら,バッテリ不良でした.
容量が194mAhだなんて.新しくバッテリを買いますかね.
1号機も今年の初めに交換していますね.前回この2号機のバッテリを変えたのはいつだったか...
ちなみに,うちの行政だと,パソコンのバッテリはリチウムイオンなのでモバイルバッテリと同じ捨て方で回収してくれました.
MacBook 2008 lateのトラックパッドがクリックが効かなくなったので2019年8月以来のバッテリ交換になるので901日目.
互換バッテリなのに2年以上もったということは評価できるかな.
スクショ撮り忘れたけれど最後は84%くらいでした.
このモデルは,バッテリ交換が楽.バッテリだけでなくメモリもストレージも簡単に交換できる.
買ったのは2009年10月なので12年と103日目.
互換バッテリなのに2年以上もったということは評価できるかな.
スクショ撮り忘れたけれど最後は84%くらいでした.
このモデルは,バッテリ交換が楽.バッテリだけでなくメモリもストレージも簡単に交換できる.
買ったのは2009年10月なので12年と103日目.
macOS Serverで使っていたTime Machine用HDDが壊れたのでSSDに入れ替えた結果、CPUリソースが圧倒的に減りました.
まずはデイリーで.

75%あたりだったのに25-30%程度に低減.
週間で確認してもこのグラフ.
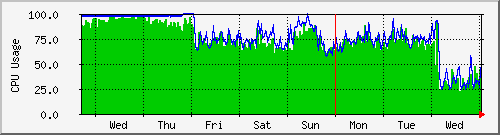
いまさらだけれどIOの改善って効果あるね.
まずはデイリーで.
75%あたりだったのに25-30%程度に低減.
週間で確認してもこのグラフ.
いまさらだけれどIOの改善って効果あるね.
(1号機)SSD-PUT250U3-BKC バッファロー スティック型SSD
- ブロガー :
- ujpblog 2021/10/13 1:07
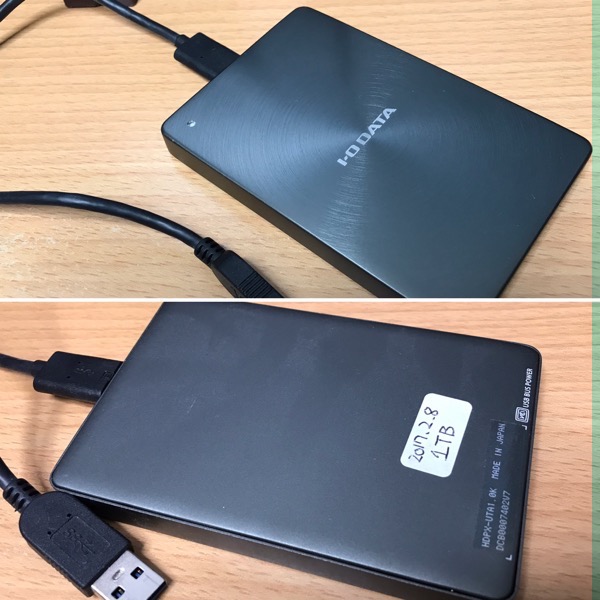
サーバのタイムマシン(バックアップ用)で使っていたカクうす HDPX-UTA1.0Kが故障したので,その代替を検討.
256GB程度のSSDと1000円くらいのケースを買って5000円程度にすれば良いのでは?と秋葉原を回ってみたけれど,256GBサイズはメニューにはあるけれどSOLD OUTでもう売られてなくて500GBだと6000円くらいするしケースは1500円くらいなのでそうなると1万円くらいの「カクうす」の背中が見えてくるので,ちょっと考え方を変更.
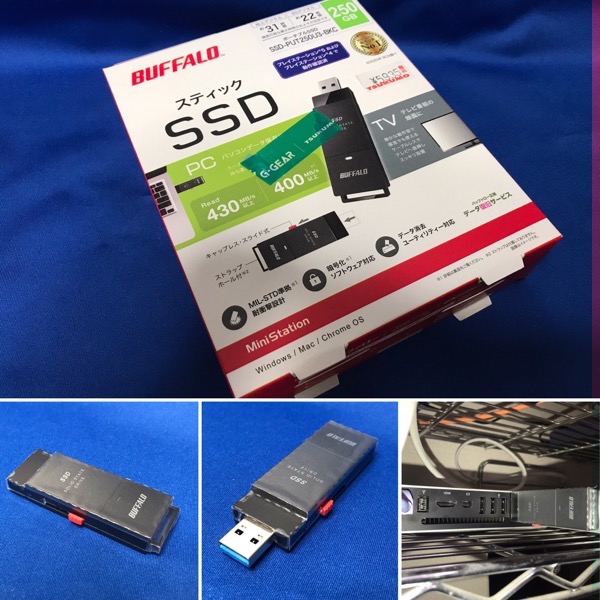
今回はスティック型のSSD型にしてみた.TSUKUMOでSSD-PUT250U3-BKCが税込5935円.mac mini 2010にぶっ刺してみたけれど邪魔にならない感じでイイ.
そしてまずはスピードを測定.パッケージには仕様上読み取り430MB/s以上,書き込み400MB/s以上となっている.はたして・・・
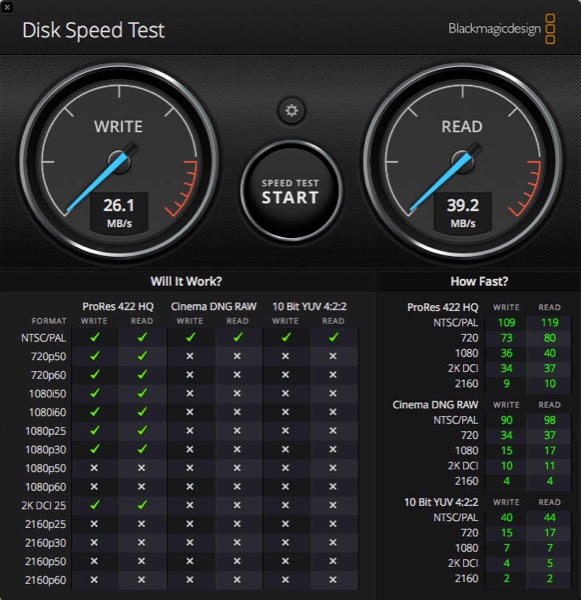
書き込み26.1MB/s! やはりmac mini 2010のUSB2.0の能力がボトルネックになっているか.
ちなみに,Mac Pro 2013で同じテストをしてみた結果がこれ.
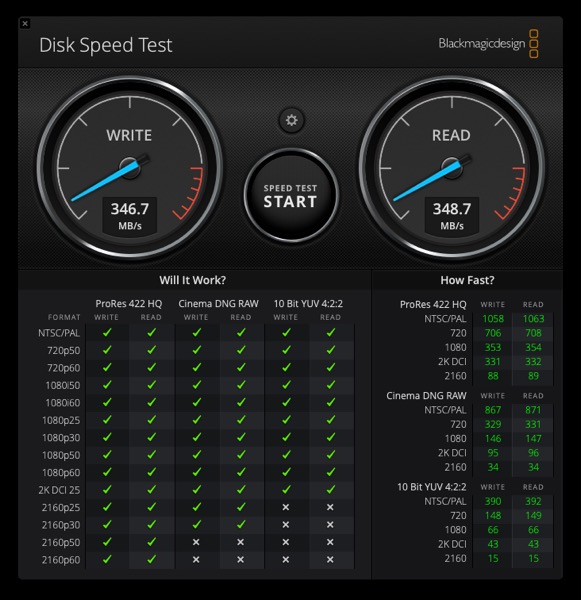
350MB/sになっているので,仕様の87%程度なので十分かな.
用途がタイムマシーン様なので,日々の差分データのバックアップだから十分かな.あとは耐久性.カクうす HDPX-UTA1.0Kは1702日,56ヶ月だったのでそれを超える耐用年数を迎えられるといいんだけれど.(その前にサーバが壊れそう・・・)
256GB程度のSSDと1000円くらいのケースを買って5000円程度にすれば良いのでは?と秋葉原を回ってみたけれど,256GBサイズはメニューにはあるけれどSOLD OUTでもう売られてなくて500GBだと6000円くらいするしケースは1500円くらいなのでそうなると1万円くらいの「カクうす」の背中が見えてくるので,ちょっと考え方を変更.
今回はスティック型のSSD型にしてみた.TSUKUMOでSSD-PUT250U3-BKCが税込5935円.mac mini 2010にぶっ刺してみたけれど邪魔にならない感じでイイ.
そしてまずはスピードを測定.パッケージには仕様上読み取り430MB/s以上,書き込み400MB/s以上となっている.はたして・・・
書き込み26.1MB/s! やはりmac mini 2010のUSB2.0の能力がボトルネックになっているか.
ちなみに,Mac Pro 2013で同じテストをしてみた結果がこれ.
350MB/sになっているので,仕様の87%程度なので十分かな.
用途がタイムマシーン様なので,日々の差分データのバックアップだから十分かな.あとは耐久性.カクうす HDPX-UTA1.0Kは1702日,56ヶ月だったのでそれを超える耐用年数を迎えられるといいんだけれど.(その前にサーバが壊れそう・・・)
2017年2月に購入したUSBハードディスクが故障.サーバのTimeMachine用で使っていたので,1702日,約4年か月というのはよく稼働したと考えるべきかな.
症状は,Time Machineが全く進まなくなって,サーバのCPUが発熱してファンが唸っている状態が続いたので,サーバも久しくOS再起動してなかったから,ついでに再起動.そしたらそれきり認識しなくなりました.

macOS標準のディスクユーティリティで確認してみるも,ディスクドライブとして認識されているが情報が取れません.容量もゼロバイトとなっている.
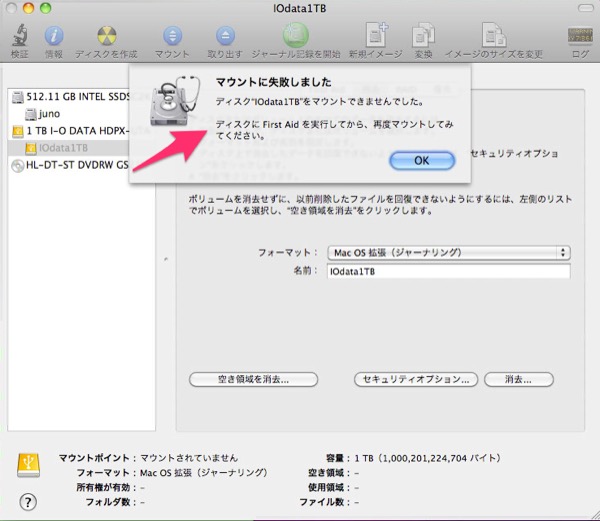
First Aidしたり,消去(フォーマット)を試みても変化ありませんでした.
カクうす HDPX-UTA1.0Kは,現行商品のようで,まだ約1万円で売られているけれど,次回はHDDじゃなくてバックアップはSSDにしてみるかな.
症状は,Time Machineが全く進まなくなって,サーバのCPUが発熱してファンが唸っている状態が続いたので,サーバも久しくOS再起動してなかったから,ついでに再起動.そしたらそれきり認識しなくなりました.
macOS標準のディスクユーティリティで確認してみるも,ディスクドライブとして認識されているが情報が取れません.容量もゼロバイトとなっている.
First Aidしたり,消去(フォーマット)を試みても変化ありませんでした.
カクうす HDPX-UTA1.0Kは,現行商品のようで,まだ約1万円で売られているけれど,次回はHDDじゃなくてバックアップはSSDにしてみるかな.
Brew Updateでosが古いからコンパイルに失敗し始めたし,このサーバでは不要なので削除した.
あっけないな.
$ brew uninstall openjdk@8🆑
Uninstalling /usr/local/Cellar/openjdk@8/1.8.0+275... (742 files, 191.9MB)
[venus:server 02:05:36 ~ ]
$ brew uninstall jenkins🆑
Uninstalling /usr/local/Cellar/jenkins/2.249... (7 files, 67.3MB)
[venus:server 02:12:59 ~ ]
$ brew uninstall openjdk@11🆑
Uninstalling /usr/local/Cellar/openjdk@11/11.0.8... (650 files, 295.8MB)
[venus:server 02:13:12 ~ ]
$
smartmontoolsをインストールして診断してみた.
稼働時間が5465時間となっているけれどMacBook 2008 LateにHigh Sierraを入れてみたのが590日前だからか,そんなもんかな.
Media_Wearout_Indicatorが気になる.初期は100から使っていくと減ってきて0になったら終わり,らしいのだけどこの数値はさっぱりわからん.
それよりも,Total_Bad_Blocksが251となっているが,この数値を追いかけたほうがいいのかなぁ...
[venus:server 16:32:39 ~ ]
$ smartctl -a /dev/disk0s3🆑
smartctl 7.2 2020-12-30 r5155 [Darwin 17.7.0 x86_64] (local build)
Copyright (C) 2002-20, Bruce Allen, Christian Franke, www.smartmontools.org

=== START OF INFORMATION SECTION ===
Model Family:     WD Blue / Red / Green SSDs
Device Model:     WDC  WDS500G2B0A-00SM50
Serial Number:    1920338xxxxx
LU WWN Device Id: 5 001b44 8b857a1d9
Firmware Version: 401000WD
User Capacity:    500,107,862,016 bytes [500 GB]
Sector Size:      512 bytes logical/physical
Rotation Rate:    Solid State Device
Form Factor:      2.5 inches
TRIM Command:     Available, deterministic, zeroed
Device is:        In smartctl database [for details use: -P show]
ATA Version is:   ACS-4 T13/BSR INCITS 529 revision 5
SATA Version is:  SATA 3.3, 6.0 Gb/s (current: 3.0 Gb/s)
Local Time is:    Tue Mar  2 16:32:52 2021 JST
SMART support is: Available - device has SMART capability.
SMART support is: Enabled

=== START OF READ SMART DATA SECTION ===
SMART overall-health self-assessment test result: PASSED

General SMART Values:
Offline data collection status:  (0x00)	Offline data collection activity
					was never started.
					Auto Offline Data Collection: Disabled.
Self-test execution status:      (   0)	The previous self-test routine completed
					without error or no self-test has ever
					been run.
Total time to complete Offline
data collection: 		(    0) seconds.
Offline data collection
capabilities: 			 (0x11) SMART execute Offline immediate.
					No Auto Offline data collection support.
					Suspend Offline collection upon new
					command.
					No Offline surface scan supported.
					Self-test supported.
					No Conveyance Self-test supported.
					No Selective Self-test supported.
SMART capabilities:            (0x0003)	Saves SMART data before entering
					power-saving mode.
					Supports SMART auto save timer.
Error logging capability:        (0x01)	Error logging supported.
					General Purpose Logging supported.
Short self-test routine
recommended polling time: 	 (   2) minutes.
Extended self-test routine
recommended polling time: 	 (  10) minutes.

SMART Attributes Data Structure revision number: 4
Vendor Specific SMART Attributes with Thresholds:
ID# ATTRIBUTE_NAME          FLAG     VALUE WORST THRESH TYPE      UPDATED  WHEN_FAILED RAW_VALUE
  5 Reallocated_Sector_Ct   0x0032   100   100   ---    Old_age   Always       -       0
  9 Power_On_Hours          0x0032   100   100   ---    Old_age   Always       -       5465🈁
 12 Power_Cycle_Count       0x0032   100   100   ---    Old_age   Always       -       2434
165 Block_Erase_Count       0x0032   100   100   ---    Old_age   Always       -       70714123
166 Minimum_PE_Cycles_TLC   0x0032   100   100   ---    Old_age   Always       -       1
167 Max_Bad_Blocks_per_Die  0x0032   100   100   ---    Old_age   Always       -       24
168 Maximum_PE_Cycles_TLC   0x0032   100   100   ---    Old_age   Always       -       41
169 Total_Bad_Blocks        0x0032   100   100   ---    Old_age   Always       -       251
170 Grown_Bad_Blocks        0x0032   100   100   ---    Old_age   Always       -       0
171 Program_Fail_Count      0x0032   100   100   ---    Old_age   Always       -       0
172 Erase_Fail_Count        0x0032   100   100   ---    Old_age   Always       -       0
173 Average_PE_Cycles_TLC   0x0032   100   100   ---    Old_age   Always       -       9
174 Unexpected_Power_Loss   0x0032   100   100   ---    Old_age   Always       -       8
184 End-to-End_Error        0x0032   100   100   ---    Old_age   Always       -       0
187 Reported_Uncorrect      0x0032   100   100   ---    Old_age   Always       -       0
188 Command_Timeout         0x0032   100   100   ---    Old_age   Always       -       0
194 Temperature_Celsius     0x0022   067   045   ---    Old_age   Always       -       33 (Min/Max 18/45)
199 UDMA_CRC_Error_Count    0x0032   100   100   ---    Old_age   Always       -       0
230 Media_Wearout_Indicator 0x0032   001   001   ---    Old_age   Always       -       0x0137005a0137🈁
232 Available_Reservd_Space 0x0033   100   100   004    Pre-fail  Always       -       100
233 NAND_GB_Written_TLC     0x0032   100   100   ---    Old_age   Always       -       4593
234 NAND_GB_Written_SLC     0x0032   100   100   ---    Old_age   Always       -       9286
241 Host_Writes_GiB         0x0030   253   253   ---    Old_age   Offline      -       8637
242 Host_Reads_GiB          0x0030   253   253   ---    Old_age   Offline      -       4966
244 Temp_Throttle_Status    0x0032   000   100   ---    Old_age   Always       -       0

SMART Error Log Version: 1
No Errors Logged

SMART Self-test log structure revision number 1
No self-tests have been logged.  [To run self-tests, use: smartctl -t]

Selective Self-tests/Logging not supported

[venus:server 16:32:52 ~ ]
$
稼働時間が5465時間となっているけれどMacBook 2008 LateにHigh Sierraを入れてみたのが590日前だからか,そんなもんかな.
Media_Wearout_Indicatorが気になる.初期は100から使っていくと減ってきて0になったら終わり,らしいのだけどこの数値はさっぱりわからん.
それよりも,Total_Bad_Blocksが251となっているが,この数値を追いかけたほうがいいのかなぁ...
当サイトへの不正ログインモニタリングの通知メールが,SpamAssasinによってスパム扱いを受けるようになった.
スパムヘッダはこれ.
不正ログイン通知の検知本文情報によるのかなぁ.
設定ファイルは以下の通り.
どれだ?!
タイムスタンプを確認.
差分を確認.
macOS Serverの管理画面を確認.
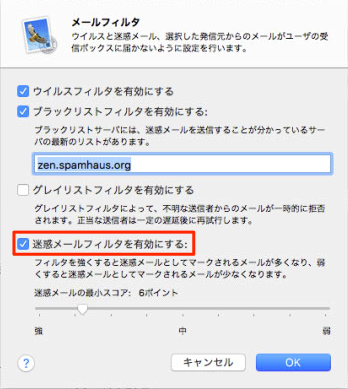
サーバの設定を見ると,スコアが6.0なので一致.
ホワイトリストを設定するため,まずは現在設定をコピー.
ホワイトリストにしたいメアドやドメインを登録.
保存したら文法チェック.
これで様子見かな.
スパムヘッダはこれ.
X-Spam-Flag: YES
X-Spam-Score: 7.269
X-Spam-Level: *******
X-Spam-Status: Yes, score=7.269 tagged_above=2 required=6
	tests=[BITCOIN_SPAM_07=3.499, BITCOIN_XPRIO=0.001,
	FORGED_SPF_HELO=2.297, NORMAL_HTTP_TO_IP=0.001,
	NUMERIC_HTTP_ADDR=0.001, PDS_BTC_ID=0.498, SPF_HELO_PASS=-0.001,
	SPF_SOFTFAIL=0.972, URIBL_BLOCKED=0.001]
	autolearn=no autolearn_force=no
設定ファイルは以下の通り.
$ locate spamassassin|grep local.cf🆑
/Applications/Server.app/Contents/ServerRoot/private/etc/mail/spamassassin/local.cf.default
/Library/Server/Mail/Config/spamassassin/local.cf
/Library/Server/Mail/Config/spamassassin/local.cf.default
/Library/Server/Mail/Data/scanner/spamassassin/3.004001/updates_spamassassin_org/local.cf
$
タイムスタンプを確認.
$ ls -la /Library/Server/Mail/Config/spamassassin/local.cf🆑
-rw-r--r-- 1 root wheel 2725  5 16  2020 /Library/Server/Mail/Config/spamassassin/local.cf
$ ls -la /Library/Server/Mail/Config/spamassassin/local.cf.default
-rw-r--r-- 1 root wheel 2706  9 13  2018 /Library/Server/Mail/Config/spamassassin/local.cf.default
$
$ diff /Library/Server/Mail/Config/spamassassin/local.cf.default /Library/Server/Mail/Config/spamassassin/local.cf🆑
99a100,101
>
> required_hits 6.0
$
サーバの設定を見ると,スコアが6.0なので一致.
ホワイトリストを設定するため,まずは現在設定をコピー.
$ sudo cp -p /Library/Server/Mail/Config/spamassassin/local.cf /Library/Server/Mail/Config/spamassassin/local.cf.20210127🆑
$ ls -la /Library/Server/Mail/Config/spamassassin/local.cf*
-rw-r--r-- 1 root wheel 2725  5 16  2020 /Library/Server/Mail/Config/spamassassin/local.cf
-rw-r--r-- 1 root wheel 2725  5 16  2020 /Library/Server/Mail/Config/spamassassin/local.cf.20210127🈁
-rw-r--r-- 1 root wheel 2706  9 13  2018 /Library/Server/Mail/Config/spamassassin/local.cf.default
$
$ tail /Library/Server/Mail/Config/spamassassin/local.cf
# shortcircuit BAYES_00                ham

endif # Mail::SpamAssassin::Plugin::Shortcircuit


required_hits 6.0

whitelist_from *@xxxxx.or.jp🈁
whitelist_from *@yyy.jp🈁
whitelist_from *@mail.xxx.jp🈁
$
sh-3.2# spamassassin --lint🆑
sh-3.2#
これで様子見かな.
メールサーバの移行に際して,行ったこと.
新規サーバを構築する
新規FQDNを使ってメールの送受信の動作確認
メールデータの移行
移行先のメールボックスは実質10個くらいだったので,IMAP4でもあるし新旧のメールサーバにメールアプリで接続して手で移動してみた.
システムイログやらメルマガやら15年分のメールがあるので数が多い.最終的に移動したメールでは6万件もあったものがある.
Apple Mailだと1000件毎に移動させている分には問題ないが,5000件くらいを一気に移動しようとするとレインボーがでて空回りして暴走.Thunderbirdは1万件くらいで問題ないことがわかりました.
移行しつつ,絶対いらないメールとかは適宜削除しながら...
読んでないメルマガの解約
ちょっと放置していたのもあるけれど,Yahoo!オークションのために用意していたメールアドレスに,Yahoo!の新サービスからのメールがたくさん.50種類くらいのものが来ていて,一括削除できない...1つつづメールのフッタにある「解約」を押して毎回ログインさせられ解約ボタンを押して行く作業.
あまりにもメールが多いので?解約を繰り返していると途中からCAPTCHA認証がでてくるようになった.
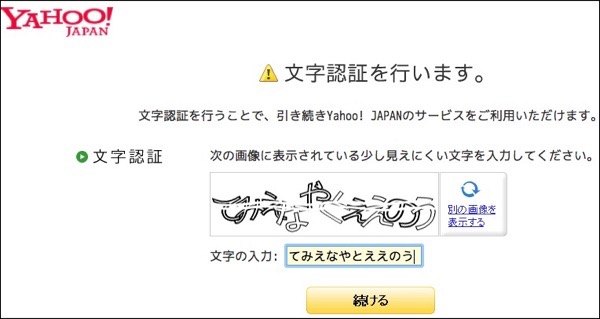
ロボット的に解約しているからなぁ,
ロボット的だと思って自動的に出てくるようになったのか,メルマガのサイト毎に実装されているところとそうでないところがあったのかは,不明.なんせ解約祭りのスピードが遅くなる事に閉口.
MXレコードは1時間くらい
10年くらい前までは,DNS変更は伝搬のタイミングがあるので1.5日くらいを計画に入れていたけれど,今回の実績だと1時間程度の模様.これ,重要.
移行先のメールボックスは実質10個くらいだったので,IMAP4でもあるし新旧のメールサーバにメールアプリで接続して手で移動してみた.
システムイログやらメルマガやら15年分のメールがあるので数が多い.最終的に移動したメールでは6万件もあったものがある.
Apple Mailだと1000件毎に移動させている分には問題ないが,5000件くらいを一気に移動しようとするとレインボーがでて空回りして暴走.Thunderbirdは1万件くらいで問題ないことがわかりました.
移行しつつ,絶対いらないメールとかは適宜削除しながら...
ちょっと放置していたのもあるけれど,Yahoo!オークションのために用意していたメールアドレスに,Yahoo!の新サービスからのメールがたくさん.50種類くらいのものが来ていて,一括削除できない...1つつづメールのフッタにある「解約」を押して毎回ログインさせられ解約ボタンを押して行く作業.
あまりにもメールが多いので?解約を繰り返していると途中からCAPTCHA認証がでてくるようになった.
ロボット的に解約しているからなぁ,
ロボット的だと思って自動的に出てくるようになったのか,メルマガのサイト毎に実装されているところとそうでないところがあったのかは,不明.なんせ解約祭りのスピードが遅くなる事に閉口.
10年くらい前までは,DNS変更は伝搬のタイミングがあるので1.5日くらいを計画に入れていたけれど,今回の実績だと1時間程度の模様.これ,重要.
(2号機) Error: nginx: no bottle available!
- ブロガー :
- ujpblog 2021/1/3 23:38
nginxをbrewから落としてこようとしたら,エラーになった.
引用: OSが古いからボトルは置いてない.コンパイルしろって.
仕方ないのでソースからコンパイル.
引用:
Warning: You are using macOS 10.13.
We (and Apple) do not provide support for this old version.
You will encounter build failures with some formulae.
Please create pull requests instead of asking for help on Homebrew's GitHub,
Twitter or any other official channels. You are responsible for resolving
any issues you experience while you are running this
old version.
Error: nginx: no bottle available!
You can try to install from source with e.g.
brew install --build-from-source nginx🈁
Please note building from source is unsupported. You will encounter build
failures with some formulae. If you experience any issues please create pull
requests instead of asking for help on Homebrew's GitHub, Twitter or any other
official channels.
仕方ないのでソースからコンパイル.
(2号機) macOS High SierraへのHomeBrew環境整備2
- ブロガー :
- ujpblog 2021/1/3 13:21
追加でパッケージを追加.
どうもApple Siliconがリリースされた影響か? configureから実行されるので全コンパイルが走る.マシンが古いせいもあるけれど,12時間くらいかかった.
もしかしてOpenSSLの脆弱性とかが関係あるのか・・・?
git clone http://github.com/possatti/pokemonsay
brew install figlet
brew install mrtg
もしかしてOpenSSLの脆弱性とかが関係あるのか・・・?
(2号機) macOS High SierraへのHomeBrew環境整備
- ブロガー :
- ujpblog 2020/5/17 14:57
新たに環境を作ろと思って,再度HomeBrew環境を整理.
そして1年前に比べると,Java環境が変わっていました.
Jenkinsを導入しようとすると,JavaのJREが必要なのですが,Oracle JavaじゃなくてIBM系のAdoptOpenJDKになっていました.
AdoptOpenJDK
https://adoptopenjdk.net
そしてPHP7.2も.
1年前はPHP7.2.17でしたが,7.2.31で,これは5月14日にリリースされたばかりの模様.今年の11月末に7.2のサポートは切れるそうです.
brew update
brew install tree
brew install wget
brew install cask
brew install gnu-sed
brew install coreutils
brew install imagemagick
brew install openjpeg
brew install fontconfig
brew install nkf
brew install cowsay
brew install ffmpeg
brew install httpd
brew info mariadb
brew install mariadb
brew install mysql-connector-c
brew install  mariadb-connector-c
Jenkinsを導入しようとすると,JavaのJREが必要なのですが,Oracle JavaじゃなくてIBM系のAdoptOpenJDKになっていました.
AdoptOpenJDK
https://adoptopenjdk.net
brew cask install homebrew/cask-versions/adoptopenjdk8
brew install jenkins
brew install php@7.2
(2号機) MacBook 2008 LateにHigh Sierraを入れてみた
- ブロガー :
- ujpblog 2020/5/16 14:01
件名の通り,12年前発売のMacBook 2008 Lateに,3年前にリリースされたOSをインストールしてみました.
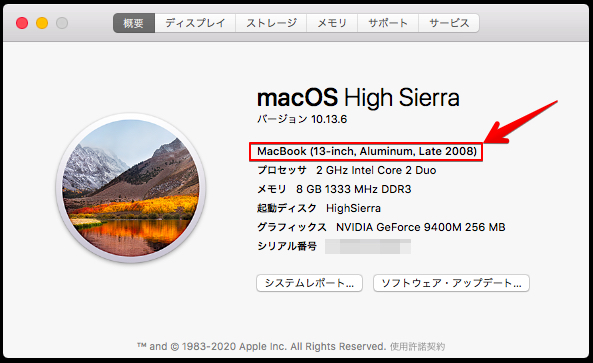
本来は対象外の機種なのでインストールできないけれど,パッチを適用したOSインストーラを用意して,インストールを行えば良いです.
macOS High Sierra Patcher Tool for Unsupported Macs
http://dosdude1.com/highsierra/
昔ダウンロードしておいたHigh Sierraのインストーラは,証明書の期限切れで利用できず.ただし,Patcherを使うとダウンロードできます.
12年前のマシンとはいえ,サーバ利用だったので見た目は綺麗だし液晶に不具合もなくメモリも8GBで,SSD 512GBに交換しているので,そこそこ快適に動作してますが,OSが古いとWebブラウザのSafariのバージョンが古く,インターネットができません.
昔はブラウザが古いとレイアウトが崩れて見るに耐えない状態があったけれど,現在はTLSが古いとアクセス自体を禁止しているページも多く,そうなるとアクセスすらできない.
LinuxをいれるとかWindowsを入れるとか考えたけれど,動くならこれが一番現実的かなと思いm,High Sierraにしました.
とにかく,セットアップに時間がかかったけれど,これでしばらく使えそうです.
(1号機) macOSでファイルシステム故障したけれどTime Machineでフルリカバリできた件
- ブロガー :
- ujpblog 2020/1/13 23:54
サーバのCPU負荷が右肩上がり.上がったきっかけはストレージをHDDからSSDに変更したこと.それ以外に,OSやミドルウェアのバージョンアップや設定変更はしていない.利用者が増えたわけでもない.
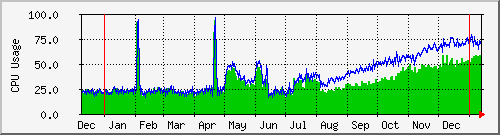
CPU Usageのグラフ
ということで,OSを再起動してみた.
するとどうでしょう...起動してこなくなった.
こんな時のために,10年前の2009年に購入したこのサーバには予備機が準備してあって,SSDを取り外して2号機に取り付けて起動.しかし残念ながらこれも起動してこない.
起動しなかったSSDを,別のMacに接続してみた.すると次のようなメッセージが.
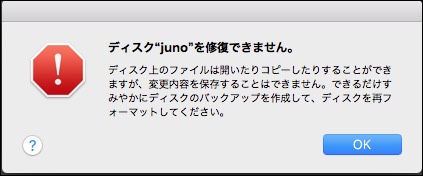
「ディスク上のファイルは開いたりコピーしたりすることができますが変更は保存することはできません」というメッセージ.
ディスクユーティリティでFirst Aidしてみる.
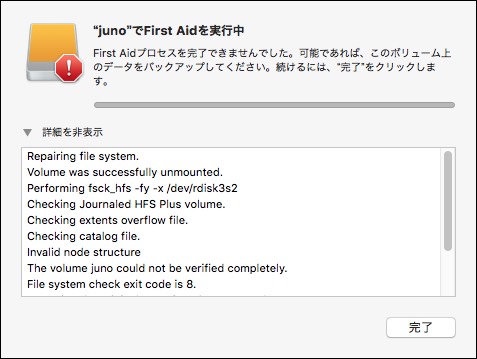
残念ながら失敗.File System check exit code is 8と出ていて,これはファイルシステムが壊れているという意味で,フォーマットしか修復する方法は無い模様.
ということで,Time Machineからのフルリストアを実施.
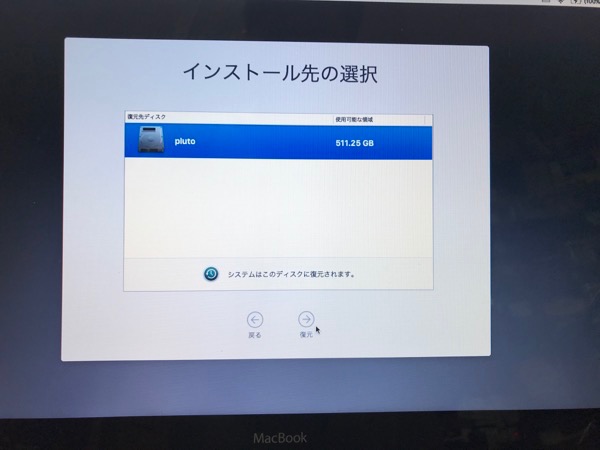
リストア先は元の1号機だけれど,2号機から取り外したSSDが入っているのでストレージの名前がPlutoになっている.
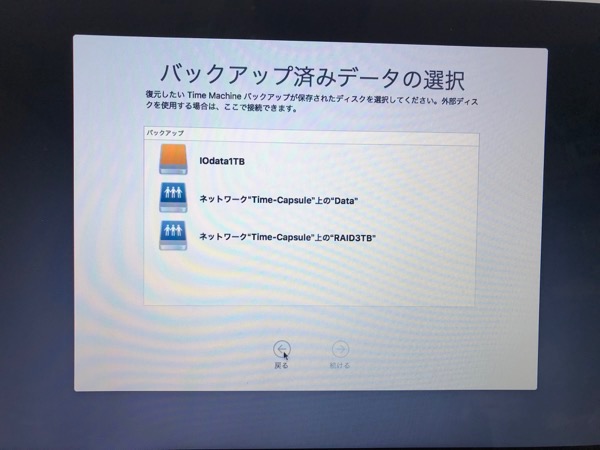
「バックアップ済みのデータ」の画面が表示されてから,Time Machineのバックアップ先のストレージ,今回は約3年前に購入したカクうす HDPX-UTA1.0KというUSB-HDDを接続する.
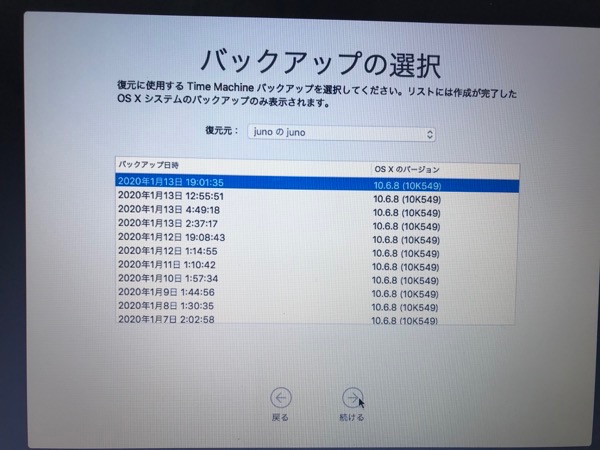
ありがたいことに,直前までバックアップされていた模様.Time Machineが二年半も動いてなかった実績もあったのでヒヤヒヤです.
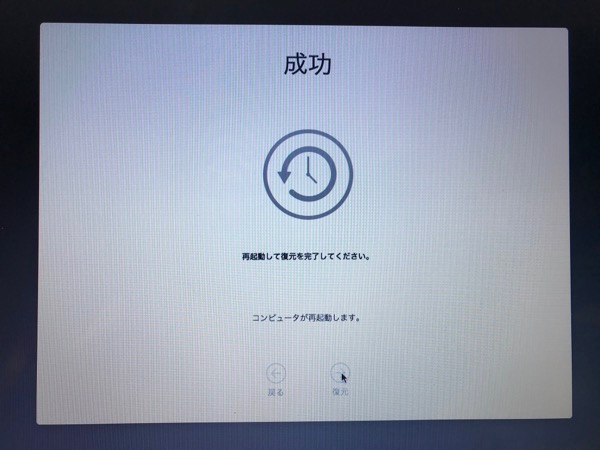
そして84GBほどのデータは1時間半弱でリストア完了.
被害は,少量のアクセスログと,2本のブログ記事がなくなりました.
使っているのはMacBook 2008 lateモデルなので,SSDもバッテリも取り外しやすいモデルでよかった...
CPU Usageのグラフ
ということで,OSを再起動してみた.
するとどうでしょう...起動してこなくなった.
こんな時のために,10年前の2009年に購入したこのサーバには予備機が準備してあって,SSDを取り外して2号機に取り付けて起動.しかし残念ながらこれも起動してこない.
起動しなかったSSDを,別のMacに接続してみた.すると次のようなメッセージが.
「ディスク上のファイルは開いたりコピーしたりすることができますが変更は保存することはできません」というメッセージ.
ディスクユーティリティでFirst Aidしてみる.
残念ながら失敗.File System check exit code is 8と出ていて,これはファイルシステムが壊れているという意味で,フォーマットしか修復する方法は無い模様.
ということで,Time Machineからのフルリストアを実施.
リストア先は元の1号機だけれど,2号機から取り外したSSDが入っているのでストレージの名前がPlutoになっている.
「バックアップ済みのデータ」の画面が表示されてから,Time Machineのバックアップ先のストレージ,今回は約3年前に購入したカクうす HDPX-UTA1.0KというUSB-HDDを接続する.
ありがたいことに,直前までバックアップされていた模様.Time Machineが二年半も動いてなかった実績もあったのでヒヤヒヤです.
そして84GBほどのデータは1時間半弱でリストア完了.
被害は,少量のアクセスログと,2本のブログ記事がなくなりました.
使っているのはMacBook 2008 lateモデルなので,SSDもバッテリも取り外しやすいモデルでよかった...
土曜日の朝にHDDをSSDに入れ替えて見たのだけれど目に見える変化があったのか?ということで,MRTGで取っているサーバシステムリソースから,特徴的な部分を抜き出して見た.
まずは,CPU Usageを.
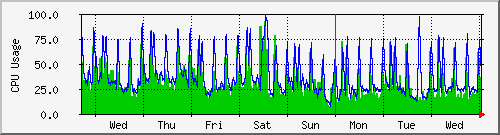
SSDによってI/Oが高速になったので,CPU負荷が下がるのではないか?という予想があったのだけれど,残念ながら変化なしという感じ.
次に,WebサーバなのでhttpdのプロセスがCPUを利用している時間をグラフ化したもの.
これがどんと減った.つまり,I/Oが速いことで高速に処理できるようになったので,CPUを占有しなくなったということ.
そして,じんわりと効いているのがこれ.
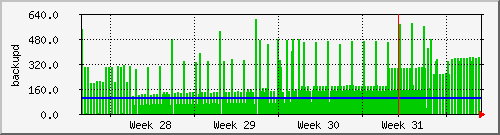
macOSのサーバなので,バックアップはTime Machineを使って取っているけえど,その実際のエンジンのbackupdが利用するCPU時間を示すもの.
backupdは1時間程度ごとに動作して,必要に応じてバックアップを取るのだけれど,その処理時間が長いとグラフに出てくるが,SSDに交換してからは,すいている感じに見える.
利用していてもサーバは速いはずなんだけれど,総合サーバになっているのと,なんせ10年以上前(MacBook 2008年モデル)なので,CPU性能なども低いので,そんなに体感できるほどの高速化は無いかな.
それよりは,11年使ったHDDが故障する前に交換できたことの方がメリットが大きい.
まずは,CPU Usageを.
SSDによってI/Oが高速になったので,CPU負荷が下がるのではないか?という予想があったのだけれど,残念ながら変化なしという感じ.
次に,WebサーバなのでhttpdのプロセスがCPUを利用している時間をグラフ化したもの.
これがどんと減った.つまり,I/Oが速いことで高速に処理できるようになったので,CPUを占有しなくなったということ.
そして,じんわりと効いているのがこれ.
macOSのサーバなので,バックアップはTime Machineを使って取っているけえど,その実際のエンジンのbackupdが利用するCPU時間を示すもの.
backupdは1時間程度ごとに動作して,必要に応じてバックアップを取るのだけれど,その処理時間が長いとグラフに出てくるが,SSDに交換してからは,すいている感じに見える.
利用していてもサーバは速いはずなんだけれど,総合サーバになっているのと,なんせ10年以上前(MacBook 2008年モデル)なので,CPU性能なども低いので,そんなに体感できるほどの高速化は無いかな.
それよりは,11年使ったHDDが故障する前に交換できたことの方がメリットが大きい.
MacBook 2008 Lateに付属していたHDDを,ウエスタンデジタルのSSD 500GB 3D NANOにクローンしました.
使用したのはガチャベイというUSB接続のHDDドックも兼ねている製品です.
複製自体は以前1回やっているのですが,今回はエラーが出たのでその記録がてらに.
元のHDDにセクタエラーがあったようで,25%のゲージのところが高速に点滅していますが,一応,その後クロンを取ることができて問題なく動いているように思います.
ただし,元のHDDが130GBでしたが,500GBのSSDにクローンすると,クローン先も130GBになりました.
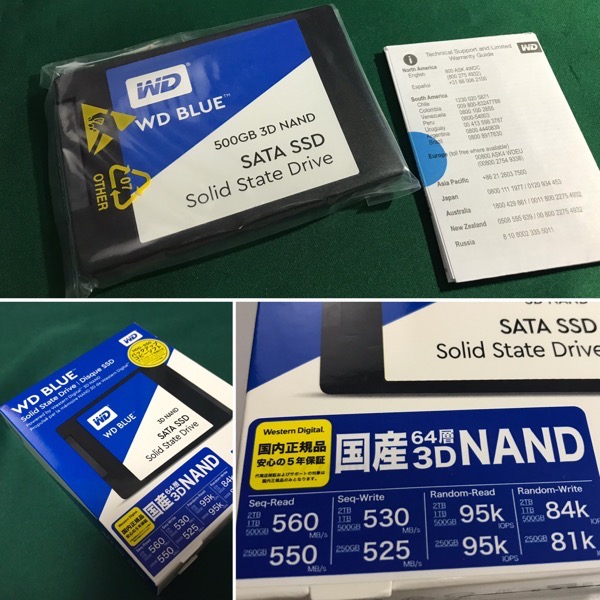
もったいないけれど,まぁ今回は我慢するかな.
使用したのはガチャベイというUSB接続のHDDドックも兼ねている製品です.
複製自体は以前1回やっているのですが,今回はエラーが出たのでその記録がてらに.
元のHDDにセクタエラーがあったようで,25%のゲージのところが高速に点滅していますが,一応,その後クロンを取ることができて問題なく動いているように思います.
ただし,元のHDDが130GBでしたが,500GBのSSDにクローンすると,クローン先も130GBになりました.
もったいないけれど,まぁ今回は我慢するかな.
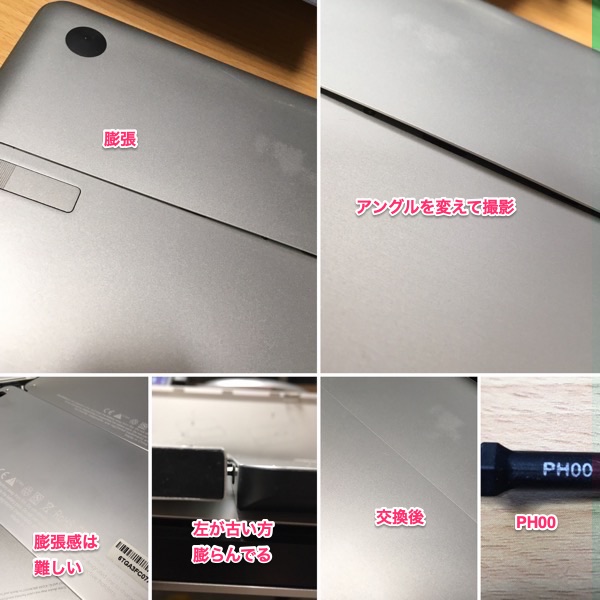
2009年10月に整備調整品を購入したMacBook 2008 Lateですが,もう一台,予備用に買っていたMacBookからバッテリを移植して今日まで動き続けてきました.
予備のMacbookには,ロワジャパンで買ったバッテリを2013年6月に装着しているようだから,使用期間は次の通り.
・2009年10月から2013年6月なので3年8ヶ月
・2013年6月から2019年8月までなので6年と2ヶ月
純正バッテリで同じようにサーバ運用していても,このように違いがあるのか...
そして今回,ロワジャパンは最近評判を落としているようで,アマゾンのワールドプラスというところでバッテリを購入しました.A1280というやつで5390円(税別)
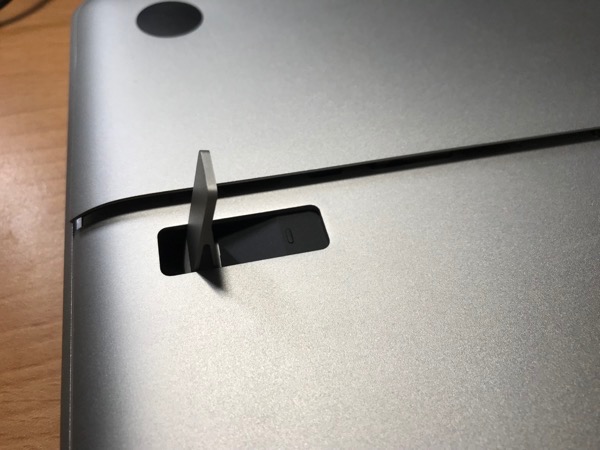
まずはMacBook 2008 lateの開腹.裏面にひっくり返してノッチを立てる.
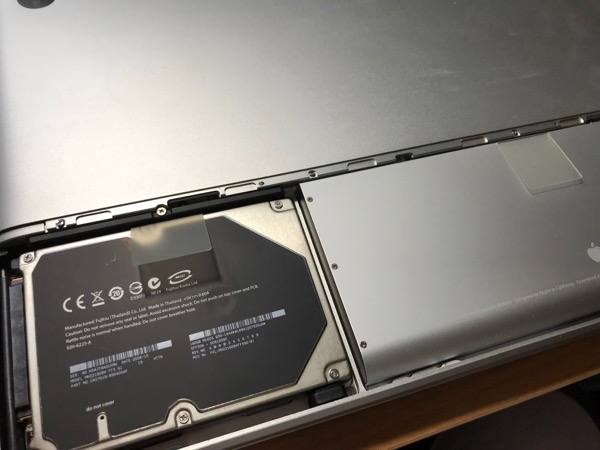
それだけでバッテリとハードディスクにアクセスできます.
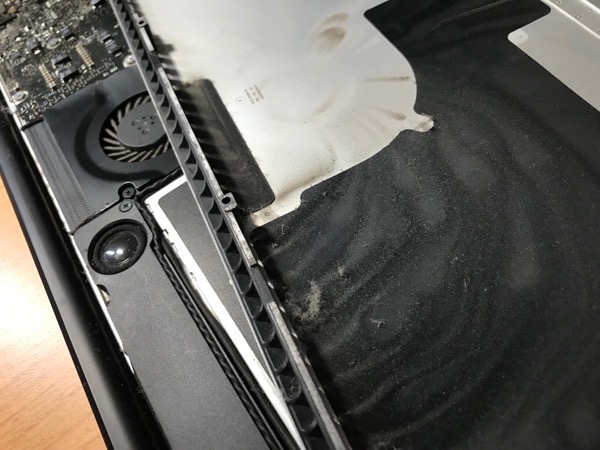
今回,6年2ヶ月ぶりなのでファンあたりの清掃をしようと裏蓋も開腹.PH00ドライバが必要です.清掃はエアーでバババッと野外で吹き飛ばして終了.少し無水エタノールで拭き掃除.
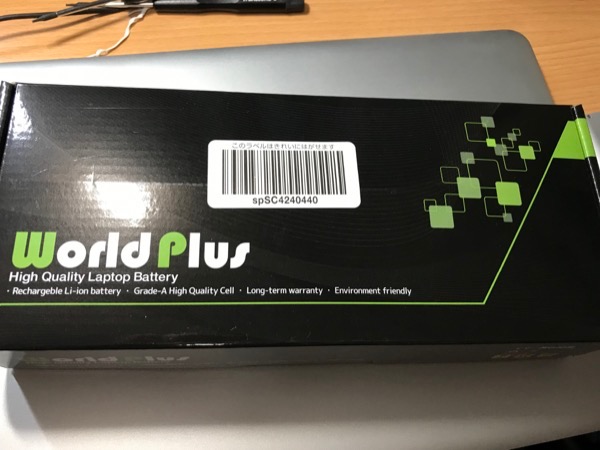
今回購入したバッテリのWorld Plusの箱.
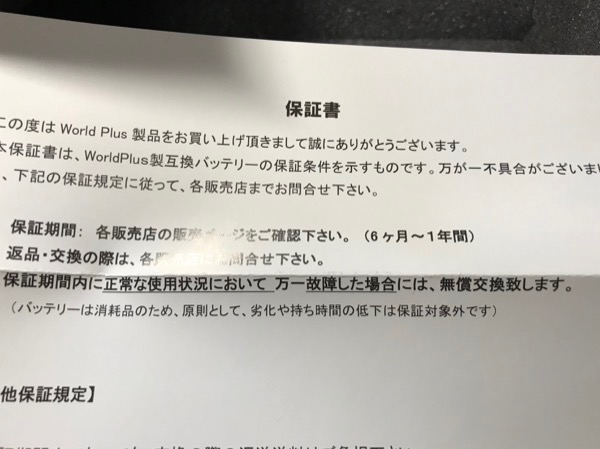
保証は6ヶ月〜1年と書かれています.今回購入したものは,アマゾンでは1年保証付きと記載されていました.
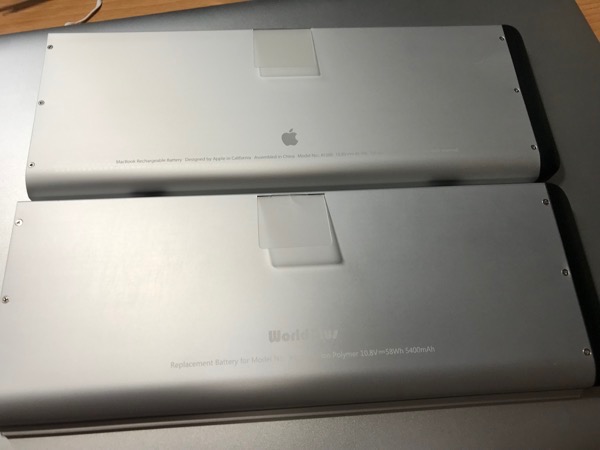
純正のバッテリとWorld Plusのバッテリを並べて確認.遠目にはわからないくらい外観もそっくり.
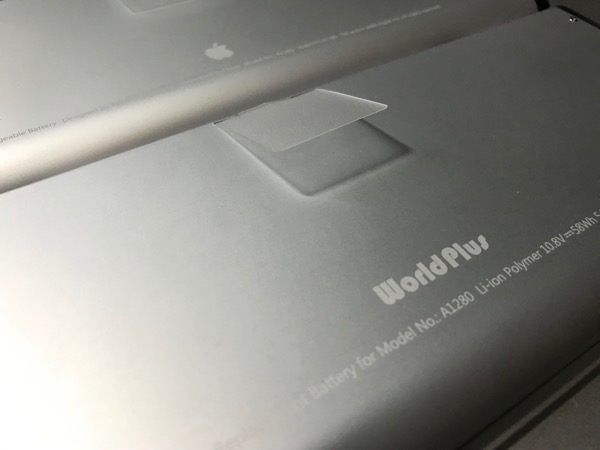
アップルのロゴがあるかどうかでわかりますかね.
そして,バッテリの情報を取得して見た.
MaxCapacityが5603なのだが,DesignCapacityは5400となっている.設計より容量は大きいようだ.
"Cycle Count"=1となっているが,これは今後もそんなに増えないのだろうと思う.付けっ放しなので.
予備のMacbookには,ロワジャパンで買ったバッテリを2013年6月に装着しているようだから,使用期間は次の通り.
・2009年10月から2013年6月なので3年8ヶ月
・2013年6月から2019年8月までなので6年と2ヶ月
純正バッテリで同じようにサーバ運用していても,このように違いがあるのか...
そして今回,ロワジャパンは最近評判を落としているようで,アマゾンのワールドプラスというところでバッテリを購入しました.A1280というやつで5390円(税別)
まずはMacBook 2008 lateの開腹.裏面にひっくり返してノッチを立てる.
それだけでバッテリとハードディスクにアクセスできます.
今回,6年2ヶ月ぶりなのでファンあたりの清掃をしようと裏蓋も開腹.PH00ドライバが必要です.清掃はエアーでバババッと野外で吹き飛ばして終了.少し無水エタノールで拭き掃除.
今回購入したバッテリのWorld Plusの箱.
保証は6ヶ月〜1年と書かれています.今回購入したものは,アマゾンでは1年保証付きと記載されていました.
純正のバッテリとWorld Plusのバッテリを並べて確認.遠目にはわからないくらい外観もそっくり.
アップルのロゴがあるかどうかでわかりますかね.
そして,バッテリの情報を取得して見た.
ujp:~ mars$  ioreg -l | grep Capacity🆑
    | |           "MaxCapacity" = 5603
    | |           "CurrentCapacity" = 5603
    | |           "LegacyBatteryInfo" = {"Amperage"=0,"Flags"=5,"Capacity"=5603,
"Current"=5603,"Voltage"=12574,"Cycle Count"=1}
    | |           "DesignCapacity" = 5400
ujp:~ mars$
"Cycle Count"=1となっているが,これは今後もそんなに増えないのだろうと思う.付けっ放しなので.
(1号機) Time Machineでバックアップエラーを見つけた・・・
- ブロガー :
- ujpblog 2019/6/13 0:54
今回はずいぶん呑気な話.そして偶然にも助かった件.
Time Machineを使ってバックアップを設定しているサーバに,前のハードディスクが壊れたので,新しくカクうす HDPX-UTA1.0Kという外付けHDDを交換したのが2017年2月8日.なので2年4ヶ月ほど前.そこからだ.
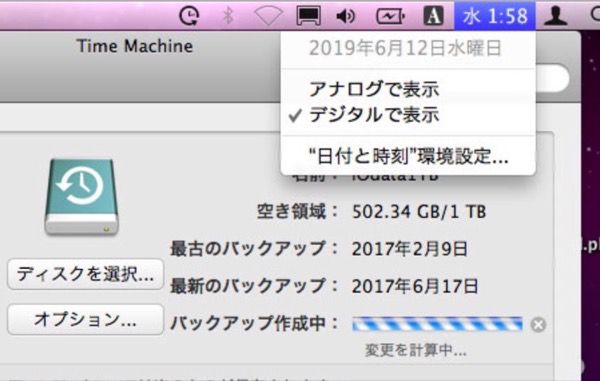 ]
]
4ヶ月は動いていたようだけれど,その後2年間,バックアップができていなかった.問題は,mdsというSpotlightの全文検索インデックス作成の失敗.
Time Machineはそのバックアップ先のストレージ空き容量は監視していたけれど,こうなると最終バックアップの実行日時を取得して,止まっているようだったらアラートをあげる的な仕組みが必要かな.
Time Machineを使ってバックアップを設定しているサーバに,前のハードディスクが壊れたので,新しくカクうす HDPX-UTA1.0Kという外付けHDDを交換したのが2017年2月8日.なので2年4ヶ月ほど前.そこからだ.
]4ヶ月は動いていたようだけれど,その後2年間,バックアップができていなかった.問題は,mdsというSpotlightの全文検索インデックス作成の失敗.
Time Machineはそのバックアップ先のストレージ空き容量は監視していたけれど,こうなると最終バックアップの実行日時を取得して,止まっているようだったらアラートをあげる的な仕組みが必要かな.
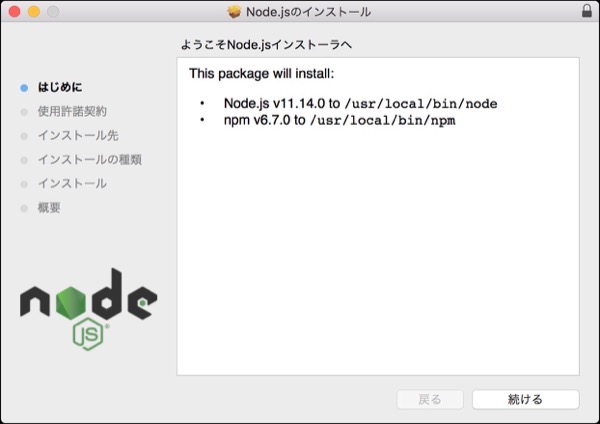
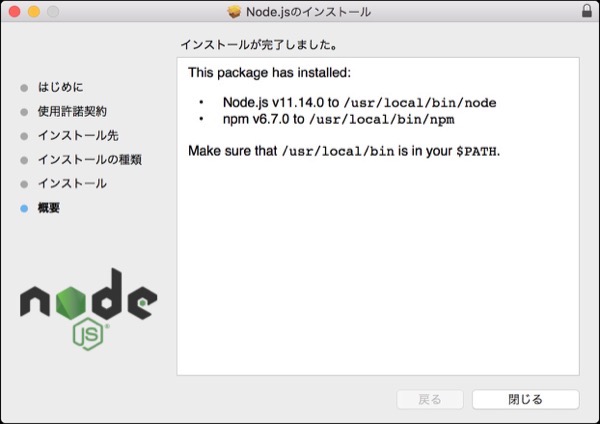
静的コンテンツ生成ツールで,以前HUGOを試して見たけれど,今回はHexo(ヘクソ)を試して見る.名前が,声に出して言いにくいなぁ...
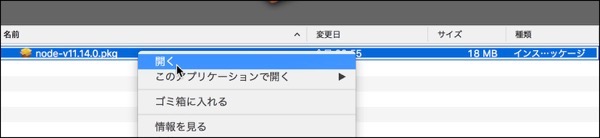
まずは,最初にnode.jsのバージョンを確認.
npmを使って,インストールを実施.
権限不足らしい.sudoで実行.
まだまだエラー出ているなぁ...
unsafe-permオプションをつける.
問題なくインストール完了した模様.
ちなみに,最初からsudoのunsafe-permオプションつけて実行したものがこちら.
軽くワーニング出ているけど,まぁいいか.
まずは,最初にnode.jsのバージョンを確認.
$ node -v🆑
v11.14.0
$ npm -v🆑
6.7.0
$
$ npm install hexo-cli -g🆑
npm WARN checkPermissions Missing write access to /usr/local/lib/node_modules
npm ERR! path /usr/local/lib/node_modules
npm ERR! code EACCES
npm ERR! errno -13
npm ERR! syscall access
npm ERR! Error: EACCES: permission denied🈁, access '/usr/local/lib/node_modules'
npm ERR!  { [Error: EACCES: permission denied, access '/usr/local/lib/node_modules']
npm ERR!   stack:
npm ERR!    "Error: EACCES: permission denied, access '/usr/local/lib/node_modules'",
npm ERR!   errno: -13,
npm ERR!   code: 'EACCES',
npm ERR!   syscall: 'access',
npm ERR!   path: '/usr/local/lib/node_modules' }
npm ERR!
npm ERR! The operation was rejected by your operating system.
npm ERR! It is likely you do not have the permissions to access this file as
 the current user
npm ERR!
npm ERR! If you believe this might be a permissions issue, please
 double-check the
npm ERR! permissions of the file and its containing directories, or try running
npm ERR! the command again as root/Administrator (though this is not recommended).

npm ERR! A complete log of this run can be found in:
npm ERR!     /Users/server/.npm/_logs/2019-04-18T15_06_08_043Z-debug.log
$
$ sudo npm install hexo-cli -g🆑

WARNING: Improper use of the sudo command could lead to data loss
or the deletion of important system files. Please double-check your
typing when using sudo. Type "man sudo" for more information.

To proceed, enter your password, or type Ctrl-C to abort.

Password:
/usr/local/bin/hexo -> /usr/local/lib/node_modules/hexo-cli/bin/hexo

> fsevents@1.2.8 install /usr/local/lib/node_modules/hexo-cli/node_modules/fsevents
> node install

node-pre-gyp WARN Using needle for node-pre-gyp https download
node-pre-gyp WARN Pre-built binaries not installable for fsevents@1.2.8 and node@11.14.0
 (node-v67 ABI, unknown) (falling back to source compile with node-gyp)
node-pre-gyp WARN Hit error EACCES: permission denied,
 mkdir '/usr/local/lib/node_modules/hexo-cli/node_modules/fsevents/lib'
gyp WARN EACCES user "root" does not have permission to access the dev dir
 "/Users/server/.node-gyp/11.14.0"
gyp WARN EACCES attempting to reinstall using temporary dev dir
 "/usr/local/lib/node_modules/hexo-cli/node_modules/fsevents/.node-gyp"
gyp WARN install got an error, rolling back install
gyp WARN install got an error, rolling back install
gyp ERR! configure error
gyp ERR! stack Error: EACCES: permission denied, mkdir
 '/usr/local/lib/node_modules/hexo-cli/node_modules/fsevents/.node-gyp'
gyp ERR! System Darwin 15.6.0
gyp ERR! command "/usr/local/bin/node"
 "/usr/local/lib/node_modules/npm/node_modules/node-gyp/bin/node-gyp.js"
 "configure" "--fallback-to-build"
 "--module=/usr/local/lib/node_modules/hexo-cli/node_modules/fsevents
/lib/binding/Release/node-v67-darwin-x64/fse.node"
 "--module_name=fse" "--module_path=/usr/local/lib/node_modules/hexo-cli
/node_modules/fsevents/lib/binding/Release/node-v67-darwin-x64"
 "--napi_version=4" "--node_abi_napi=napi" "--napi_build_version=0"
 "--node_napi_label=node-v67"
gyp ERR! cwd /usr/local/lib/node_modules/hexo-cli/node_modules/fsevents
gyp ERR! node -v v11.14.0
gyp ERR! node-gyp -v v3.8.0
gyp ERR! not ok
node-pre-gyp ERR! build error
node-pre-gyp ERR! stack Error: Failed to execute '/usr/local/bin/node
 /usr/local/lib/node_modules/npm/node_modules/node-gyp/bin/node-gyp.js
 configure --fallback-to-build
 --module=/usr/local/lib/node_modules/hexo-cli/node_modules/fsevents
/lib/binding/Release/node-v67-darwin-x64/fse.node --module_name=fse
 --module_path=/usr/local/lib/node_modules/hexo-cli/node_modules/fsevents
/lib/binding/Release/node-v67-darwin-x64 --napi_version=4
 --node_abi_napi=napi --napi_build_version=0
 --node_napi_label=node-v67' (1)
node-pre-gyp ERR! stack     at ChildProcess.<anonymous>
 (/usr/local/lib/node_modules/hexo-cli/node_modules
/fsevents/node_modules/node-pre-gyp/lib/util/compile.js:83:29)
node-pre-gyp ERR! stack     at ChildProcess.emit (events.js:193:13)
node-pre-gyp ERR! stack     at maybeClose (internal/child_process.js:999:16)
node-pre-gyp ERR! stack     at Process.ChildProcess._handle.onexit
 (internal/child_process.js:266:5)
node-pre-gyp ERR! System Darwin 15.6.0
node-pre-gyp ERR! command "/usr/local/bin/node"
 "/usr/local/lib/node_modules/hexo-cli/node_modules/fsevents
/node_modules/node-pre-gyp/bin/node-pre-gyp" "install"
 "--fallback-to-build"
node-pre-gyp ERR! cwd /usr/local/lib/node_modules/hexo-cli/node_modules/fsevents
node-pre-gyp ERR! node -v v11.14.0
node-pre-gyp ERR! node-pre-gyp -v v0.12.0
node-pre-gyp ERR! not ok
Failed to execute '/usr/local/bin/node /usr/local/lib/node_modules/npm
/node_modules/node-gyp/bin/node-gyp.js
 configure --fallback-to-build --module=/usr/local/lib/node_modules
/hexo-cli/node_modules/fsevents/lib/binding/Release
/node-v67-darwin-x64/fse.node --module_name=fse
 --module_path=/usr/local/lib/node_modules/hexo-cli/node_modules
/fsevents/lib/binding/Release/node-v67-darwin-x64 --napi_version=4
 --node_abi_napi=napi --napi_build_version=0
 --node_napi_label=node-v67' (1)
npm WARN optional SKIPPING OPTIONAL DEPENDENCY: fsevents@1.2.8
 (node_modules/hexo-cli/node_modules/fsevents):
npm WARN optional SKIPPING OPTIONAL DEPENDENCY: fsevents@1.2.8
 install: `node install`
npm WARN optional SKIPPING OPTIONAL DEPENDENCY: Exit status 1

+ hexo-cli@1.1.0
added 225 packages from 434 contributors in 11.876s
$
unsafe-permオプションをつける.
$ sudo npm install hexo-cli -g --unsafe-perm🆑
/usr/local/bin/hexo -> /usr/local/lib/node_modules/hexo-cli/bin/hexo

> fsevents@1.2.8 install /usr/local/lib/node_modules/hexo-cli/node_modules/fsevents
> node install

node-pre-gyp WARN Using needle for node-pre-gyp https download
[fsevents] Success: "/usr/local/lib/node_modules
/hexo-cli/node_modules/fsevents/lib/binding/Release
/node-v67-darwin-x64/fse.node" is installed via remote
+ hexo-cli@1.1.0
added 68 packages from 33 contributors and updated 1 package in 6.508s
$
ちなみに,最初からsudoのunsafe-permオプションつけて実行したものがこちら.
$ sudo npm install hexo-cli -g --unsafe-perm🆑
Password:🆑
/usr/local/bin/hexo -> /usr/local/lib/node_modules/hexo-cli/bin/hexo

> fsevents@1.2.8 install /usr/local/lib/node_modules/hexo-cli/node_modules/fsevents
> node install

node-pre-gyp WARN Using needle for node-pre-gyp https download
[fsevents] Success: "/usr/local/lib/node_modules/hexo-cli/node_modules
/fsevents/lib/binding/Release/node-v67-darwin-x64
/fse.node" is installed via remote
+ hexo-cli@1.1.0
added 293 packages from 458 contributors in 11.245s
$

やりすぎだと思うは,この世界.SLコマンドあたりから相当な発展?が行われているようだ.
cowsayのポケモン版があるというので.流石に?Brewには入ってなかったので,Githubからクローンしてインストール.
無事クローンできたので,インストール.
/usr/local/binじゃなくて,ユーザのローカルに入るのね.ご利用に注意ってことかなぁ.
そして実行して見る.
おおおお.ランダムか.
英語でスペルを知っていれば,-pオプションで指定できるそうだ...
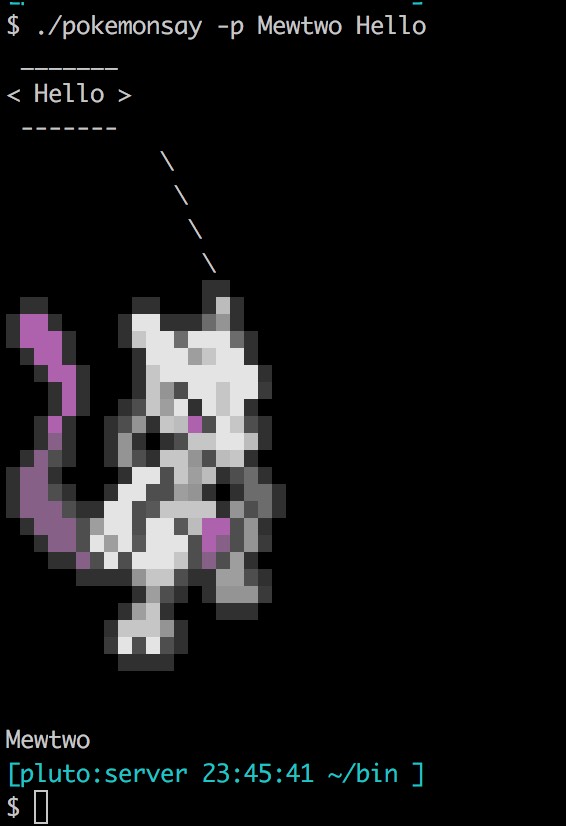
cowsayのポケモン版があるというので.流石に?Brewには入ってなかったので,Githubからクローンしてインストール.
$ git clone http://github.com/possatti/pokemonsay🆑
Cloning into 'pokemonsay'...
warning: redirecting to https://github.com/possatti/pokemonsay/
remote: Enumerating objects: 423, done.
remote: Total 423 (delta 0), reused 0 (delta 0), pack-reused 423
Receiving objects: 100% (423/423), 257.11 KiB | 87.00 KiB/s, done.
Resolving deltas: 100% (358/358), done.
$
$ cd pokemonsay🆑
$ ./install.sh🆑
The files were installed to '/Users/server/.pokemonsay/'.
A 'pokemonsay' script was created in '/Users/server/bin/'.
A uninstall script was created in '/Users/server/.pokemonsay/'.
It may be necessary to logout and login back again in order to have the
 'pokemonsay' available in your path.
$
そして実行して見る.
$ ~/bin/pokemonsay Hello🆑
 _______
< Hello >
 -------
           \
            \
             \
              \
   ▄▄▄▄▄▄▄▄
 ▄▄
 ▄▄▄ ▄▄▄
 ▀▄▄▄▄▄▄▄▄▄▀
▄▄▄▄▄▄▄▄▄▄▄▀
▀▄▄▄▄▄▄▄▄▄
   ▄▄▄▄
   ▀▄▄▄ ▄▀
     ▀▄▄▀

Kakuna
$ ~/bin/pokemonsay Hello🆑
 _______
< Hello >
 -------
           \
            \
             \
              \
             ▄▄▄
            ▄▄ ▄▄▄
     ▄▄▄       ▄▄▀
   ▄▄  ▄▄▄▄▄▄▄▄▄▀
    ▄ ▄▄▄▄ ▄▄▄  ▄▄
     ▄▄▄▄   ▄    ▄▄
  ▄▄▄▄▄▄▄▄▄▄▄  ▄▄▄▄▄
▄▄▄▄▄▄▄▄▄▄▄▄▄  ▄  ▄▀
 ▀▀▀  ▄▄▄▄▄▄ ▄   ▄ ▄▄
          ▄▄▄▄▄▄▄▀
     ▀▄▄▄▄ ▄▀▀   ▄▄▄▀
       ▀▀ ▀▀     ▀▄▀

Magikarp
$
英語でスペルを知っていれば,-pオプションで指定できるそうだ...
いいのを教えてもらった第2弾.これは実用的ではない,とおもうけど.
まずは,どんなものか確認.
これもサクッとHomeBrewでインストール.
実行して見る.

んー,動いてないと寂しい...海上や海中に時より特殊生物やイベントが発生したりして,意外と目が離せないよ.
まずは,どんなものか確認.
$ brew info asciiquarium🆑
asciiquarium: stable 1.1 (bottled)
Aquarium animation in ASCII art
https://robobunny.com/projects/asciiquarium/html/
Not installed
From: https://github.com/Homebrew/homebrew-core/blob/master/Formula/asciiquarium.rb
==> Analytics
install: 203 (30 days), 628 (90 days), 2,189 (365 days)
install_on_request: 201 (30 days), 626 (90 days), 2,166 (365 days)
build_error: 0 (30 days)
$
$ brew install asciiquarium🆑
Warning: You are using macOS 10.11.
We (and Apple) do not provide support for this old version.
You will encounter build failures with some formulae.
Please create pull requests instead of asking for help on Homebrew's GitHub,
Discourse, Twitter or IRC. You are responsible for resolving any issues you
experience, as you are running this old version.

==> Downloading https://homebrew.bintray.com
/bottles/asciiquarium-1.1_1.el_capitan.bottle.tar.gz
######################################################################## 100.0%
==> Pouring asciiquarium-1.1_1.el_capitan.bottle.tar.gz
🍺  /usr/local/Cellar/asciiquarium/1.1_1: 17 files, 369.2KB
$
んー,動いてないと寂しい...海上や海中に時より特殊生物やイベントが発生したりして,意外と目が離せないよ.
いいのを教えてもらった.このツール.
brewに対応しているのでサクッとインストール.
パスを確認して.
早速使って見る.
昔,いや今もbannerコマンドというのがあって,こういうアスキーアートをログイン前画面に出していたりしたけれど,現在の?bannerコマンドだと横断幕印刷用みたいな感じになってしまう.
$ brew info figlet🆑
figlet: stable 2.2.5 (bottled)
Banner-like program prints strings as ASCII art
http://www.figlet.org/
Not installed
From: https://github.com/Homebrew/homebrew-core/blob/master/Formula/figlet.rb
==> Analytics
install: 1,327 (30 days), 4,256 (90 days), 13,780 (365 days)
install_on_request: 1,317 (30 days), 4,237 (90 days), 13,732 (365 days)
build_error: 0 (30 days)
$
$ brew install figlet🆑
Updating Homebrew...
==> Auto-updated Homebrew!

〜略〜

==> Downloading https://homebrew.bintray.com/bottles/figlet-2.2.5.el_capitan.bottle.tar.gz
==> Downloading from https://akamai.bintray.com/94/943067dae95de58518b20334aec4
01cf5fd24866ff77315c0d7bd8b5d4ab0011?__gda__=exp=1555597549~hm
######################################################################## 100.0%
==> Pouring figlet-2.2.5.el_capitan.bottle.tar.gz
🍺  /usr/local/Cellar/figlet/2.2.5: 676 files, 9.4MB
$
$ which figlet🆑
/usr/local/bin/figlet🈁
$
$ figlet Hello🆑
 _   _      _ _
| | | | ___| | | ___
| |_| |/ _ \ | |/ _ \
|  _  |  __/ | | (_) |
|_| |_|\___|_|_|\___/

$
$ /usr/local/bin/figlet `hostname`🆑
       _       _         _                 _
 _ __ | |_   _| |_ ___  | | ___   ___ __ _| |
| '_ \| | | | | __/ _ \ | |/ _ \ / __/ _` | |
| |_) | | |_| | || (_) || | (_) | (_| (_| | |
| .__/|_|\__,_|\__\___(_)_|\___/ \___\__,_|_|
|_|
$
(2号機) Cake/Core/Object.php on line 18 Fatal Error Error: Cannot use 'object' as class name as it is reserved in
- ブロガー :
- ujpblog 2019/4/18 1:07
NetCommons3をインストルしようとしたのだけれど,エラーが.
これはNetCommons3が使っているフレームワーク,CakePHP2のクラス名が重複してしまっているからだそうです.
これは,次のファイルを編集.
この変更.
インストールをリトライしてみる.
いくつかワーニングは出ているけれど,インストールはできた模様.
$ cd /netcommons/htdocs/app/Console🆑
$ ./cake install.install🆑
---------------------------------------------------------------
NetCommons Install
---------------------------------------------------------------
[S]tart
[H]elp
[Q]uit
What would you like to do? (S/H/Q)
[Q] > S🆑
Please entry base url.
> netcommons.test.jp🆑
Current language? (en/ja)
[ja] > ja🆑
Success: PHP(7.2.17) 正常
Success: pdo_mysql(7.2.17) 正常
Database configuration's datasource? (Mysql)
[Mysql] >🆑
Database configuration's host?
[localhost] >🆑
Database configuration's port?
[3306] >🆑
Database configuration's database?
[nc3] >🆑
Database configuration's prefix?
[] >🆑
Database configuration's login?
> root🆑
Database configuration's password?
> password🆑
2019-04-14 14:35:29 Info: DB Connected
2019-04-14 14:35:29 Info: Database nc3 for Database/Mysql created successfully
2019-04-14 14:35:29 Info: [Migrations.migration] Start migrating all plugins
2019-04-14 14:35:29 Info: [migration] Start migrating "Files" for master connection
2019-04-14 14:35:29 Info: [migration]   cd /netcommons/htdocs/app &&
 Console/cake Migrations.migration run all -p Files -c master -i master 2>&1
2019-04-14 14:35:30 Info: [migration]   Cake Migration Shell
2019-04-14 14:35:30 Info: [migration]   -------------------------------------------
--------------------
2019-04-14 14:35:30 Info: [migration]   PHP Fatal error:
  Cannot use 'object' as class name as it is reserved in
 /netcommons/htdocs/vendors/cakephp/cakephp/lib/Cake/Core/Object.php on line 18
2019-04-14 14:35:30 Info: [migration]   Fatal Error Error: Cannot use 'object'
 as class name as it is reserved in [/netcommons/htdocs/vendors/cakephp/cakephp/lib/Cake/Core/Object.php, line 18]
2019-04-14 14:35:30 Info: [migration]
2019-04-14 14:35:30 Info: [migration]   2019-04-14 14:35:30 Error: Cannot use
 'object' as class name as it is reserved in [/netcommons/htdocs/vendors/cakephp/cakephp/lib/Cake/Core/Object.php, line 18]
2019-04-14 14:35:30 Info: [migration]
2019-04-14 14:35:30 Info: [migration] Failure migrated "Files" for master connection
2019-04-14 14:35:30 Info: [migration] Start migrating "Users" for master connection

〜略〜

2019-04-14 14:35:42 Info: [migration]
   2019-04-14 14:35:42 Error: Cannot use 'object' as class name as it is reserved in
 [/netcommons/htdocs/vendors/cakephp/cakephp/lib/Cake/Core/Object.php, line 18]
2019-04-14 14:35:42 Info: [migration]
2019-04-14 14:35:42 Info: [migration] Failure migrated "Wysiwyg" for master connection
Error: SQLSTATE[42S02]: Base table or view not found: 1146 Table
 'nc3.site_settings' doesn't exist
#0
/netcommons/htdocs/vendors/cakephp/cakephp/lib/Cake/Model/Datasource/DboSource.php(502):
 PDOStatement->execute(Array)
#1 /netcommons/htdocs/vendors/cakephp/cakephp/lib/Cake/Model/Datasource/Database/Mysql.php
(348): DboSource->_execute('SHOW FULL COLUM...')
#2 /netcommons/htdocs/vendors/cakephp/cakephp/lib/Cake/Model/Model.php(1397):
 Mysql->describe(Object(SiteSetting))
#3 /netcommons/htdocs/vendors/cakephp/cakephp/lib/Cake/Model/Datasource/DboSource.php(2199):
 Model->schema()
#4 /netcommons/htdocs/vendors/cakephp/cakephp/lib/Cake/Model/Datasource/Database/Mysql.php
(409): DboSource->_prepareUpdateFields(Object(SiteSetting), Array, false, true)
#5 /netcommons/htdocs/vendors/cakephp/cakephp/lib/Cake/Model/Model.php(2672):
 Mysql->update(Object(SiteSetting), Array, NULL, Array)
#6 /netcommons/htdocs/app/Plugin/Install/Utility/InstallUtil.php(616):
 Model->updateAll(Array, Array)
#7 /netcommons/htdocs/app/Plugin/Install/Console/Command/Task/InstallMigrationsTask.php(48):
 InstallUtil->installMigrations('master', Array)
#8 /netcommons/htdocs/app/Plugin/Install/Console/Command/InstallShell.php(90):
 InstallMigrationsTask->execute()
#9 /netcommons/htdocs/vendors/cakephp/cakephp/lib/Cake/Console/Shell.php(462):
 InstallShell->main()
#10
/netcommons/htdocs/vendors/cakephp/cakephp/lib/Cake/Console/ShellDispatcher.php(219):
 Shell->runCommand(NULL, Array)
#11
/netcommons/htdocs/vendors/cakephp/cakephp/lib/Cake/Console/ShellDispatcher.php(66):
 ShellDispatcher->dispatch()
#12 /netcommons/htdocs/app/Console/cake.php(35): ShellDispatcher::run(Array)
#13 {main}
$
app/Plugin/Migrations/Lib/CakeMigration.php
  1 <?php
  2 /**
  3  * Copyright 2009 - 2014, Cake Development Corporation (http://cakedc.com)
  4  *
  5  * Licensed under The MIT License
  6  * Redistributions of files must retain the above copyright notice.
  7  *
  8  * @copyright Copyright 2009 - 2014, Cake Development Corporation (http://cakedc.com)
  9  * @license MIT License (http://www.opensource.org/licenses/mit-license.php)
 10  */
 11
 12 App::uses('CakeSchema', 'Model');
 13
 14 /**
 15  * Base Class for Migration management
 16  */
 17 class CakeMigration extends CakeObject { 🈁 ObjectからCakeObjectに変更した
 18
 19 /**
2019-04-15 13:37:19 Info: [bower] Successfully bower install angular-nvd3#>=0.1.1 for Registrations
2019-04-15 13:37:19 Info: [bower] Start bower install visualcaptcha.jquery#>=0.0.5 for VisualCaptcha
sh: --allow-root: command not found
<?php
2019-04-15 13:37:19 Info: [bower] Successfully bower install visualcaptcha.jquery#>=0.0.5 for VisualCaptcha
2019-04-15 13:37:19 Info: [bower] Start bower install components/MathJax#>=2.6 for Wysiwyg
sh: --allow-root: command not found
2019-04-15 13:37:19 Info: [bower] Successfully bower install components/MathJax#>=2.6 for Wysiwyg
2019-04-15 13:37:19 Info: [bower] Start bower install jquery.simplePagination#* for Wysiwyg
sh: --allow-root: command not found
2019-04-15 13:37:19 Info: [bower] Successfully bower install jquery.simplePagination#* for Wysiwyg
NetCommons Login id?
> administrator🆑
NetCommons Login password?
> password🆑
Actival languages? (en,ja/en/ja)
[ja] > ja🆑
<?php
Warning Error: get_class() expects parameter 1 to be object, null given in
 [/netcommons/htdocs/app/Plugin/Auth/Model/AutoUserRegistMail.php, line 54]

2019-04-15 13:38:32 Warning: get_class() expects parameter 1 to be object, null given in
 [/netcommons/htdocs/app/Plugin/Auth/Model/AutoUserRegistMail.php, line 54]
Install success.
$
(2号機) PHP Warning: PHP Startup: Unable to load dynamic library 'imagick' tried: /usr/local/lib/php/pecl/20170718/imagick
- ブロガー :
- ujpblog 2019/4/14 23:51
NetCommons3をインストールしようとたら,次のようなエラーがでた.
ImageMagickはHomeBrewでインストールしたはずなのだが.
インストール済みを確認.ライブラリを検索.
入ってない.
PHPの拡張ライブラリ管理ツールのpeclを使って,インストールする.
自動検出なので,空でエンタキーを押下.
コンパイルできた模様.
ファイルを確認.
ありました.PHP.INIも変更したと書いてあるので,確認.
再度実行してみる.
エラーが出なくなった.これで先に進めるかなぁ.
$ ./cake install.install🆑
PHP Warning:  PHP Startup: Unable to load dynamic library 'imagick'
 (tried: /usr/local/lib/php/pecl/20170718/imagick
 (dlopen(/usr/local/lib/php/pecl/20170718/imagick, 9): image not found),
 /usr/local/lib/php/pecl/20170718/imagick.so
 (dlopen(/usr/local/lib/php/pecl/20170718/imagick.so, 9): image not found))
 in Unknown on line 0

Warning: PHP Startup: Unable to load dynamic library 'imagick'
 (tried: /usr/local/lib/php/pecl/20170718/imagick
 (dlopen(/usr/local/lib/php/pecl/20170718/imagick, 9): image not found),
 /usr/local/lib/php/pecl/20170718/imagick.so
 (dlopen(/usr/local/lib/php/pecl/20170718/imagick.so, 9): image not found))
 in Unknown on line 0
---------------------------------------------------------------
NetCommons Install
---------------------------------------------------------------
[S]tart
[H]elp
[Q]uit
What would you like to do? (S/H/Q)
[Q] >
$ brew info imagemagick🆑
imagemagick: stable 7.0.8-35, HEAD
Tools and libraries to manipulate images in many formats
https://www.imagemagick.org/
/usr/local/Cellar/imagemagick/7.0.8-35 (1,477 files, 23.7MB) *
  Built from source on 2019-04-10 at 01:52:17
From: https://github.com/Homebrew/homebrew-core/blob/master/Formula/imagemagick.rb
==> Dependencies
Build: pkg-config ✔
Required: freetype ✔, jpeg ✔, libheif ✔, libomp ✔, libpng ✔,
 libtiff ✔, libtool ✔, little-cms2 ✔, openexr ✔, openjpeg ✔,
 webp ✔, xz ✔
==> Options
--HEAD
	Install HEAD version
==> Analytics
install: 100,125 (30 days), 339,156 (90 days), 1,337,647 (365 days)
install_on_request: 70,180 (30 days), 237,303 (90 days), 891,786 (365 days)
build_error: 0 (30 days)
$
$ find /usr/local/Cellar/ |grep imagick.so🆑
$
PHPの拡張ライブラリ管理ツールのpeclを使って,インストールする.
$ pecl install imagick🆑
PHP Warning:  PHP Startup: Unable to load dynamic library 'imagick'
 (tried: /usr/local/lib/php/pecl/20170718/imagick
 (dlopen(/usr/local/lib/php/pecl/20170718/imagick, 9):
 image not found), /usr/local/lib/php/pecl/20170718/imagick.so
 (dlopen(/usr/local/lib/php/pecl/20170718/imagick.so, 9):
 image not found)) in Unknown on line 0

Warning: PHP Startup: Unable to load dynamic library 'imagick'
 (tried: /usr/local/lib/php/pecl/20170718/imagick
 (dlopen(/usr/local/lib/php/pecl/20170718/imagick, 9):
 image not found), /usr/local/lib/php/pecl/20170718/imagick.so
 (dlopen(/usr/local/lib/php/pecl/20170718/imagick.so, 9):
 image not found)) in Unknown on line 0
downloading imagick-3.4.3.tgz ...
Starting to download imagick-3.4.3.tgz (245,410 bytes)
...................................................done: 245,410 bytes
19 source files, building

Warning: preg_match(): Unknown modifier '7' in Builder.php on line 310
PHP Warning:  preg_match(): Unknown modifier '7'
 in /usr/local/Cellar/php@7.2/7.2.17/share/php@7.2/pear/PEAR/Builder.php on line 310

Warning: preg_match(): Unknown modifier '7' in
 /usr/local/Cellar/php@7.2/7.2.17/share/php@7.2/pear/PEAR/Builder.php on line 310
running: phpize
Configuring for:
PHP Api Version:         20170718
Zend Module Api No:      20170718
Zend Extension Api No:   320170718
Please provide the prefix of Imagemagick installation [autodetect] :🈁
自動検出なので,空でエンタキーを押下.
Please provide the prefix of Imagemagick installation [autodetect] :🆑
building in /private/tmp/pear/temp/pear-build-serverbmLHSj/imagick-3.4.3
running: /private/tmp/pear/temp/imagick/configure
 --with-php-config=/usr/local/opt/php@7.2/bin/php-config --with-imagick
checking for grep that handles long lines and -e... /usr/bin/grep
checking for egrep... /usr/bin/grep -E
checking for a sed that does not truncate output... /usr/local/opt/gnu-sed/libexec/gnubin/sed
checking for cc... cc
checking whether the C compiler works... yes
checking for C compiler default output file name... a.out
checking for suffix of executables...
checking whether we are cross compiling... no
checking for suffix of object files... o
checking whether we are using the GNU C compiler... yes
checking whether cc accepts -g... yes
checking for cc option to accept ISO C89... none needed
checking how to run the C preprocessor... cc -E
checking for icc... no
checking for suncc... no
checking whether cc understands -c and -o together... yes
checking for system library directory... lib
checking if compiler supports -R... no
checking if compiler supports -Wl,-rpath,... yes
checking build system type... x86_64-apple-darwin15.6.0
checking host system type... x86_64-apple-darwin15.6.0
checking target system type... x86_64-apple-darwin15.6.0
checking for PHP prefix... /usr/local/Cellar/php@7.2/7.2.17
checking for PHP includes... -I/usr/local/Cellar/php@7.2/7.2.17/include/php
 -I/usr/local/Cellar/php@7.2/7.2.17/include/php/main
 -I/usr/local/Cellar/php@7.2/7.2.17/include/php/TSRM
 -I/usr/local/Cellar/php@7.2/7.2.17/include/php/Zend
 -I/usr/local/Cellar/php@7.2/7.2.17/include/php/ext
 -I/usr/local/Cellar/php@7.2/7.2.17/include/php/ext/date/lib
checking for PHP extension directory... /usr/local/Cellar/php@7.2/7.2.17/pecl/20170718
checking for PHP installed headers prefix... /usr/local/Cellar/php@7.2/7.2.17/include/php
checking if debug is enabled... no
checking if zts is enabled... no
checking for re2c... no
configure: WARNING: You will need re2c 0.13.4 or later if you want to regenerate PHP parsers.
checking for gawk... no
checking for nawk... no
checking for awk... awk
checking if awk is broken... no
checking whether to enable the imagick extension... yes, shared
checking for pkg-config... /usr/local/bin/pkg-config
checking ImageMagick MagickWand API configuration program...
 checking Testing /usr/local/bin/MagickWand-config... It exists
found in /usr/local/bin/MagickWand-config
checking if ImageMagick version is at least 6.2.4... found version 7.0.8 Q16 HDRI
checking for MagickWand.h or magick-wand.h header...
 /usr/local/Cellar/imagemagick/7.0.8-35/include/ImageMagick-7/MagickWand/MagickWand.h
checking PHP version is at least 5.1.3... yes. found 7.2.17
libs
-L/usr/local/Cellar/imagemagick/7.0.8-35/lib -lMagickWand-7.Q16HDRI -lMagickCore-7.Q16HDRI


checking for MagickGetVersion... yes
checking for MagickSetImageInterpolateMethod... yes
checking for ld used by cc... /Library/Developer/CommandLineTools/usr/bin/ld
checking if the linker (/Library/Developer/CommandLineTools/usr/bin/ld) is GNU ld... no
checking for /Library/Developer/CommandLineTools/usr/bin/ld option to reload object files... -r
checking for BSD-compatible nm... /usr/bin/nm -B
checking whether ln -s works... yes
checking how to recognize dependent libraries... pass_all
checking for ANSI C header files... yes
checking for sys/types.h... yes
checking for sys/stat.h... yes
checking for stdlib.h... yes
checking for string.h... yes
checking for memory.h... yes
checking for strings.h... yes
checking for inttypes.h... yes
checking for stdint.h... yes
checking for unistd.h... yes
checking dlfcn.h usability... yes
checking dlfcn.h presence... yes
checking for dlfcn.h... yes
checking the maximum length of command line arguments... 196608
checking command to parse /usr/bin/nm -B output from cc object... ok
checking for objdir... .libs
checking for ar... ar
checking for ranlib... ranlib
checking for strip... strip
checking for dsymutil... dsymutil
checking for nmedit... nmedit
checking for -single_module linker flag... yes
checking for -exported_symbols_list linker flag... yes
checking if cc supports -fno-rtti -fno-exceptions... yes
checking for cc option to produce PIC... -fno-common
checking if cc PIC flag -fno-common works... yes
checking if cc static flag -static works... no
checking if cc supports -c -o file.o... yes
checking whether the cc linker (/Library/Developer/CommandLineTools/usr/bin/ld)
 supports shared libraries... yes
checking dynamic linker characteristics... darwin15.6.0 dyld
checking how to hardcode library paths into programs... immediate
checking whether stripping libraries is possible... yes
checking if libtool supports shared libraries... yes
checking whether to build shared libraries... yes
checking whether to build static libraries... no

creating libtool
appending configuration tag "CXX" to libtool
configure: creating ./config.status
config.status: creating config.h
running: make
/bin/sh /private/tmp/pear/temp/pear-build-serverbmLHSj/imagick-3.4.3/libtool
 --mode=compile cc -Xpreprocessor -fopenmp -DMAGICKCORE_HDRI_ENABLE=1
 -DMAGICKCORE_QUANTUM_DEPTH=16 -Xpreprocessor -fopenmp -DMAGICKCORE_HDRI_ENABLE=1
 -DMAGICKCORE_QUANTUM_DEPTH=16 -I/usr/local/Cellar/imagemagick/7.0.8-35/include/ImageMagick-7 -I.
 -I/private/tmp/pear/temp/imagick -DPHP_ATOM_INC
 -I/private/tmp/pear/temp/pear-build-serverbmLHSj/imagick-3.4.3/include
 -I/private/tmp/pear/temp/pear-build-serverbmLHSj/imagick-3.4.3/main

 -I/private/tmp/pear/temp/imagick
 -I/usr/local/Cellar/php@7.2/7.2.17/include/php
 -I/usr/local/Cellar/php@7.2/7.2.17/include/php/main
 -I/usr/local/Cellar/php@7.2/7.2.17/include/php/TSRM
 -I/usr/local/Cellar/php@7.2/7.2.17/include/php/Zend
 -I/usr/local/Cellar/php@7.2/7.2.17/include/php/ext
 -I/usr/local/Cellar/php@7.2/7.2.17/include/php/ext/date/lib
 -I/usr/local/Cellar/imagemagick/7.0.8-35/include/ImageMagick-7  -DHAVE_CONFIG_H
  -g -O2   -c /private/tmp/pear/temp/imagick/imagick_file.c -o imagick_file.lo
mkdir .libs
 cc -Xpreprocessor -fopenmp -DMAGICKCORE_HDRI_ENABLE=1 -DMAGICKCORE_QUANTUM_DEPTH=16
 -Xpreprocessor -fopenmp -DMAGICKCORE_HDRI_ENABLE=1 -DMAGICKCORE_QUANTUM_DEPTH=16
 -I/usr/local/Cellar/imagemagick/7.0.8-35/include/ImageMagick-7
 -I.
 -I/private/tmp/pear/temp/imagick -DPHP_ATOM_INC
 -I/private/tmp/pear/temp/pear-build-serverbmLHSj/imagick-3.4.3/include
 -I/private/tmp/pear/temp/pear-build-serverbmLHSj/imagick-3.4.3/main
 -I/private/tmp/pear/temp/imagick
 -I/usr/local/Cellar/php@7.2/7.2.17/include/php
 -I/usr/local/Cellar/php@7.2/7.2.17/include/php/main
 -I/usr/local/Cellar/php@7.2/7.2.17/include/php/TSRM
 -I/usr/local/Cellar/php@7.2/7.2.17/include/php/Zend
 -I/usr/local/Cellar/php@7.2/7.2.17/include/php/ext
 -I/usr/local/Cellar/php@7.2/7.2.17/include/php/ext/date/lib
 -I/usr/local/Cellar/imagemagick/7.0.8-35/include/ImageMagick-7 -DHAVE_CONFIG_H
 -g -O2 -c /private/tmp/pear/temp/imagick/imagick_file.c  -fno-common -DPIC
 -o .libs/imagick_file.o
/bin/sh /private/tmp/pear/temp/pear-build-serverbmLHSj/imagick-3.4.3/libtool
 --mode=compile cc -Xpreprocessor -fopenmp -DMAGICKCORE_HDRI_ENABLE=1
 -DMAGICKCORE_QUANTUM_DEPTH=16 -Xpreprocessor -fopenmp -DMAGICKCORE_HDRI_ENABLE=1
 -DMAGICKCORE_QUANTUM_DEPTH=16
 -I/usr/local/Cellar/imagemagick/7.0.8-35/include/ImageMagick-7
 -I.
 -I/private/tmp/pear/temp/imagick -DPHP_ATOM_INC
 -I/private/tmp/pear/temp/pear-build-serverbmLHSj/imagick-3.4.3/include
 -I/private/tmp/pear/temp/pear-build-serverbmLHSj/imagick-3.4.3/main
 -I/private/tmp/pear/temp/imagick
 -I/usr/local/Cellar/php@7.2/7.2.17/include/php
 -I/usr/local/Cellar/php@7.2/7.2.17/include/php/main
 -I/usr/local/Cellar/php@7.2/7.2.17/include/php/TSRM
 -I/usr/local/Cellar/php@7.2/7.2.17/include/php/Zend
 -I/usr/local/Cellar/php@7.2/7.2.17/include/php/ext
 -I/usr/local/Cellar/php@7.2/7.2.17/include/php/ext/date/lib
 -I/usr/local/Cellar/imagemagick/7.0.8-35/include/ImageMagick-7  -DHAVE_CONFIG_H
  -g -O2   -c /private/tmp/pear/temp/imagick/imagick_class.c -o imagick_class.lo
 cc -Xpreprocessor -fopenmp -DMAGICKCORE_HDRI_ENABLE=1 -DMAGICKCORE_QUANTUM_DEPTH=16
 -Xpreprocessor -fopenmp -DMAGICKCORE_HDRI_ENABLE=1 -DMAGICKCORE_QUANTUM_DEPTH=16
 -I/usr/local/Cellar/imagemagick/7.0.8-35/include/ImageMagick-7
 -I.
 -I/private/tmp/pear/temp/imagick -DPHP_ATOM_INC
 -I/private/tmp/pear/temp/pear-build-serverbmLHSj/imagick-3.4.3/include
 -I/private/tmp/pear/temp/pear-build-serverbmLHSj/imagick-3.4.3/main
 -I/private/tmp/pear/temp/imagick
 -I/usr/local/Cellar/php@7.2/7.2.17/include/php
 -I/usr/local/Cellar/php@7.2/7.2.17/include/php/main
 -I/usr/local/Cellar/php@7.2/7.2.17/include/php/TSRM
 -I/usr/local/Cellar/php@7.2/7.2.17/include/php/Zend
 -I/usr/local/Cellar/php@7.2/7.2.17/include/php/ext
 -I/usr/local/Cellar/php@7.2/7.2.17/include/php/ext/date/lib
 -I/usr/local/Cellar/imagemagick/7.0.8-35/include/ImageMagick-7 -DHAVE_CONFIG_H -g
 -O2 -c /private/tmp/pear/temp/imagick/imagick_class.c  -fno-common -DPIC -o .libs/imagick_class.o
/private/tmp/pear/temp/imagick/imagick_class.c:2436:56: warning: incompatible
 pointer types passing 'zend_long *' (aka 'long long *') to parameter of type
 'long *' [-Wincompatible-pointer-types]
                        long_array = php_imagick_zval_to_long_array(pixels, &num_elements TSRMLS_CC);
                                                                            ^~~~~~~~~~~~~
/private/tmp/pear/temp/imagick/php_imagick_helpers.h:33:63: note: passing argument
 to parameter 'num_elements' here
long *php_imagick_zval_to_long_array(zval *param_array, long *num_elements TSRMLS_DC);
                                                              ^
/private/tmp/pear/temp/imagick/imagick_class.c:2446:56: warning: incompatible pointer
 types passing 'zend_long *' (aka 'long long *') to parameter of type 'long *'
 [-Wincompatible-pointer-types]
                        char_array = php_imagick_zval_to_char_array(pixels, &num_elements TSRMLS_CC);
                                                                            ^~~~~~~~~~~~~
/private/tmp/pear/temp/imagick/php_imagick_helpers.h:35:72: note: passing argument to parameter
 'num_elements' here
unsigned char *php_imagick_zval_to_char_array(zval *param_array, long *num_elements TSRMLS_DC);
                                                                       ^
/private/tmp/pear/temp/imagick/imagick_class.c:7731:79: warning: incompatible pointer
 types passing 'long *' to parameter of type 'zend_long *' (aka 'long long *')
 [-Wincompatible-pointer-types]
        if (!php_imagick_thumbnail_dimensions(magick_wand, 1, box_width, box_height,
 &new_width, &new_height, legacy)) {
                                                                                     ^~~~~~~~~~
/private/tmp/pear/temp/imagick/php_imagick_helpers.h:27:144: note: passing argument
 to parameter 'new_width' here
zend_bool php_imagick_thumbnail_dimensions(MagickWand *magick_wand, zend_bool bestfit,
 im_long desired_width, im_long desired_height, im_long *new_width, im_long *new_height,
 zend_bool legacy);
 ^
/private/tmp/pear/temp/imagick/imagick_class.c:7731:91: warning: incompatible pointer
 types passing 'long *' to parameter of type 'zend_long *' (aka 'long long *')
 [-Wincompatible-pointer-types]
        if (!php_imagick_thumbnail_dimensions(magick_wand, 1, box_width, box_height,
 &new_width, &new_height, legacy)) {

			  ^~~~~~~~~~~
/private/tmp/pear/temp/imagick/php_imagick_helpers.h:27:164: note: passing argument
 to parameter 'new_height' here
zend_bool php_imagick_thumbnail_dimensions(MagickWand *magick_wand, zend_bool bestfit,
 im_long desired_width, im_long desired_height, im_long *new_width, im_long *new_height,
 zend_bool legacy);
/private/tmp/pear/temp/imagick/imagick_class.c:8510:14: warning: address of array
 'trim->val' will always evaluate to 'true' [-Wpointer-bool-conversion]
                        if (trim->val) {
                        ~~  ~~~~~~^~~
5 warnings generated.
/bin/sh /private/tmp/pear/temp/pear-build-serverbmLHSj/imagick-3.4.3/libtool
--mode=compile cc -Xpreprocessor -fopenmp -DMAGICKCORE_HDRI_ENABLE=1
 -DMAGICKCORE_QUANTUM_DEPTH=16 -Xpreprocessor -fopenmp -DMAGICKCORE_HDRI_ENABLE=1
 -DMAGICKCORE_QUANTUM_DEPTH=16 -I/usr/local/Cellar/imagemagick/7.0.8-35/include/ImageMagick-7
 -I. -I/private/tmp/pear/temp/imagick -DPHP_ATOM_INC
 -I/private/tmp/pear/temp/pear-build-serverbmLHSj/imagick-3.4.3/include
 -I/private/tmp/pear/temp/pear-build-serverbmLHSj/imagick-3.4.3/main
 -I/private/tmp/pear/temp/imagick -I/usr/local/Cellar/php@7.2/7.2.17/include/php
 -I/usr/local/Cellar/php@7.2/7.2.17/include/php/main
 -I/usr/local/Cellar/php@7.2/7.2.17/include/php/TSRM
 -I/usr/local/Cellar/php@7.2/7.2.17/include/php/Zend
 -I/usr/local/Cellar/php@7.2/7.2.17/include/php/ext
 -I/usr/local/Cellar/php@7.2/7.2.17/include/php/ext/date/lib
 -I/usr/local/Cellar/imagemagick/7.0.8-35/include/ImageMagick-7
 -DHAVE_CONFIG_H  -g -O2   -c /private/tmp/pear/temp/imagick/imagickdraw_class.c
 -o imagickdraw_class.
lo
 cc -Xpreprocessor -fopenmp -DMAGICKCORE_HDRI_ENABLE=1
 -DMAGICKCORE_QUANTUM_DEPTH=16 -Xpreprocessor -fopenmp -DMAGICKCORE_HDRI_ENABLE=1
 -DMAGICKCORE_QUANTUM_DEPTH=16 -I/usr/local/Cellar/imagemagick/7.0.8-35/include/ImageMagick-7
 -I. -I/private/tmp/pear/temp/imagick -DPHP_ATOM_INC
 -I/private/tmp/pear/temp/pear-build-serverbmLHSj/imagick-3.4.3/include
 -I/private/tmp/pear/temp/pear-build-serverbmLHSj/imagick-3.4.3/main
 -I/private/tmp/pear/temp/imagick -I/usr/local/Cellar/php@7.2/7.2.17/include/php
 -I/usr/local/Cellar/php@7.2/7.2.17/include/php/main
 -I/usr/local/Cellar/php@7.2/7.2.17/include/php/TSRM
 -I/usr/local/Cellar/php@7.2/7.2.17/include/php/Zend
 -I/usr/local/Cellar/php@7.2/7.2.17/include/php/ext
 -I/usr/local/Cellar/php@7.2/7.2.17/include/php/ext/date/lib
 -I/usr/local/Cellar/imagemagick/7.0.8-35/include/ImageMagick-7 -DHAVE_CONFIG_H
 -g -O2 -c /private/tmp/pear/temp/imagick/imagickdraw_class.c  -fno-common -DPIC
 -o .libs/imagickdraw_class.o
/bin/sh /private/tmp/pear/temp/pear-build-serverbmLHSj/imagick-3.4.3/libtool
 --mode=compile cc -Xpreprocessor -fopenmp -DMAGICKCORE_HDRI_ENABLE=1
 -DMAGICKCORE_QUANTUM_DEPTH=16 -Xpreprocessor -fopenmp -DMAGICKCORE_HDRI_ENABLE=1 -DMAGICKCORE_QUANTUM_DEPTH=16
 -I/usr/local/Cellar/imagemagick/7.0.8-35/include/ImageMagick-7
 -I.
 -I/private/tmp/pear/temp/imagick -DPHP_ATOM_INC
 -I/private/tmp/pear/temp/pear-build-serverbmLHSj/imagick-3.4.3/include
 -I/private/tmp/pear/temp/pear-build-serverbmLHSj/imagick-3.4.3/main
 -I/private/tmp/pear/temp/imagick
 -I/usr/local/Cellar/php@7.2/7.2.17/include/php
 -I/usr/local/Cellar/php@7.2/7.2.17/include/php/main
 -I/usr/local/Cellar/php@7.2/7.2.17/include/php/TSRM
 -I/usr/local/Cellar/php@7.2/7.2.17/include/php/Zend
 -I/usr/local/Cellar/php@7.2/7.2.17/include/php/ext
 -I/usr/local/Cellar/php@7.2/7.2.17/include/php/ext/date/lib
 -I/usr/local/Cellar/imagemagick/7.0.8-35/include/ImageMagick-7  -DHAVE_CONFIG_H
  -g -O2   -c /private/tmp/pear/temp/imagick/imagickpixel_class.c -o imagickpixel_clas
s.lo
 cc -Xpreprocessor -fopenmp -DMAGICKCORE_HDRI_ENABLE=1 -DMAGICKCORE_QUANTUM_DEPTH=16
 -Xpreprocessor -fopenmp -DMAGICKCORE_HDRI_ENABLE=1 -DMAGICKCORE_QUANTUM_DEPTH=16
 -I/usr/local/Cellar/imagemagick/7.0.8-35/include/ImageMagick-7
 -I.
 -I/private/tmp/pear/temp/imagick -DPHP_ATOM_INC
 -I/private/tmp/pear/temp/pear-build-serverbmLHSj/imagick-3.4.3/include
 -I/private/tmp/pear/temp/pear-build-serverbmLHSj/imagick-3.4.3/main
 -I/private/tmp/pear/temp/imagick
 -I/usr/local/Cellar/php@7.2/7.2.17/include/php
 -I/usr/local/Cellar/php@7.2/7.2.17/include/php/main
 -I/usr/local/Cellar/php@7.2/7.2.17/include/php/TSRM
 -I/usr/local/Cellar/php@7.2/7.2.17/include/php/Zend
 -I/usr/local/Cellar/php@7.2/7.2.17/include/php/ext
 -I/usr/local/Cellar/php@7.2/7.2.17/include/php/ext/date/lib
 -I/usr/local/Cellar/imagemagick/7.0.8-35/include/ImageMagick-7 -DHAVE_CONFIG_H
 -g -O2 -c /private/tmp/pear/temp/imagick/imagickpixel_class.c  -fno-common -DPIC
 -o .libs/imagickpixel_class.o
/bin/sh /private/tmp/pear/temp/pear-build-serverbmLHSj/imagick-3.4.3/libtool
 --mode=compile cc -Xpreprocessor -fopenmp -DMAGICKCORE_HDRI_ENABLE=1
 -DMAGICKCORE_QUANTUM_DEPTH=16 -Xpreprocessor -fopenmp -DMAGICKCORE_HDRI_ENABLE=1
 -DMAGICKCORE_QUANTUM_DEPTH=16
 -I/usr/local/Cellar/imagemagick/7.0.8-35/include/ImageMagick-7
 -I.
 -I/private/tmp/pear/temp/imagick -DPHP_ATOM_INC
 -I/private/tmp/pear/temp/pear-build-serverbmLHSj/imagick-3.4.3/include
 -I/private/tmp/pear/temp/pear-build-serverbmLHSj/imagick-3.4.3/main
 -I/private/tmp/pear/temp/imagick
 -I/usr/local/Cellar/php@7.2/7.2.17/include/php
 -I/usr/local/Cellar/php@7.2/7.2.17/include/php/main
 -I/usr/local/Cellar/php@7.2/7.2.17/include/php/TSRM
 -I/usr/local/Cellar/php@7.2/7.2.17/include/php/Zend
 -I/usr/local/Cellar/php@7.2/7.2.17/include/php/ext
 -I/usr/local/Cellar/php@7.2/7.2.17/include/php/ext/date/lib
 -I/usr/local/Cellar/imagemagick/7.0.8-35/include/ImageMagick-7  -DHAVE_CONFIG_H
  -g -O2   -c /private/tmp/pear/temp/imagick/imagickpixeliterator_class.c -o imagickpi
xeliterator_class.lo
 cc -Xpreprocessor -fopenmp -DMAGICKCORE_HDRI_ENABLE=1 -DMAGICKCORE_QUANTUM_DEPTH=16
 -Xpreprocessor -fopenmp -DMAGICKCORE_HDRI_ENABLE=1 -DMAGICKCORE_QUANTUM_DEPTH=16
 -I/usr/local/Cellar/imagemagick/7.0.8-35/include/ImageMagick-7
 -I.
 -I/private/tmp/pear/temp/imagick -DPHP_ATOM_INC
 -I/private/tmp/pear/temp/pear-build-serverbmLHSj/imagick-3.4.3/include
 -I/private/tmp/pear/temp/pear-build-serverbmLHSj/imagick-3.4.3/main
 -I/private/tmp/pear/temp/imagick
 -I/usr/local/Cellar/php@7.2/7.2.17/include/php
 -I/usr/local/Cellar/php@7.2/7.2.17/include/php/main
 -I/usr/local/Cellar/php@7.2/7.2.17/include/php/TSRM
 -I/usr/local/Cellar/php@7.2/7.2.17/include/php/Zend
 -I/usr/local/Cellar/php@7.2/7.2.17/include/php/ext
 -I/usr/local/Cellar/php@7.2/7.2.17/include/php/ext/date/lib
 -I/usr/local/Cellar/imagemagick/7.0.8-35/include/ImageMagick-7 -DHAVE_CONFIG_H
 -g -O2 -c /private/tmp/pear/temp/imagick/imagickpixeliterator_class.c
  -fno-common -DPIC -o .libs/imagickpixeliterator_class.o
/bin/sh /private/tmp/pear/temp/pear-build-serverbmLHSj/imagick-3.4.3/libtool
 --mode=compile cc -Xpreprocessor -fopenmp -DMAGICKCORE_HDRI_ENABLE=1
 -DMAGICKCORE_QUANTUM_DEPTH=16 -Xpreprocessor -fopenmp -DMAGICKCORE_HDRI_ENABLE=1
 -DMAGICKCORE_QUANTUM_DEPTH=16
 -I/usr/local/Cellar/imagemagick/7.0.8-35/include/ImageMagick-7
 -I.
 -I/private/tmp/pear/temp/imagick -DPHP_ATOM_INC
 -I/private/tmp/pear/temp/pear-build-serverbmLHSj/imagick-3.4.3/include
 -I/private/tmp/pear/temp/pear-build-serverbmLHSj/imagick-3.4.3/main
 -I/private/tmp/pear/temp/imagick
 -I/usr/local/Cellar/php@7.2/7.2.17/include/php
 -I/usr/local/Cellar/php@7.2/7.2.17/include/php/main
 -I/usr/local/Cellar/php@7.2/7.2.17/include/php/TSRM
 -I/usr/local/Cellar/php@7.2/7.2.17/include/php/Zend
 -I/usr/local/Cellar/php@7.2/7.2.17/include/php/ext
 -I/usr/local/Cellar/php@7.2/7.2.17/include/php/ext/date/lib
 -I/usr/local/Cellar/imagemagick/7.0.8-35/include/ImageMagick-7  -DHAVE_CONFIG_H
  -g -O2   -c /private/tmp/pear/temp/imagick/imagick_helpers.c -o imagick_helpers.lo
 cc -Xpreprocessor -fopenmp -DMAGICKCORE_HDRI_ENABLE=1 -DMAGICKCORE_QUANTUM_DEPTH=16
 -Xpreprocessor -fopenmp -DMAGICKCORE_HDRI_ENABLE=1 -DMAGICKCORE_QUANTUM_DEPTH=16
 -I/usr/local/Cellar/imagemagick/7.0.8-35/include/ImageMagick-7
 -I.
 -I/private/tmp/pear/temp/imagick -DPHP_ATOM_INC
 -I/private/tmp/pear/temp/pear-build-serverbmLHSj/imagick-3.4.3/include
 -I/private/tmp/pear/temp/pear-build-serverbmLHSj/imagick-3.4.3/main
 -I/private/tmp/pear/temp/imagick
 -I/usr/local/Cellar/php@7.2/7.2.17/include/php
 -I/usr/local/Cellar/php@7.2/7.2.17/include/php/main
 -I/usr/local/Cellar/php@7.2/7.2.17/include/php/TSRM
 -I/usr/local/Cellar/php@7.2/7.2.17/include/php/Zend
 -I/usr/local/Cellar/php@7.2/7.2.17/include/php/ext
 -I/usr/local/Cellar/php@7.2/7.2.17/include/php/ext/date/lib
 -I/usr/local/Cellar/imagemagick/7.0.8-35/include/ImageMagick-7 -DHAVE_CONFIG_H
 -g -O2 -c /private/tmp/pear/temp/imagick/imagick_helpers.c  -fno-common -DPI
 C -o .libs/imagick_helpers.o
/bin/sh /private/tmp/pear/temp/pear-build-serverbmLHSj/imagick-3.4.3/libtool
 --mode=compile cc -Xpreprocessor -fopenmp -DMAGICKCORE_HDRI_ENABLE=1
 -DMAGICKCORE_QUANTUM_DEPTH=16 -Xpreprocessor -fopenmp -DMAGICKCORE_HDRI_ENABLE=1
 -DMAGICKCORE_QUANTUM_DEPTH=16
 -I/usr/local/Cellar/imagemagick/7.0.8-35/include/ImageMagick-7
 -I.
 -I/private/tmp/pear/temp/imagick -DPHP_ATOM_INC
 -I/private/tmp/pear/temp/pear-build-serverbmLHSj/imagick-3.4.3/include
 -I/private/tmp/pear/temp/pear-build-serverbmLHSj/imagick-3.4.3/main
 -I/private/tmp/pear/temp/imagick
 -I/usr/local/Cellar/php@7.2/7.2.17/include/php
 -I/usr/local/Cellar/php@7.2/7.2.17/include/php/main
 -I/usr/local/Cellar/php@7.2/7.2.17/include/php/TSRM
 -I/usr/local/Cellar/php@7.2/7.2.17/include/php/Zend
 -I/usr/local/Cellar/php@7.2/7.2.17/include/php/ext
 -I/usr/local/Cellar/php@7.2/7.2.17/include/php/ext/date/lib
 -I/usr/local/Cellar/imagemagick/7.0.8-35/include/ImageMagick-7
  -DHAVE_CONFIG_H  -g -O2   -c /private/tmp/pear/temp/imagick/imagick.c -o imagick.lo
 cc -Xpreprocessor -fopenmp -DMAGICKCORE_HDRI_ENABLE=1 -DMAGICKCORE_QUANTUM_DEPTH=16
 -Xpreprocessor -fopenmp -DMAGICKCORE_HDRI_ENABLE=1 -DMAGICKCORE_QUANTUM_DEPTH=16
 -I/usr/local/Cellar/imagemagick/7.0.8-35/include/ImageMagick-7
 -I.
 -I/private/tmp/pear/temp/imagick -DPHP_ATOM_INC
 -I/private/tmp/pear/temp/pear-build-serverbmLHSj/imagick-3.4.3/include
 -I/private/tmp/pear/temp/pear-build-serverbmLHSj/imagick-3.4.3/main
 -I/private/tmp/pear/temp/imagick
 -I/usr/local/Cellar/php@7.2/7.2.17/include/php
 -I/usr/local/Cellar/php@7.2/7.2.17/include/php/main
 -I/usr/local/Cellar/php@7.2/7.2.17/include/php/TSRM
 -I/usr/local/Cellar/php@7.2/7.2.17/include/php/Zend
 -I/usr/local/Cellar/php@7.2/7.2.17/include/php/ext
 -I/usr/local/Cellar/php@7.2/7.2.17/include/php/ext/date/lib
 -I/usr/local/Cellar/imagemagick/7.0.8-35/include/ImageMagick-7 -DHAVE_CONFIG_H -g
 -O2 -c /private/tmp/pear/temp/imagick/imagick.c  -fno-common -DPIC -o .libs/imagick.o
/bin/sh /private/tmp/pear/temp/pear-build-serverbmLHSj/imagick-3.4.3/libtool
 --mode=compile cc -Xpreprocessor -fopenmp -DMAGICKCORE_HDRI_ENABLE=1
 -DMAGICKCORE_QUANTUM_DEPTH=16 -Xpreprocessor -fopenmp -DMAGICKCORE_HDRI_ENABLE=1
 -DMAGICKCORE_QUANTUM_DEPTH=16
 -I/usr/local/Cellar/imagemagick/7.0.8-35/include/ImageMagick-7
 -I.
 -I/private/tmp/pear/temp/imagick -DPHP_ATOM_INC
 -I/private/tmp/pear/temp/pear-build-serverbmLHSj/imagick-3.4.3/include
 -I/private/tmp/pear/temp/pear-build-serverbmLHSj/imagick-3.4.3/main
 -I/private/tmp/pear/temp/imagick
 -I/usr/local/Cellar/php@7.2/7.2.17/include/php
 -I/usr/local/Cellar/php@7.2/7.2.17/include/php/main
 -I/usr/local/Cellar/php@7.2/7.2.17/include/php/TSRM
 -I/usr/local/Cellar/php@7.2/7.2.17/include/php/Zend
 -I/usr/local/Cellar/php@7.2/7.2.17/include/php/ext
 -I/usr/local/Cellar/php@7.2/7.2.17/include/php/ext/date/lib
 -I/usr/local/Cellar/imagemagick/7.0.8-35/include/ImageMagick-7  -DHAVE_CONFIG_H
  -g -O2   -c /private/tmp/pear/temp/imagick/imagickkernel_class.c -o imagickkernel_cl
ass.lo
 cc -Xpreprocessor -fopenmp -DMAGICKCORE_HDRI_ENABLE=1
 -DMAGICKCORE_QUANTUM_DEPTH=16 -Xpreprocessor -fopenmp -DMAGICKCORE_HDRI_ENABLE=1
 -DMAGICKCORE_QUANTUM_DEPTH=16
 -I/usr/local/Cellar/imagemagick/7.0.8-35/include/ImageMagick-7
 -I.
 -I/private/tmp/pear/temp/imagick -DPHP_ATOM_INC
 -I/private/tmp/pear/temp/pear-build-serverbmLHSj/imagick-3.4.3/include
 -I/private/tmp/pear/temp/pear-build-serverbmLHSj/imagick-3.4.3/main
 -I/private/tmp/pear/temp/imagick
 -I/usr/local/Cellar/php@7.2/7.2.17/include/php
 -I/usr/local/Cellar/php@7.2/7.2.17/include/php/main
 -I/usr/local/Cellar/php@7.2/7.2.17/include/php/TSRM
 -I/usr/local/Cellar/php@7.2/7.2.17/include/php/Zend
 -I/usr/local/Cellar/php@7.2/7.2.17/include/php/ext
 -I/usr/local/Cellar/php@7.2/7.2.17/include/php/ext/date/lib
 -I/usr/local/Cellar/imagemagick/7.0.8-35/include/ImageMagick-7 -DHAVE_CONFIG_H
 -g -O2 -c /private/tmp/pear/temp/imagick/imagickkernel_class.c  -fno-common
 -DPIC -o .libs/imagickkernel_class.o
/bin/sh /private/tmp/pear/temp/pear-build-serverbmLHSj/imagick-3.4.3/libtool
 --mode=compile cc -Xpreprocessor -fopenmp -DMAGICKCORE_HDRI_ENABLE=1
 -DMAGICKCORE_QUANTUM_DEPTH=16 -Xpreprocessor -fopenmp -DMAGICKCORE_HDRI_ENABLE=1
 -DMAGICKCORE_QUANTUM_DEPTH=16
 -I/usr/local/Cellar/imagemagick/7.0.8-35/include/ImageMagick-7
 -I.
 -I/private/tmp/pear/temp/imagick -DPHP_ATOM_INC
 -I/private/tmp/pear/temp/pear-build-serverbmLHSj/imagick-3.4.3/include
 -I/private/tmp/pear/temp/pear-build-serverbmLHSj/imagick-3.4.3/main
 -I/private/tmp/pear/temp/imagick
 -I/usr/local/Cellar/php@7.2/7.2.17/include/php
 -I/usr/local/Cellar/php@7.2/7.2.17/include/php/main
 -I/usr/local/Cellar/php@7.2/7.2.17/include/php/TSRM
 -I/usr/local/Cellar/php@7.2/7.2.17/include/php/Zend
 -I/usr/local/Cellar/php@7.2/7.2.17/include/php/ext
 -I/usr/local/Cellar/php@7.2/7.2.17/include/php/ext/date/lib
 -I/usr/local/Cellar/imagemagick/7.0.8-35/include/ImageMagick-7  -DHAVE_CONFIG_H
  -g -O2   -c /private/tmp/pear/temp/imagick/shim_im6_to_im7.c -o shim_im6_to_im7.lo
 cc -Xpreprocessor -fopenmp -DMAGICKCORE_HDRI_ENABLE=1 -DMAGICKCORE_QUANTUM_DEPTH=16
 -Xpreprocessor -fopenmp -DMAGICKCORE_HDRI_ENABLE=1 -DMAGICKCORE_QUANTUM_DEPTH=16
 -I/usr/local/Cellar/imagemagick/7.0.8-35/include/ImageMagick-7
 -I.
 -I/private/tmp/pear/temp/imagick -DPHP_ATOM_INC
 -I/private/tmp/pear/temp/pear-build-serverbmLHSj/imagick-3.4.3/include
 -I/private/tmp/pear/temp/pear-build-serverbmLHSj/imagick-3.4.3/main
 -I/private/tmp/pear/temp/imagick
 -I/usr/local/Cellar/php@7.2/7.2.17/include/php
 -I/usr/local/Cellar/php@7.2/7.2.17/include/php/main
 -I/usr/local/Cellar/php@7.2/7.2.17/include/php/TSRM
 -I/usr/local/Cellar/php@7.2/7.2.17/include/php/Zend
 -I/usr/local/Cellar/php@7.2/7.2.17/include/php/ext
 -I/usr/local/Cellar/php@7.2/7.2.17/include/php/ext/date/lib
 -I/usr/local/Cellar/imagemagick/7.0.8-35/include/ImageMagick-7 -DHAVE_CONFIG_H
 -g -O2 -c /private/tmp/pear/temp/imagick/shim_im6_to_im7.c  -fno-common -DPIC
 -o .libs/shim_im6_to_im7.o
/bin/sh /private/tmp/pear/temp/pear-build-serverbmLHSj/imagick-3.4.3/libtool
 --mode=link cc -DPHP_ATOM_INC
 -I/private/tmp/pear/temp/pear-build-serverbmLHSj/imagick-3.4.3/include
 -I/private/tmp/pear/temp/pear-build-serverbmLHSj/imagick-3.4.3/main
 -I/private/tmp/pear/temp/imagick
 -I/usr/local/Cellar/php@7.2/7.2.17/include/php
 -I/usr/local/Cellar/php@7.2/7.2.17/include/php/main
 -I/usr/local/Cellar/php@7.2/7.2.17/include/php/TSRM
 -I/usr/local/Cellar/php@7.2/7.2.17/include/php/Zend
 -I/usr/local/Cellar/php@7.2/7.2.17/include/php/ext
 -I/usr/local/Cellar/php@7.2/7.2.17/include/php/ext/date/lib
 -I/usr/local/Cellar/imagemagick/7.0.8-35/include/ImageMagick-7  -DHAVE_CONFIG_H
  -g -O2    -o imagick.la -export-dynamic -avoid-version -prefer-pic -module
  -rpath /private/tmp/pear/temp/pear-build-serverbmLHSj/imagick-3.4.3/modules
  imagick_file.lo imagick_class.lo imagickdraw_class.lo imagickpixel_class.lo
 imagickpixeliterator_class.lo imagick_helpers.lo imagick.lo
 imagickkernel_class.lo shim_im6_to_im7.lo -Wl,-rpath,/usr/loc
al/Cellar/imagemagick/7.0.8-35/lib -L/usr/local/Cellar/imagemagick/7.0.8-35/lib
 -lMagickWand-7.Q16HDRI -lMagickCore-7.Q16HDRI
cc ${wl}-flat_namespace ${wl}-undefined ${wl}suppress -o .libs/imagick.so
 -bundle  .libs/imagick_file.o .libs/imagick_class.o .libs/imagickdraw_class.o
 .libs/imagickpixel_class.o .libs/imagickpixeliterator_class.o .libs/imagick_helpers.o
 .libs/imagick.o .libs/imagickkernel_class.o .libs/shim_im6_to_im7.o
  -L/usr/local/Cellar/imagemagick/7.0.8-35/lib
  /usr/local/Cellar/imagemagick/7.0.8-35/lib/libMagickWand-7.Q16HDRI.dylib
 -L/usr/local/Cellar/little-cms2/2.9/lib -L/usr/local/opt/freetype/lib
 -L/usr/local/Cellar/xz/5.2.4/lib
 /usr/local/Cellar/imagemagick/7.0.8-35/lib/libMagickCore-7.Q16HDRI.dylib
  -Wl,-rpath -Wl,/usr/local/Cellar/imagemagick/7.0.8-35/lib
dsymutil .libs/imagick.so || :
creating imagick.la
(cd .libs && rm -f imagick.la && ln -s ../imagick.la imagick.la)
/bin/sh /private/tmp/pear/temp/pear-build-serverbmLHSj/imagick-3.4.3/libtool
 --mode=install cp ./imagick.la /private/tmp/pear/temp/pear-build-serverbmLHSj/imagick-3.4.3/modules
cp ./.libs/imagick.so /private/tmp/pear/temp/pear-build-serverbmLHSj/imagick-3.4.3/modules/imagick.so
cp ./.libs/imagick.lai /private/tmp/pear/temp/pear-build-serverbmLHSj/imagick-3.4.3/modules/imagick.la
----------------------------------------------------------------------
Libraries have been installed in:
   /private/tmp/pear/temp/pear-build-serverbmLHSj/imagick-3.4.3/modules

If you ever happen to want to link against installed libraries
in a given directory, LIBDIR, you must either use libtool, and
specify the full pathname of the library, or use the `-LLIBDIR'
flag during linking and do at least one of the following:
   - add LIBDIR to the `DYLD_LIBRARY_PATH' environment variable
     during execution

See any operating system documentation about shared libraries for
more information, such as the ld(1) and ld.so(8) manual pages.
----------------------------------------------------------------------

Build complete.
Don't forget to run 'make test'.

running: make INSTALL_ROOT="/private/tmp/pear/temp/pear-build-serverbmLHSj/install-imagick-3.4.3" install
Installing shared extensions:
     /private/tmp/pear/temp/pear-build-serverbmLHSj/install-imagick-3.4.3
/usr/local/Cellar/php@7.2/7.2.17/pecl/20170718/
Installing header files:
          /private/tmp/pear/temp/pear-build-serverbmLHSj/install-imagick-3.4.3
/usr/local/Cellar/php@7.2/7.2.17/include/php/
running: find "/private/tmp/pear/temp/pear-build-serverbmLHSj
/install-imagick-3.4.3" | xargs ls -dils
1589706   0 drwxr-xr-x 3 server wheel
    102  4 14 23:07 /private/tmp/pear/temp/pear-build-serverbmLHSj
/install-imagick-3.4.3
1590097   0 drwxr-xr-x 3 server wheel
    102  4 14 23:07 /private/tmp/pear/temp/pear-build-serverbmLHSj
/install-imagick-3.4.3/usr
1590098   0 drwxr-xr-x 3 server wheel
    102  4 14 23:07 /private/tmp/pear/temp/pear-build-serverbmLHSj
/install-imagick-3.4.3/usr/local
1590099   0 drwxr-xr-x 3 server wheel
    102  4 14 23:07 /private/tmp/pear/temp/pear-build-serverbmLHSj
/install-imagick-3.4.3/usr/local/Cellar
1590100   0 drwxr-xr-x 3 server wheel
    102  4 14 23:07 /private/tmp/pear/temp/pear-build-serverbmLHSj
/install-imagick-3.4.3/usr/local/Cellar/php@7.2
1590101   0 drwxr-xr-x 4 server wheel
    136  4 14 23:07 /private/tmp/pear/temp/pear-build-serverbmLHSj
/install-imagick-3.4.3/usr/local/Cellar/php@7.2/7.2.17
1590107   0 drwxr-xr-x 3 server wheel
    102  4 14 23:07 /private/tmp/pear/temp/pear-build-serverbmLHS
j/install-imagick-3.4.3/usr/local/Cellar/php@7.2/7.2.17/include
1590108   0 drwxr-xr-x 3 server wheel
    102  4 14 23:07 /private/tmp/pear/temp/pear-build-serverbmLHSj
/install-imagick-3.4.3/usr/local/Cellar/php@7.2/7.2.17/include/php
1590109   0 drwxr-xr-x 3 server wheel
    102  4 14 23:07 /private/tmp/pear/temp/pear-build-serverbmLHSj
/install-imagick-3.4.3/usr/local/Cellar/php@7.2/7.2.17/include/php/ext
1590110   0 drwxr-xr-x 3 server wheel
    102  4 14 23:07 /private/tmp/pear/temp/pear-build-serverbmLHSj
/install-imagick-3.4.3/usr/local/Cellar/php@7.2/7.2.17/include/php/ext/imagick
1590111   4 -rw-r--r-- 1 server wheel
   1828  4 14 23:07 /private/tmp/pear/temp/pear-build-serverbmLHSj
/install-imagick-3.4.3/usr/local/Cellar/php@7.2/7.2.17/include/php/ext/imagick/php_imagick_shared.h
1590102   0 drwxr-xr-x 3 server wheel
    102  4 14 23:07 /private/tmp/pear/temp/pear-build-serverbmLHSj
/install-imagick-3.4.3/usr/local/Cellar/php@7.2/7.2.17/pecl
1590103   0 drwxr-xr-x 3 server wheel
    102  4 14 23:07 /private/tmp/pear/temp/pear-build-serverbmLHS
j/install-imagick-3.4.3/usr/local/Cellar/php@7.2/7.2.17/pecl/20170718
1590104 416 -rwxr-xr-x 1 server wheel
 422560  4 14 23:07 /private/tmp/pear/temp/pear-build-serverbmLHSj
/install-imagick-3.4.3/usr/local/Cellar/php@7.2/7.2.17/pecl/20170718/imagick.so

Build process completed successfully
Installing '/usr/local/Cellar/php@7.2/7.2.17/include/php/ext/imagick/php_imagick_shared.h'
Installing '/usr/local/Cellar/php@7.2/7.2.17/pecl/20170718/imagick.so'🈁
install ok: channel://pecl.php.net/imagick-3.4.3
Extension imagick enabled in php.ini🈁
$
ファイルを確認.
$ ls -la /usr/local/Cellar/php@7.2/7.2.17/pecl/20170718/imagick.so🆑
-rw-r--r-- 1 server admin 422560  4 14 23:07 /usr/local/Cellar/php@7.2/7.2.17/pecl/20170718/imagick.so🈁
$
$ grep imagick /usr/local/etc/php/7.2/php.ini🆑
extension="imagick.so"🈁
$
$ ./cake install.install🆑
PHP Warning:  Module 'imagick' already loaded in Unknown on line 0

Warning: Module 'imagick' already loaded in Unknown on line 0
---------------------------------------------------------------
NetCommons Install
---------------------------------------------------------------
[S]tart
[H]elp
[Q]uit
What would you like to do? (S/H/Q)
[Q] >
brewでインストールしたphp7.2の詳細情報を確認.
DirectoryIndexの付け替え.phpの優先度を先にするのと,PHPのモジュールと拡張子の設定を追加.
作業前にファイルのバックアップを.
編集した結果のdiffをとる.
文法間違いがないか確認.
問題ないので,停止して,起動する.
PHPが動くか確認.
test.txtに結果を保存するようにして,curlコマンドを実行する.
中身を確認.
動きました.
$ brew info php72🆑
php@7.2: stable 7.2.17 [keg-only]
General-purpose scripting language
https://secure.php.net/
/usr/local/Cellar/php@7.2/7.2.17 (509 files, 75.7MB)
  Built from source on 2019-04-11 at 01:27:23
From: https://github.com/Homebrew/homebrew-core/blob/master/Formula/php@7.2.rb
==> Dependencies
Build: httpd ✔, pkg-config ✔
Required: apr ✔, apr-util ✔, argon2 ✔, aspell ✔, autoconf ✔, curl-openssl ✔,
 freetds ✔, freetype ✔, gettext ✔, glib ✔, gmp ✔, icu4c ✔, jpeg ✔, libpng ✔,
 libpq ✔, libsodium ✔, libzip ✔, openldap ✔, openssl ✔, sqlite ✔,
tidy-html5 ✔, unixodbc ✔, webp ✔
==> Caveats
To enable PHP in Apache add the following to httpd.conf and restart Apache:
    LoadModule php7_module /usr/local/opt/php@7.2/lib/httpd/modules/libphp7.so🈁

    <FilesMatch \.php$>🈁
        SetHandler application/x-httpd-php🈁
    </FilesMatch>🈁

Finally, check DirectoryIndex includes index.php
    DirectoryIndex index.php index.html🈁

The php.ini and php-fpm.ini file can be found in:
    /usr/local/etc/php/7.2/

php@7.2 is keg-only, which means it was not symlinked into /usr/local,
because this is an alternate version of another formula.

If you need to have php@7.2 first in your PATH run:
  echo 'export PATH="/usr/local/opt/php@7.2/bin:$PATH"' >> ~/.bash_profile
  echo 'export PATH="/usr/local/opt/php@7.2/sbin:$PATH"' >> ~/.bash_profile

For compilers to find php@7.2 you may need to set:
  export LDFLAGS="-L/usr/local/opt/php@7.2/lib"
  export CPPFLAGS="-I/usr/local/opt/php@7.2/include"


To have launchd start php@7.2 now and restart at login:
  brew services start php@7.2
Or, if you don't want/need a background service you can just run:
  php-fpm
==> Analytics
install: 17,123 (30 days), 53,229 (90 days), 70,669 (365 days)
install_on_request: 16,922 (30 days), 52,686 (90 days), 70,069 (365 days)
build_error: 0 (30 days)
$
作業前にファイルのバックアップを.
$ cp /usr/local/etc/httpd/httpd.conf /usr/local/etc/httpd/httpd.conf.v001🆑
$
$ diff /usr/local/etc/httpd/httpd.conf.v001 /usr/local/etc/httpd/httpd.conf🆑
279c279,280
<     DirectoryIndex index.html
---
> #    DirectoryIndex index.html
>     DirectoryIndex index.php index.html
531a533,537
> #for PHP72
> LoadModule php7_module /usr/local/opt/php@7.2/lib/httpd/modules/libphp7.so
> <FilesMatch \.php$>
>     SetHandler application/x-httpd-php
> </FilesMatch>
[pluto:server 20:08:49 /usr/local/etc/httpd/extra ]
$
$ apachectl configtest🆑
Syntax OK
$
$ apachectl stop🆑
$ apachectl start🆑
$ ps -ef|grep httpd🆑
  501 77440     1   0  8:11PM ??         0:00.05 /usr/local/opt/httpd/bin/httpd -k start
  501 77441 77440   0  8:11PM ??         0:00.00 /usr/local/opt/httpd/bin/httpd -k start
  501 77442 77440   0  8:11PM ??         0:00.00 /usr/local/opt/httpd/bin/httpd -k start
  501 77443 77440   0  8:11PM ??         0:00.00 /usr/local/opt/httpd/bin/httpd -k start
  501 77444 77440   0  8:11PM ??         0:00.00 /usr/local/opt/httpd/bin/httpd -k start
  501 77445 77440   0  8:11PM ??         0:00.00 /usr/local/opt/httpd/bin/httpd -k start
  501 77450 77050   0  8:12PM ttys002    0:00.00 grep httpd
$
$ ls -la /usr/local/var/www/🆑
total 8
drwxr-xr-x 5 server admin 170  4 12 20:02 .
drwxrwxr-x 8 server admin 272  4 10 23:36 ..
drwxr-xr-x 6 server admin 204  4 10 23:36 cgi-bin
-rw-r--r-- 1 server admin  45  6 12  2007 index.html
-rw-r--r-- 1 server admin  22  4 12 20:02 index.php🈁
$ cat /usr/local/var/www/index.php🆑
<?php
  phpinfo();
?>
$
$ curl -o test.txt localhost:8080/index.php🆑
  % Total    % Received % Xferd  Average Speed   Time    Time     Time  Current
                                 Dload  Upload   Total   Spent    Left  Speed
100  101k    0  101k    0     0  8478k      0 --:--:-- --:--:-- --:--:-- 9249k
$
$ tail test.txt🆑
<p>
This program is free software; you can redistribute it and/or modify it under
 the terms of the PHP License as published by the PHP Group and included in
 the distribution in the file:  LICENSE
</p>
<p>This program is distributed in the hope that it will be useful, but WITHOUT
 ANY WARRANTY; without even the implied warranty of MERCHANTABILITY or
 FITNESS FOR A PARTICULAR PURPOSE.
</p>
<p>If you did not receive a copy of the PHP license, or have any questions
 about PHP licensing, please contact license@php.net.
</p>
</td></tr>
</table>
</div></body></html>
$
brew infoで,インストールした時の情報を確認.
nghttp2が入ってない.今回はコンパイルできないのだから仕方ない.
ドキュメントを配置するhtdocの場所を確認.
index.htmlファイルを確認.
一番軽いやつだ.
次に,httpd.confを確認.ブランク行やコメント行を削除する.
SSLの設定を確認.
そのまま起動できそう.
apachectlの場所を確認して,起動してみる.
起動しました.ログを確認.
ゼロバイト.curlコマンドでアクセスしてみる.
It worksが返ってきた.ログを確認.
問題なくアクセスログが記録されていました.
$ brew info httpd🆑
httpd: stable 2.4.38
Apache HTTP server
https://httpd.apache.org/
/usr/local/Cellar/httpd/2.4.38 (1,613 files, 26.4MB) *
  Built from source on 2019-04-10 at 23:36:23
From: https://github.com/Homebrew/homebrew-core/blob/master/Formula/httpd.rb
==> Dependencies
Required: apr ✔, apr-util ✔, brotli ✔, nghttp2 ✘, openssl ✔, pcre ✔
==> Caveats
DocumentRoot is /usr/local/var/www.🈁

The default ports have been set in /usr/local/etc/httpd/httpd.conf🈁 to 8080 and in
/usr/local/etc/httpd/extra/httpd-ssl.conf🈁 to 8443 so that httpd can run without sudo.

To have launchd start httpd now and restart at login:
  brew services start httpd
Or, if you don't want/need a background service you can just run:
  apachectl start🈁
==> Analytics
install: 12,837 (30 days), 45,067 (90 days), 174,047 (365 days)
install_on_request: 10,475 (30 days), 34,852 (90 days), 132,302 (365 days)
build_error: 0 (30 days)
$
ドキュメントを配置するhtdocの場所を確認.
$ ls -la /usr/local/var/www🆑
total 4
drwxr-xr-x 4 server admin 136  4 10 23:36 .
drwxrwxr-x 8 server admin 272  4 10 23:36 ..
drwxr-xr-x 6 server admin 204  4 10 23:36 cgi-bin
-rw-r--r-- 1 server admin  45  6 12  2007 index.html🈁
$ cat /usr/local/var/www/index.html🆑
<html><body><h1>It works!</h1></body></html>
$
次に,httpd.confを確認.ブランク行やコメント行を削除する.
$ grep -v -e '^\s*#' -e '^\s*$' /usr/local/etc/httpd/httpd.conf🆑
ServerRoot "/usr/local/opt/httpd"
Listen 8080
LoadModule mpm_prefork_module lib/httpd/modules/mod_mpm_prefork.so
LoadModule authn_file_module lib/httpd/modules/mod_authn_file.so
LoadModule authn_core_module lib/httpd/modules/mod_authn_core.so
LoadModule authz_host_module lib/httpd/modules/mod_authz_host.so
LoadModule authz_groupfile_module lib/httpd/modules/mod_authz_groupfile.so
LoadModule authz_user_module lib/httpd/modules/mod_authz_user.so
LoadModule authz_core_module lib/httpd/modules/mod_authz_core.so
LoadModule access_compat_module lib/httpd/modules/mod_access_compat.so
LoadModule auth_basic_module lib/httpd/modules/mod_auth_basic.so
LoadModule reqtimeout_module lib/httpd/modules/mod_reqtimeout.so
LoadModule filter_module lib/httpd/modules/mod_filter.so
LoadModule mime_module lib/httpd/modules/mod_mime.so
LoadModule log_config_module lib/httpd/modules/mod_log_config.so
LoadModule env_module lib/httpd/modules/mod_env.so
LoadModule headers_module lib/httpd/modules/mod_headers.so
LoadModule setenvif_module lib/httpd/modules/mod_setenvif.so
LoadModule version_module lib/httpd/modules/mod_version.so
LoadModule unixd_module lib/httpd/modules/mod_unixd.so
LoadModule status_module lib/httpd/modules/mod_status.so
LoadModule autoindex_module lib/httpd/modules/mod_autoindex.so
<IfModule !mpm_prefork_module>
</IfModule>
<IfModule mpm_prefork_module>
</IfModule>
LoadModule dir_module lib/httpd/modules/mod_dir.so
LoadModule alias_module lib/httpd/modules/mod_alias.so
<IfModule unixd_module>
User _www
Group _www
</IfModule>
ServerAdmin you@example.com
<Directory />
    AllowOverride none
    Require all denied
</Directory>
DocumentRoot "/usr/local/var/www"
<Directory "/usr/local/var/www">
    Options Indexes FollowSymLinks
    AllowOverride None
    Require all granted
</Directory>
<IfModule dir_module>
    DirectoryIndex index.html
</IfModule>
<Files ".ht*">
    Require all denied
</Files>
ErrorLog "/usr/local/var/log/httpd/error_log"
LogLevel warn
<IfModule log_config_module>
    LogFormat "%h %l %u %t \"%r\" %>s %b \"%{Referer}i\" \"%{User-Agent}i\"" combined
    LogFormat "%h %l %u %t \"%r\" %>s %b" common
    <IfModule logio_module>
      LogFormat "%h %l %u %t \"%r\" %>s %b \"%{Referer}i\" \"%{User-Agent}i\" %I %O" combinedio
    </IfModule>
    CustomLog "/usr/local/var/log/httpd/access_log" common🈁
</IfModule>
<IfModule alias_module>
    ScriptAlias /cgi-bin/ "/usr/local/var/www/cgi-bin/"
</IfModule>
<IfModule cgid_module>
</IfModule>
<Directory "/usr/local/var/www/cgi-bin">
    AllowOverride None
    Options None
    Require all granted
</Directory>
<IfModule headers_module>
    RequestHeader unset Proxy early
</IfModule>
<IfModule mime_module>
    TypesConfig /usr/local/etc/httpd/mime.types
    AddType application/x-compress .Z
    AddType application/x-gzip .gz .tgz
</IfModule>
<IfModule proxy_html_module>
Include /usr/local/etc/httpd/extra/proxy-html.conf
</IfModule>
<IfModule ssl_module>
SSLRandomSeed startup builtin
SSLRandomSeed connect builtin
</IfModule>
$
$ grep -v -e '^\s*#' -e '^\s*$' /usr/local/etc/httpd/extra/httpd-ssl.conf🆑
Listen 8443
SSLCipherSuite HIGH:MEDIUM:!MD5:!RC4:!3DES
SSLProxyCipherSuite HIGH:MEDIUM:!MD5:!RC4:!3DES
SSLHonorCipherOrder on
SSLProtocol all -SSLv3
SSLProxyProtocol all -SSLv3
SSLPassPhraseDialog  builtin
SSLSessionCache        "shmcb:/usr/local/var/run/httpd/ssl_scache(512000)"
SSLSessionCacheTimeout  300
<VirtualHost _default_:8443>
DocumentRoot "/usr/local/var/www"
ServerName www.example.com:8443
ServerAdmin you@example.com
ErrorLog "/usr/local/var/log/httpd/error_log"
TransferLog "/usr/local/var/log/httpd/access_log"
SSLEngine on
SSLCertificateFile "/usr/local/etc/httpd/server.crt"
SSLCertificateKeyFile "/usr/local/etc/httpd/server.key"
<FilesMatch "\.(cgi|shtml|phtml|php)$">
    SSLOptions +StdEnvVars
</FilesMatch>
<Directory "/usr/local/var/www/cgi-bin">
    SSLOptions +StdEnvVars
</Directory>
BrowserMatch "MSIE [2-5]" \
         nokeepalive ssl-unclean-shutdown \
         downgrade-1.0 force-response-1.0
CustomLog "/usr/local/var/log/httpd/ssl_request_log" \
          "%t %h %{SSL_PROTOCOL}x %{SSL_CIPHER}x \"%r\" %b"
</VirtualHost>
$
apachectlの場所を確認して,起動してみる.
$ which apachectl🆑
/usr/local/bin/apachectl🈁
$ apachectl start🆑
$ ps -ef|grep httpd🆑
  501 77099     1   0  7:39PM ??         0:00.01 /usr/local/opt/httpd/bin/httpd -k start
  501 77100 77099   0  7:39PM ??         0:00.00 /usr/local/opt/httpd/bin/httpd -k start
  501 77101 77099   0  7:39PM ??         0:00.00 /usr/local/opt/httpd/bin/httpd -k start
  501 77102 77099   0  7:39PM ??         0:00.00 /usr/local/opt/httpd/bin/httpd -k start
  501 77103 77099   0  7:39PM ??         0:00.00 /usr/local/opt/httpd/bin/httpd -k start
  501 77104 77099   0  7:39PM ??         0:00.00 /usr/local/opt/httpd/bin/httpd -k start
  501 77106 77050   0  7:39PM ttys002    0:00.00 grep httpd
$
$ ls -la /usr/local/var/log/httpd/🆑
total 4
drwxr-xr-x 4 server admin 136  4 12 19:39 .
drwxr-xr-x 4 server admin 136  4 11 01:27 ..
-rw-r--r-- 1 server admin   0  4 12 19:39 access_log🈁
-rw-r--r-- 1 server admin 254  4 12 19:39 error_log
$
$ curl localhost:8080🆑
<html><body><h1>It works!</h1></body></html>
$
$ ls -la /usr/local/var/log/httpd/🆑
total 8
drwxr-xr-x 4 server admin 136  4 12 19:39 .
drwxr-xr-x 4 server admin 136  4 11 01:27 ..
-rw-r--r-- 1 server admin  61  4 12 19:42 access_log🈁
-rw-r--r-- 1 server admin 254  4 12 19:39 error_log
$ cat /usr/local/var/log/httpd/access_log🆑
::1 - - [12/Apr/2019:19:41:59 +0900] "GET / HTTP/1.1" 200 45
$
(2号機) mysql_secure_installationを実行する
- ブロガー :
- ujpblog 2019/4/11 23:19
Rasberry Piにmariadbをインストールした時にも実行したmysql_secure_installationを実行する.
まずはコマンドの場所を確認.
あった.
rootのパスワードを入力.インストール直後は入ってないので,カラでエンター.
rootユーザのパスワードをセットするので,yを返答.
匿名ユーザがあるらしいので,それを削除する.
rootユーザはリモートから接続できないようにするので,yを選択.
testという名前のデータベースがあるようなので,削除するのでyを選択.
testデータベースを削除した際に,権限も削除したので権限情報をリロードするというので,yを選択.
最低限のセキュアセットアップができた模様.
接続してみる.
存在しているデータベースを確認.
ユーザを確認.
データベースが選択されてないとエラーが.データベースを指定して実行.
それでプロンプトがnoneになっているのか.
ではデータベースを変更してもう一回.
抜けて終了.
前回はパスワード長の指定などがあったけれど今回はそれがありませんでした.今時のトレンドなのかな.
まずはコマンドの場所を確認.
$ find /usr/local/Cellar/mariadb/10.3.14|grep secure🆑
/usr/local/Cellar/mariadb/10.3.14/bin/mysql_secure_installation🈁
/usr/local/Cellar/mariadb/10.3.14/share/man/man1/mysql_secure_installation.1
$
$ /usr/local/Cellar/mariadb/10.3.14/bin/mysql_secure_installation🆑

NOTE: RUNNING ALL PARTS OF THIS SCRIPT IS RECOMMENDED FOR ALL MariaDB
      SERVERS IN PRODUCTION USE!  PLEASE READ EACH STEP CAREFULLY!

In order to log into MariaDB to secure it, we'll need the current
password for the root user.  If you've just installed MariaDB, and
you haven't set the root password yet, the password will be blank,
so you should just press enter here.

Enter current password for root (enter for none):🈁
Enter current password for root (enter for none):🆑
OK, successfully used password, moving on...

Setting the root password ensures that nobody can log into the MariaDB
root user without the proper authorisation.

Set root password? [Y/n]🈁
Set root password? [Y/n] y🆑
New password:🆑
Re-enter new password:🆑
Password updated successfully!
Reloading privilege tables..
 ... Success!


By default, a MariaDB installation has an anonymous user, allowing anyone
to log into MariaDB without having to have a user account created for
them.  This is intended only for testing, and to make the installation
go a bit smoother.  You should remove them before moving into a
production environment.

Remove anonymous users? [Y/n]🈁
Remove anonymous users? [Y/n] y🆑
 ... Success!🈁

Normally, root should only be allowed to connect from 'localhost'.  This
ensures that someone cannot guess at the root password from the network.

Disallow root login remotely? [Y/n]🈁
Disallow root login remotely? [Y/n] y🆑
 ... Success!🈁

By default, MariaDB comes with a database named 'test' that anyone can
access.  This is also intended only for testing, and should be removed
before moving into a production environment.

Remove test database and access to it? [Y/n]
Remove test database and access to it? [Y/n] y🆑
 - Dropping test database...
 ... Success!🈁
 - Removing privileges on test database...
 ... Success!🈁

Reloading the privilege tables will ensure that all changes made so far
will take effect immediately.

Reload privilege tables now? [Y/n]
Reload privilege tables now? [Y/n] y🆑
 ... Success!

Cleaning up...

All done!  If you've completed all of the above steps, your MariaDB
installation should now be secure.

Thanks for using MariaDB!🈁
$
接続してみる.
$ mysql -uroot -p🆑
Enter password:🆑
Welcome to the MariaDB monitor.  Commands end with ; or \g.
Your MariaDB connection id is 19
Server version: 10.3.14-MariaDB Homebrew

Copyright (c) 2000, 2018, Oracle, MariaDB Corporation Ab and others.

Type 'help;' or '\h' for help. Type '\c' to clear the current input statement.

MariaDB [(none)]>
MariaDB [(none)]> show databases;
+--------------------+
| Database           |
+--------------------+
| information_schema |
| mysql              |
| performance_schema |
+--------------------+
3 rows in set (0.003 sec)

MariaDB [(none)]>
MariaDB [(none)]> select host,user from user;
ERROR 1046 (3D000): No database selected
MariaDB [(none)]>
MariaDB [(none)]> select host,user from mysql.user;
+-----------+------+
| host      | user |
+-----------+------+
| 127.0.0.1 | root |
| ::1       | root |
| localhost | root |
+-----------+------+
3 rows in set (0.010 sec)

MariaDB [(none)]>
ではデータベースを変更してもう一回.
MariaDB [(none)]> use mysql🆑
Reading table information for completion of table and column names
You can turn off this feature to get a quicker startup with -A

Database changed
MariaDB [mysql]> select host,user from user;🆑
+-----------+------+
| host      | user |
+-----------+------+
| 127.0.0.1 | root |
| ::1       | root |
| localhost | root |
+-----------+------+
3 rows in set (0.008 sec)

MariaDB [mysql]>
MariaDB [mysql]> quit🆑
Bye
$
(2号機) brewでインストールしたmariadb10.3.14の状態確認と起動
- ブロガー :
- ujpblog 2019/4/11 22:52
バージョンを確認.
my.cnfを確認.
ない.my.cnfの場所を確認.まずはヘルプを見てみる.
指定されたファイルを確認.
ありました.中身を確認.
中身がないね...
とりあえず,指示通りに起動してみる.
プロセスを確認.
データフォルダを確認してみる.
エラーログを確認.
ready for connections.と出ているので,問題ない模様.
$ brew info mariadb🆑
mariadb: stable 10.3.14
Drop-in replacement for MySQL
https://mariadb.org/
Conflicts with:
  mariadb-connector-c (because both install plugins)
  mysql (because mariadb, mysql, and percona install the same binaries.)
  mysql-cluster (because mariadb, mysql, and percona install the same binaries.)
  mysql-connector-c (because both install MySQL client libraries)
  mytop (because both install `mytop` binaries)
  percona-server (because mariadb, mysql, and percona install the same binaries.)
/usr/local/Cellar/mariadb/10.3.14 (653 files, 173.5MB) *🈁
  Built from source on 2019-04-10 at 21:58:51
From: https://github.com/Homebrew/homebrew-core/blob/master/Formula/mariadb.rb
==> Dependencies
Build: cmake ✔
Required: openssl ✔
==> Caveats
A "/etc/my.cnf"🈁 from another install may interfere with a Homebrew-built
server starting up correctly.

MySQL is configured to only allow connections from localhost by default

To connect:
    mysql -uroot

To have launchd start mariadb now and restart at login:
  brew services start mariadb🈁
Or, if you don't want/need a background service you can just run:
  mysql.server start
==> Analytics
install: 19,276 (30 days), 49,267 (90 days), 165,865 (365 days)
install_on_request: 18,357 (30 days), 47,053 (90 days), 155,100 (365 days)
build_error: 0 (30 days)
$
$ cat /etc/my.cnf🆑
cat: /etc/my.cnf: No such file or directory
$
$ mysql --help|grep cnf
/usr/local/etc/my.cnf ~/.my.cnf
                      order of preference, my.cnf, $MYSQL_TCP_PORT,
$ ls -la /usr/local/etc/my.cnf🆑
-rw-r--r-- 1 server admin 212  4 10 21:58 /usr/local/etc/my.cnf
$ ls -la ~/.my.cnf🆑
ls: cannot access '/Users/ujpadmin/.my.cnf': No such file or directory
$
$ cat  /usr/local/etc/my.cnf🆑
#
# This group is read both both by the client and the server
# use it for options that affect everything
#
[client-server]

#
# include all files from the config directory
#
!includedir /usr/local/etc/my.cnf.d

$
とりあえず,指示通りに起動してみる.
$ brew services start mariadb🆑
==> Tapping homebrew/services
Cloning into '/usr/local/Homebrew/Library/Taps/homebrew/homebrew-services'...
remote: Enumerating objects: 17, done.
remote: Counting objects: 100% (17/17), done.
remote: Compressing objects: 100% (14/14), done.
remote: Total 17 (delta 0), reused 12 (delta 0), pack-reused 0
Unpacking objects: 100% (17/17), done.
Tapped 1 command (50 files, 62.8KB).
==> Successfully started `mariadb` (label: homebrew.mxcl.mariadb)🈁
$
$ ps -ef|grep mariadb🆑
  501 16043     1   0 10:41PM ??         0:00.03 /bin/sh /usr/local/opt/mariadb/bin/mysqld_safe
 --datadir=/usr/local/var/mysql
  501 16140 16043   0 10:41PM ??         0:00.31 /usr/local/opt/mariadb/bin/mysqld
 --basedir=/usr/local/opt/mariadb
 --datadir=/usr/local/var/mysql🈁
 --plugin-dir=/usr/local/opt/mariadb/lib/plugin
 --log-error=/usr/local/var/mysql/plute.local.err🈁
 --pid-file=plute.local.pid
$
$ ls -la /usr/local/var/mysql🆑
total 122936
drwxr-xr-x 16 server admin      544  4 11 22:41 .
drwxrwxr-x  8 server admin      272  4 10 23:36 ..
-rw-rw----  1 server admin    16384  4 10 21:59 aria_log.00000001
-rw-rw----  1 server admin       52  4 10 21:59 aria_log_control
-rw-r-----  1 server admin      972  4 10 21:59 ib_buffer_pool
-rw-rw----  1 server admin 50331648  4 11 22:41 ib_logfile0
-rw-rw----  1 server admin 50331648  4 10 21:59 ib_logfile1
-rw-rw----  1 server admin 12582912  4 10 21:59 ibdata1
-rw-rw----  1 server admin 12582912  4 11 22:41 ibtmp1
-rw-rw----  1 server admin        0  4 11 22:41 multi-master.info
drwx------ 91 server admin     3094  4 10 21:59 mysql
drwx------  3 server admin      102  4 10 21:59 performance_schema
-rw-rw----  1 server admin     1607  4 11 22:41 plute.local.err
-rw-rw----  1 server admin        6  4 11 22:41 plute.local.pid
-rw-rw----  1 server admin    24576  4 11 22:41 tc.log
drwx------  3 server admin      102  4 10 21:59 test
$
$ cat /usr/local/var/mysql/plute.local.err🆑
2019-04-11 22:41:41 0 [Note] InnoDB: Mutexes and rw_locks use GCC atomic builtins
2019-04-11 22:41:41 0 [Note] InnoDB: Uses event mutexes
2019-04-11 22:41:41 0 [Note] InnoDB: Compressed tables use zlib 1.2.5
2019-04-11 22:41:41 0 [Note] InnoDB: Number of pools: 1
2019-04-11 22:41:41 0 [Note] InnoDB: Using generic crc32 instructions
2019-04-11 22:41:41 0 [Note] InnoDB: Initializing buffer pool, total size = 128M, instances
 = 1, chunk size = 128M
2019-04-11 22:41:41 0 [Note] InnoDB: Completed initialization of buffer pool
2019-04-11 22:41:41 0 [Note] InnoDB: 128 out of 128 rollback segments are active.
2019-04-11 22:41:41 0 [Note] InnoDB: Creating shared tablespace for temporary tables
2019-04-11 22:41:41 0 [Note] InnoDB: Setting file './ibtmp1' size to 12 MB. Physically
 writing the file full; Please wait ...
2019-04-11 22:41:42 0 [Note] InnoDB: File './ibtmp1' size is now 12 MB.
2019-04-11 22:41:42 0 [Note] InnoDB: 10.3.14 started; log sequence number 1630815;
 transaction id 21
2019-04-11 22:41:42 0 [Note] InnoDB: Loading buffer pool(s) from
 /usr/local/var/mysql/ib_buffer_pool
2019-04-11 22:41:42 0 [Note] Plugin 'FEEDBACK' is disabled.
2019-04-11 22:41:42 0 [Note] InnoDB: Buffer pool(s) load completed at 190411 22:41:42
2019-04-11 22:41:42 0 [Note] Server socket created on IP: '::'.
2019-04-11 22:41:42 0 [Note] Reading of all Master_info entries succeded
2019-04-11 22:41:42 0 [Note] Added new Master_info '' to hash table
2019-04-11 22:41:42 0 [Note] /usr/local/opt/mariadb/bin/mysqld: ready for connections.🈁
Version: '10.3.14-MariaDB'  socket: '/tmp/mysql.sock'  port: 3306  Homebrew
$
(2号機) PHP7.2の詳細バージョンを確認してcomposerをインストール
- ブロガー :
- ujpblog 2019/4/11 22:36
この時代にEl Capitanに無理やりbrewでインストールしたPHP7.2のバージョンを確認.
CakePHPを動かすには,compserというものが必要らしい.Brewにあるか確認.
存在していた.インストール.
ダウンロードしただけでインストールされた模様.
バージョンを確認.
$ php -v🆑
PHP 7.2.17 (cli) (built: Apr 11 2019 01:25:03) ( NTS )
Copyright (c) 1997-2018 The PHP Group
Zend Engine v3.2.0, Copyright (c) 1998-2018 Zend Technologies
    with Zend OPcache v7.2.17, Copyright (c) 1999-2018, by Zend Technologies
$
$ brew info composer🆑
composer: stable 1.8.5🈁
Dependency Manager for PHP
https://getcomposer.org/
Not installed🈁
From: https://github.com/Homebrew/homebrew-core/blob/master/Formula/composer.rb
==> Analytics
install: 22,659 (30 days), 77,861 (90 days), 285,530 (365 days)
install_on_request: 21,683 (30 days), 73,363 (90 days), 261,200 (365 days)
build_error: 0 (30 days)
$
$ brew install composer🆑
Warning: You are using macOS 10.11.
We (and Apple) do not provide support for this old version.
You will encounter build failures with some formulae.
Please create pull requests instead of asking for help on Homebrew's GitHub,
Discourse, Twitter or IRC. You are responsible for resolving any issues you
experience, as you are running this old version.

==> Downloading https://getcomposer.org/download/1.8.5/composer.phar
######################################################################## 100.0%
🍺  /usr/local/Cellar/composer/1.8.5: 3 files, 1.8MB, built in 36 seconds
$
バージョンを確認.
$ composer -v🆑
   ______
  / ____/___  ____ ___  ____  ____  ________  _____
 / /   / __ \/ __ `__ \/ __ \/ __ \/ ___/ _ \/ ___/
/ /___/ /_/ / / / / / / /_/ / /_/ (__  )  __/ /
\____/\____/_/ /_/ /_/ .___/\____/____/\___/_/
                    /_/
Composer version 1.8.5 2019-04-09 17:46:47

Usage:
  command [options] [arguments]

Options:
  -h, --help                     Display this help message
  -q, --quiet                    Do not output any message
  -V, --version                  Display this application version
      --ansi                     Force ANSI output
      --no-ansi                  Disable ANSI output
  -n, --no-interaction           Do not ask any interactive question
      --profile                  Display timing and memory usage information
      --no-plugins               Whether to disable plugins.
  -d, --working-dir=WORKING-DIR  If specified, use the given directory as working directory.
  -v|vv|vvv, --verbose           Increase the verbosity of messages: 1 for normal output,
 2 for more verbose output and 3 for debug

Available commands:
  about                Shows the short information about Composer.
  archive              Creates an archive of this composer package.
  browse               Opens the package's repository URL or homepage in your browser.
  check-platform-reqs  Check that platform requirements are satisfied.
  clear-cache          Clears composer's internal package cache.
  clearcache           Clears composer's internal package cache.
  config               Sets config options.
  create-project       Creates new project from a package into given directory.
  depends              Shows which packages cause the given package to be installed.
  diagnose             Diagnoses the system to identify common errors.
  dump-autoload        Dumps the autoloader.
  dumpautoload         Dumps the autoloader.
  exec                 Executes a vendored binary/script.
  global               Allows running commands in the global composer dir ($COMPOSER_HOME).
  help                 Displays help for a command
  home                 Opens the package's repository URL or homepage in your browser.
  i                    Installs the project dependencies from the composer.lock file if present,
 or falls back on the composer.json.
  info                 Shows information about packages.
  init                 Creates a basic composer.json file in current directory.
  install              Installs the project dependencies from the composer.lock file if present,
 or falls back on the composer.json.
  licenses             Shows information about licenses of dependencies.
  list                 Lists commands
  outdated             Shows a list of installed packages that have updates available, including
 their latest version.
  prohibits            Shows which packages prevent the given package from being installed.
  remove               Removes a package from the require or require-dev.
  require              Adds required packages to your composer.json and installs them.
  run-script           Runs the scripts defined in composer.json.
  search               Searches for packages.
  self-update          Updates composer.phar to the latest version.
  selfupdate           Updates composer.phar to the latest version.
  show                 Shows information about packages.
  status               Shows a list of locally modified packages, for packages installed from
 source.
  suggests             Shows package suggestions.
  u                    Upgrades your dependencies to the latest version according to
 composer.json, and updates the composer.lock file.
  update               Upgrades your dependencies to the latest version according to
 composer.json, and updates the composer.lock file.
  upgrade              Upgrades your dependencies to the latest version according to
 composer.json, and updates the composer.lock file.
  validate             Validates a composer.json and composer.lock.
  why                  Shows which packages cause the given package to be installed.
  why-not              Shows which packages prevent the given package from being installed.
$
今回は,次のようなモジュールをインストール.
環境変数はこちら.
Apache httpd 2.4とPHP7.2をインストールする際に,nghttp2が依存関係になっているので,前の記事にあった通り依存関係からnghttp2を全部消す.httpd,php以外のモジュール(.rbファイル)もチェックすることを忘れないように.
brew install tree
brew install wget
brew install cask
brew install cask
brew install gnu-sed
brew install coreutils
brew install app-engine-java
brew install imagemagick
brew install openjpeg
brew install fontconfig
brew install jenkins
brew install nkf
brew install fontconfig
brew install homebrew/apache/httpd24
brew install mariadb
brew install mysql-connector-c
brew install  mariadb-connector-c
brew install httpd
brew install php@7.2
brew install cowsay
brew install ffmpeg
環境変数はこちら.
$ cat .bash_profile🆑
PS1='\[\e[0;36m\][\h:\u \t \w ]\[\e[0m\]\n\$ '
export COWPATH=/usr/local/Cellar/cowsay/3.04/share/cows
cowsay -f ghostbusters `hostname`

export PATH="/usr/local/opt/gettext/bin:$PATH"
export PATH="/usr/local/opt/gnu-sed/libexec/gnubin:$PATH"
export PATH="/usr/local/opt/coreutils/libexec/gnubin:$PATH"
export PATH="/usr/local/opt/sqlite/bin:$PATH"
export PATH="/usr/local/opt/sphinx-doc/bin:$PATH"

#php7.2
export PATH="/usr/local/opt/curl-openssl/bin:$PATH"
export PATH="/usr/local/opt/icu4c/bin:$PATH"
export PATH="/usr/local/opt/icu4c/sbin:$PATH"
export PATH="/usr/local/opt/libpq/bin:$PATH"
export PATH="/usr/local/opt/php@7.2/bin:$PATH"
export PATH="/usr/local/opt/php@7.2/sbin:$PATH"

$
(2号機) memory:2628:35: note: candidate template ignored: could not match 'auto_ptr' against 'unique_ptr'
- ブロガー :
- ujpblog 2019/4/10 23:42
El Capitan上にHomeBrewでhttpd(Apache httpd 2.4)をインストールしようとすると,エラーがでた.
解決策は・・・OSをバージョンアップしてコンパイラのxcodeも新しくすること.らしいけれど,それができないので問題なのである.
よくみると,httpdに依存関係があるとされているnghttp2(HTTP2.0対応の次世代Webサーバのリファレンス)のコンパイルエラー担っている.今回はこれを使わないので,依存関係から外してしまえば良い.
ビルドの定義は,以下のファイルに書いてある.
ここのnghttpd2の部分を消せば良いです.2箇所あった....バックアップ取ってないので差分が出せない〜...
/Library/Developer/CommandLineTools/usr/bin/../include/c++/v1/memory:2613:9:
 note: candidate constructor [with _Up = shrpx::Http2DownstreamConnection,
 _Ep = std::__1::default_delete<shrpx::Http2DownstreamConnection>] not viable:
 no known conversion from 'std::__1::unique_ptr<shrpx::Http2DownstreamConnection,
 std::__1::default_delete<shrpx::Http2DownstreamConnection> >' to
 'unique_ptr<shrpx::Http2DownstreamConnection,
 std::__1::default_delete<shrpx::Http2DownstreamConnection> > &&'
 for 1st argument
        unique_ptr(unique_ptr<_Up, _Ep>&& __u,
        ^
/Library/Developer/CommandLineTools/usr/bin/../include/c++/v1/memory:2628:35: note:
 candidate template ignored: could not match 'auto_ptr' against 'unique_ptr'
        _LIBCPP_INLINE_VISIBILITY unique_ptr(auto_ptr<_Up>&& __p,
                                  ^
1 error generated.
make[3]: *** [libnghttpx_a-shrpx_client_handler.o] Error 1
make[3]: *** Waiting for unfinished jobs....
mv -f .deps/libnghttpx_a-shrpx_config.Tpo .deps/libnghttpx_a-shrpx_config.Po
make[2]: *** [all-recursive] Error 1
make[1]: *** [all-recursive] Error 1
make: *** [all] Error 2
よくみると,httpdに依存関係があるとされているnghttp2(HTTP2.0対応の次世代Webサーバのリファレンス)のコンパイルエラー担っている.今回はこれを使わないので,依存関係から外してしまえば良い.
ビルドの定義は,以下のファイルに書いてある.
/usr/local/Homebrew/Library/Taps/homebrew/homebrew-core/Formula/httpd.rb
MacBook 2008 LateのHDDをSSD(CSSD-S6i512HG7V)に交換する
- ブロガー :
- ujpblog 2019/4/8 0:02
カミさん専用で2009年に購入したMacBook 2008 Lateですが,ずっと眠っているのでテコ入れすることに.再活性化か.
それで,メモリは最大の8GBに搭載済みだったので,HDDをSSDしてみることに.
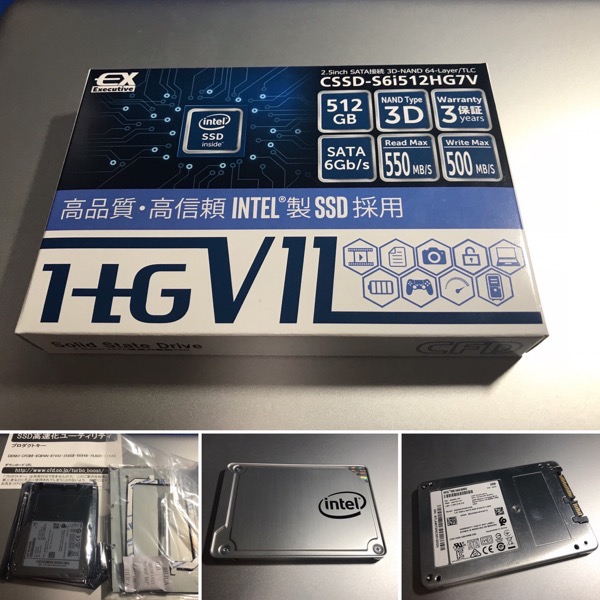
特にこだわりはなかったのだけれど,秋葉原のTSUKUMOで一番安かったCFDのもので512GBが7,538円(税込)でした.1GBあたり14.7円でした.店頭で「中身は,まんまIntelです」と書いてあったけれど,実際インテルでした.
内容物は本体以外に,7.5mm→9.5mmスペーサーと2.5インチを3.5インチに変換する金属製のマウンターも.デスクトップ用として買うにも良いってことか.
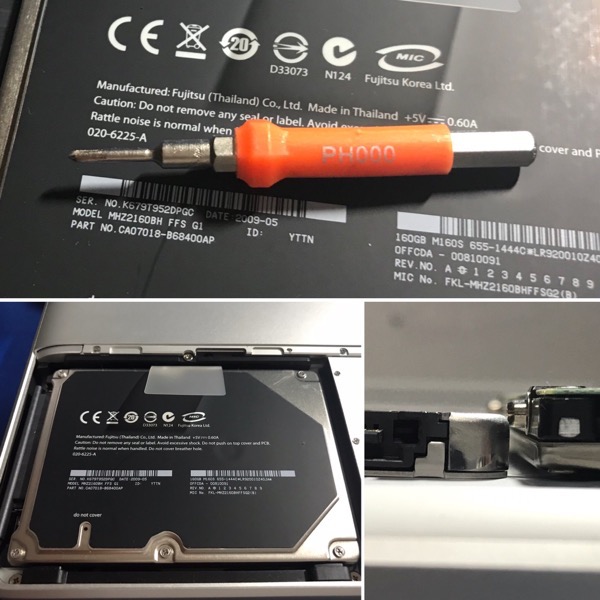
MacBook 2008のハードディスクの交換は,バッテリパックのケースを外して,固定している3本のネジをとるだけだけど,PH000というドライバが必要です.
取り出してみたHDDと今回購入したSSDを比べてみたけれど,サイズに差がありました.重量も差がある.SSDは軽い.
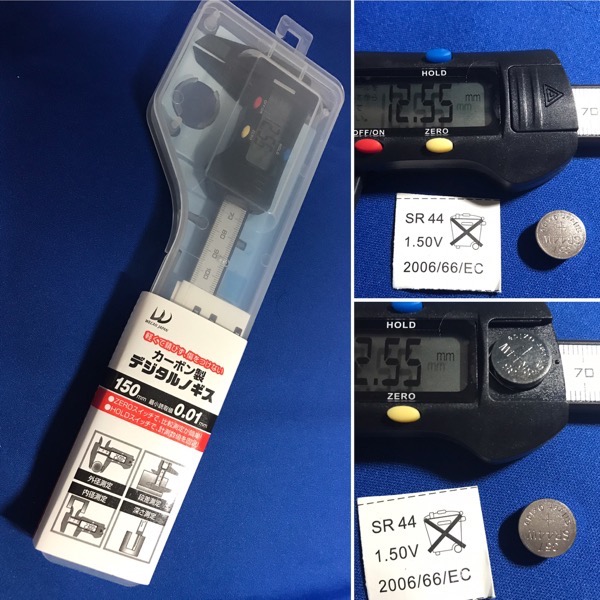
1〜2年前に秋葉原で購入したデジタルノギスを取り出してみました.SR44という電池が2つ付属.早速測ってみます.
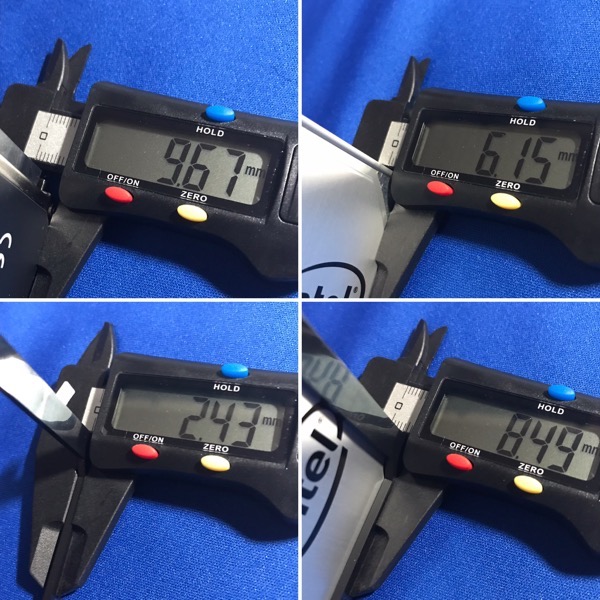
写真左上からHDDが9.67mm,SSDが6.15mm.HDDは9.5mmサイズの中ではオーバー気味で,SSDは7.5mmより小さいと言うことでした.
スペーサは2.4mmで,SSDにスペーサを取り付けても8.5mmでした.
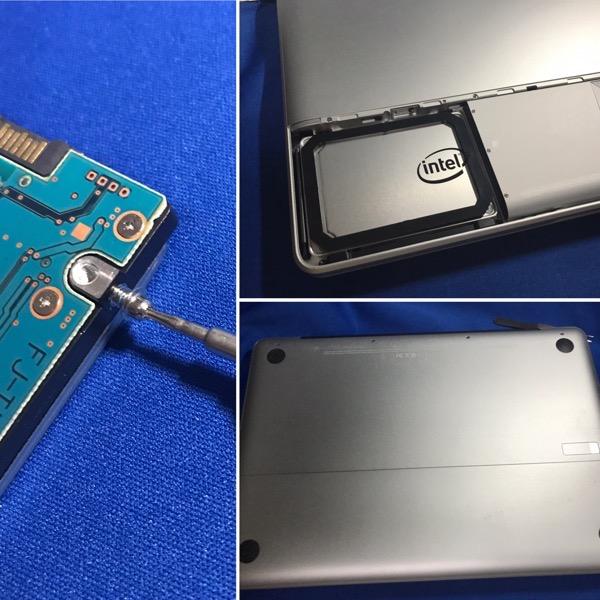
HDDについていたネジをSSDに移植して再度セットして蓋を閉めたら終了.
それで,メモリは最大の8GBに搭載済みだったので,HDDをSSDしてみることに.
特にこだわりはなかったのだけれど,秋葉原のTSUKUMOで一番安かったCFDのもので512GBが7,538円(税込)でした.1GBあたり14.7円でした.店頭で「中身は,まんまIntelです」と書いてあったけれど,実際インテルでした.
内容物は本体以外に,7.5mm→9.5mmスペーサーと2.5インチを3.5インチに変換する金属製のマウンターも.デスクトップ用として買うにも良いってことか.
MacBook 2008のハードディスクの交換は,バッテリパックのケースを外して,固定している3本のネジをとるだけだけど,PH000というドライバが必要です.
取り出してみたHDDと今回購入したSSDを比べてみたけれど,サイズに差がありました.重量も差がある.SSDは軽い.
1〜2年前に秋葉原で購入したデジタルノギスを取り出してみました.SR44という電池が2つ付属.早速測ってみます.
写真左上からHDDが9.67mm,SSDが6.15mm.HDDは9.5mmサイズの中ではオーバー気味で,SSDは7.5mmより小さいと言うことでした.
スペーサは2.4mmで,SSDにスペーサを取り付けても8.5mmでした.
HDDについていたネジをSSDに移植して再度セットして蓋を閉めたら終了.
すっかりiPadしか使わなくなったカミさんのMacBook 2008をスリープから解除してみた.
1472日前! まるまる4年前か.
pluto:~ kamisan$ uptime
17:09  up 1472 days,  5:22, 2 users, load averages: 0.98 0.60 0.47
pluto:~ kamisan$
2008年モデルのMacBookに接続しているLaCieのポルシェデザイン320GB 2.5インチ HDDで2010年に購入したLCH-PT320Uを,L型コネクタを使って接続してみた.
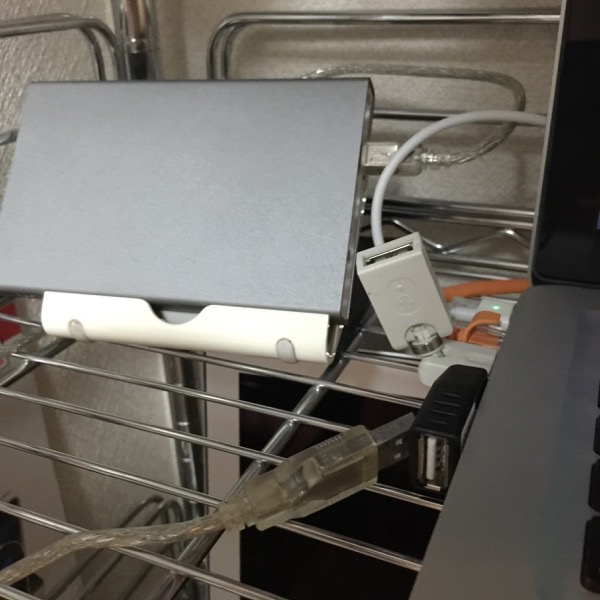
黒いL型のコネクタも,白いクネクネコネクタも,Mac側の2つのポートどちらに挿しても,HDDを認識しなかった.認識しないというか,明らかにハードディスクから回転できません的な音が.危険!
LCH-PT320Uの仕様を調べてみたら,電源投入時 (ピーク時) :4W(320GB) Rand W/R時 定格 :3W 待機時 (アイドル時) :2Wとなっていて,この電源投入時の5Wに対応してないという事だな.
ちなみに,TRANCENDの512GB SSDをつけたら認識したので,電力消費量が高いUSB機器の場合,認識できなくなる可能性があるという事だね.
ケーブリングをすっきりさせるために買ったのに全部無駄になったな.今回は.
Time Machineの動作時間を毎時から毎日へ変更した事で,CPU温度に変化があるか確認.
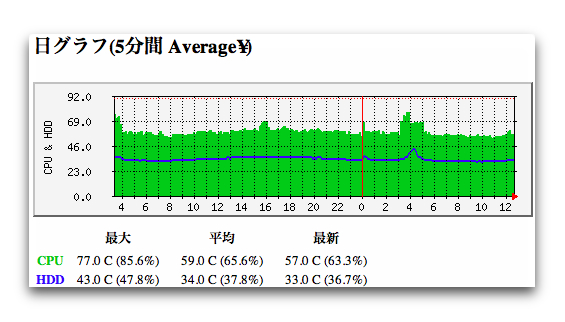
変更後
朝方,温度が上がっている事が判る.
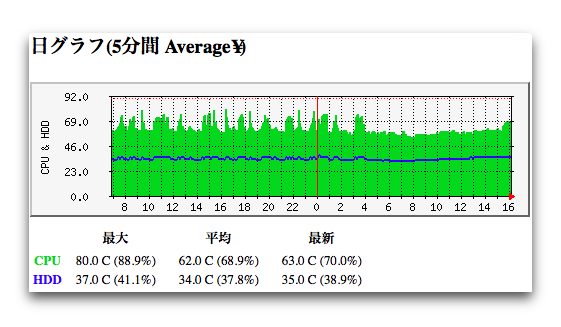
変更前
あとは,こうして見るとHDDの温度グラフ(青色線)部分が,ギザギザしてない事が確認できる.
変更後
朝方,温度が上がっている事が判る.
変更前
あとは,こうして見るとHDDの温度グラフ(青色線)部分が,ギザギザしてない事が確認できる.
Webサーバとして利用しているMacBook Late 2008ですがCPU温度について調べてみました.
これが直近1日分.最大温度が80度になっています.朝方からボコボコしなくなったのは,Time Machineによるバックアップの頻度を変更したからです.朝8時くらいが最低温度で,日中にかけて温度が上がっていますね.気温と連動という感じでしょうか.
ハードディスクの温度は一定に保たれていますね.ファンが動作しているからかな.
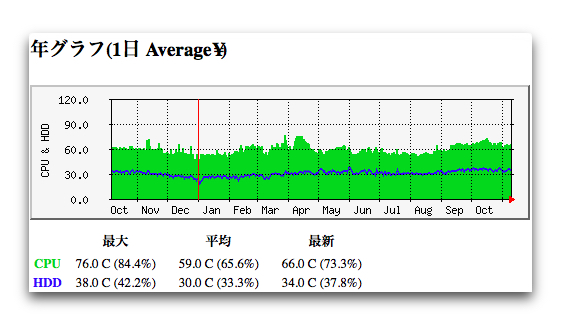
1年間のグラフで確認してみると,季節変動がある事がわかります.4月に温度が高いのは,不正な大量アクセスを受けていたから.9月から温度が上がっているのは,エアコンを使わなくなったからかな.
これが直近1日分.最大温度が80度になっています.朝方からボコボコしなくなったのは,Time Machineによるバックアップの頻度を変更したからです.朝8時くらいが最低温度で,日中にかけて温度が上がっていますね.気温と連動という感じでしょうか.
ハードディスクの温度は一定に保たれていますね.ファンが動作しているからかな.
1年間のグラフで確認してみると,季節変動がある事がわかります.4月に温度が高いのは,不正な大量アクセスを受けていたから.9月から温度が上がっているのは,エアコンを使わなくなったからかな.
5日前にuptimeが542日を超えたという記事を書いたけれど,今日,リセットされた....
泣・・・
ujpserver:~ webserver1$ uptime
21:07  up 12 mins, 2 users, load averages: 0.68 0.54 0.29
ujpserer:~ webserver1$
泣・・・
ふと気づいたら,某サーバのuptimeが542日になっていた.1年半か.自分の記録だと9年前に記録した304日越えってのがある.昨日も,emond(8)が暴走していて対処したんだけどね.
(1号機) MacBook (late2008) のメモリを増設完了
- ブロガー :
- ujpblog 2010/10/19 13:58
サーバとして動いているMacBook(late2008)ですが,メモリを追加しました.
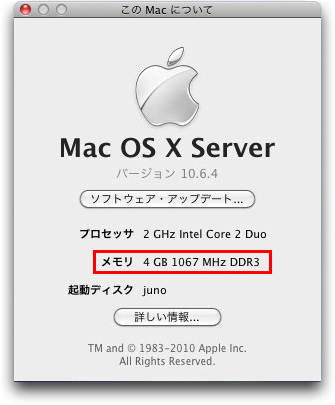
2スロットあるので2GBx2枚で合計4GBです.これでメモリスワップ等が発生しなくなるのか,検証を続けたいと思っています.
新MacBook・MacBook Proのメモリーを交換しよう
http://ascii.jp/elem/000/000/186/186030/index-2.html
2スロットあるので2GBx2枚で合計4GBです.これでメモリスワップ等が発生しなくなるのか,検証を続けたいと思っています.
新MacBook・MacBook Proのメモリーを交換しよう
http://ascii.jp/elem/000/000/186/186030/index-2.html
修理したMacBookが返ってきました.
1.8日にAppleStoreで注文
Storeといってもオンライン店舗で嫁さんの許可を取って深夜に注文.
2.10日午前中に到着
サーバOSを入れる為にDVDメディアを入れたら,高周波の異音が.
3.13日の午前中に電話
連休が明けてから電話連絡.
前回書いた通り,電話かけて24分弱で手続き終了.
4.ステータスメール到着
電話が終わってから30分以内くらいに修理依頼を受け付けたとメールが到着.
5.15日の午前中に集荷
この時,クロネコでしたが専用の箱が未だ届いてないということで,名刺サイズの受取チケットを置いて本体だけ持って帰りました.
6.16日の17時
修理完了して配送したとメールが到着.
7.17日の午前中
修理から戻ってきました. 修理伝票を見るとドライブ異常音が確認され,交換したとかいてありました. ドライブの交換だけならすぐですが,最初に電話した時に聞いたのですが,その他の部分も一通りテストするのだそうです.(その家庭でHDDの中身が消える可能性もあるので,説明を受けた後同意が必要)
アップルが利用している業者は昔は福山通運でしたが,今はクロネコヤマトで,今回ノートパソコン輸送船用の梱包状態を初めて見たのですが,最低限の資材で十分な精密機械のガードが行われていますね.感心しました.
色々なものを修理してきましたが,ツインバードとアップルは好印象です. 三洋電機も少し保証期間切れている洗濯機を無料で修理してくれた事があるので気持ちよかったなぁ.
オンラインのAppleStoreでMacBookを2台購入し,先週土曜日10/10に届いたのですが,うち一台のDVDドライブにメディアを挿入すると異音が・・・
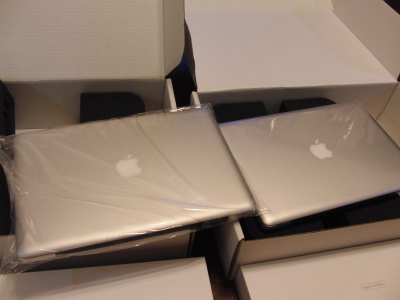
異音は高周波の不快な回転音で明らかにおかしく,同じ機種が2台あって正常状態と比べられるので,Appleに修理を依頼する事にしました.
Appleの初期不良交換は初めてです.DE×Lは初期不良に頻繁に遭遇しましたね...
電話で修理サポートに電話すると「iPodの方は1を.iPhoneの方は2を.その他の方は3を」という音声ガイダンスが流れます. Macは「その他」扱いか・・・
結局電話が通じてから手続きが終わるまで23分28秒かかりました.
システム構成等を確認する為にシリアル番号が必要なのですが,アップルメニューから[詳しい情報]ボタンを押してシステムプロファイラを呼び出し,ハードウェアを選択するとシリアルが表示されるので,これを準備しておくと良いでしょう.(OSが起動する場合に限られますが)
実際の修理ですが,次の様な2つの選択肢が有りました.
1.銀座か渋谷のアップルストアに持ち込むと,修理が必要かどうか判断してもらえる.
2.そのまま修理工場に送っても修理が必要と判断されない場合がある.
店舗のある渋谷にも銀座にも行く用事が無いので,取りに来てもらう事にしました. 最短が明後日の15日という事でそれでお願いしました.
ピックアップは,業者が専用のケース?を持ってくるらしいので,箱等は不要との事でした.
DE×Lには何度も故障修理連絡した事があるのですが,融通が利かなくて頭に来る事も多かったのですが,今回はスムースに事が進みました.思ったより時間がかかってましたがイライラすることもない対応でした.
あとはちゃんと修理交換されるか否かでしょうか. 修理となれば,ピックアップ後7日〜10日ということでした.
