


Wabi 2.2 インストール
〜Windows Application Binary Interface〜
0.改定履歴
- 1997.07.01 初版
- 1997.07.02 環境変数設定と起動方法を追加
1.はじめに
このドキュメントは,Solaris2.5.1でCDE(Common Desktop Environment:共通デスクトップ環境)でWabi 2.2をインストールする方法である.
2.用意する物
- Solaris2.5.1に付属のCD-ROM
- Microsoft社製Windows3.1のFD
最初にIBM社製のWindows3.1のFDでインストールを試みたが,1枚目で失敗した.
3.Wabiのインストール
- CD-ROMをセットする.
- ディレクトリを移動する.
| cd /cdrom/ja_solaris_2_5_1_desktop_1_1/Wabi/sparc/pkgs |
- パッケージインストール用の以下のコマンドを入力する.` は,バッククオートであることに注意する.
| pkgadd -d `pwd` SUNWwabi |
- 以下のようなメッセージが表示される.
|
</cdrom/ja_solaris_2_5_1_desktop_1_1/Wabi/sparc/pkgs> 中のパッケージインスタンス <SUNWwabi> を処理しています。 Japanese Wabi Application Copyright 1995-1996 Sun Microsystems, Inc. All Rights
Reserved. |
- ボリュームマネージャを使ってFDドライブを制御している場合に次のの,メッセージが出力される.(OSをインストールしてボリュームマネージャを変更していなければ普通表示される)
|
To use your diskette drive under Wabi, we recommend that you disable Volume Manager's control of the diskette drive. Would you like this done now? |
- FDドライブの制御を無効にするために,ここではyを入力する. 無効にすると,WabiがFDの管理を行う. 有効にすると,ボリュームマネージャが管理を行うことになる.
|
This package contains scripts which will be executed with super-user permission during the process of installing this package. Do you want to continue with the installation of <SUNWwabi> [y,n,?] |
- よくわからないが,yを入力する.すると,次のようなメッセージが表示され,ファイルの複写が始まる.
|
Japanese Wabi Application を <SUNWwabi> としてインストールしています。 Installing Deskset File Manager icons. NOTICE: You must add /opt/SUNWwabi/bin to your PATH and login again in order to use these icons. Updating Volume Management for Wabi. If you would like to use the UNIX serial ports in Wabi, please run the following command as root: chmod 666 /dev/cua/* This gives ordinary users read/write permissions to the
serial devices, allowing them to use these ports from Wabi. |
- ここで示してあるchmodは,これを実行するとモデムやシリアルデバイス用のWabi COMポートを利用できない事を表示している. 必要が有ればrootユーザで実行する.
| Installation of <SUNWwabi> was successful. |
- このメッセージが表示されたらWabiのインストールが正常終了.
4.Windows3.1のインストール
WabiをインストールしただけではWindows3.1は稼働しない. Windows3.1は別途入手しインストールする必要が有る.
この時のWindows3.1はMicrosoft社製のDOS/Vが必要である. 冒頭にも記述したとおりIBM版では稼働しない. きっとNEC版でも稼働しないと思われる.
- OpenWindow環境でインストールを行なう.
- Wabiを稼働させるする次のコマンドを実行する. 最初の1回だけはWindows3.1のインストールが始まる.
| /opt/SUNWwabi/bin/wabi |
- 次のようなウィンドウが表示される.

- Windows3.1のFDをSolarisのFDドライブに挿入して[OK]ボタンを押す.
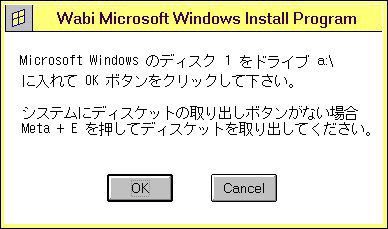
- 再度[OK]ボタンを押す. この後,12枚のFDを指示によって入れ換える. このダイアログで表示されているMetaキーとは,スペースキーの左辺りにある◆キーである. 使えなければ,他のウインドウからeject fdコマンドを実行する.

- ここで表示されているディスクAとは,10枚目である.この後,B,C,D・・・とFDの番号が続く.
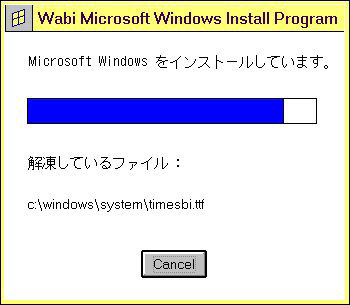
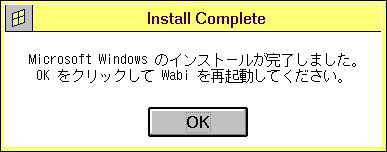
- 全部のFDの読み込みが終了したら,ファイルの展開が始まる. 作業が終了したら,次のダイアログが表示されるので,[OK]ボタンを押すと終了する.
- 再度以下のコマンドを実行する.
| /opt/SUNWwabi/bin/wabi |
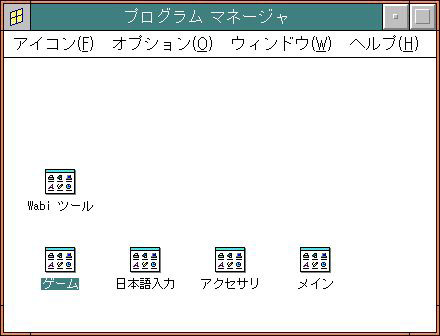
- すると,(スピーカがあれば)スタートアップ音と同時に[プログラムマネージャ]が起動する.
5.Wabiの日本語版アンサーブックのインストール
- CD-ROMをセットする.
- ディレクトリを移動する.
| cd /cdrom/ja_solaris_2_5_1_desktop_1_1/Wabi/sparc/pkgs |
- パッケージインストール用の以下のコマンドを入力する.` は,バッククオートであることに注意する.
| pkgadd -d `pwd` SUNWjaws |
|
</cdrom/ja_solaris_2_5_1_desktop_1_1/Wabi/sparc/pkgs> 中のパッケージインスタンス<SUNWjaws> を処理しています。 Wabi 2.2 Japanese User's Guide AnswerBook Copyright 1996 Sun Microsystems, Inc. All Rights Reserved. The installation options are as follows: Option: Description: -------------------------------------------- 1. nil: less than 1 Megabyte disk space required [slowest
performance]. Note: If the install option which you choose below fails Enter the number of an installation option from the list above (1 or 2). Select an installation option: |
- インストールオプションを選択する.1を選ぶと少ない量ですむ. ここでは2を選択してみる.(ディスクの空き容量に応じてどちらでも良い)
- すると,次のように表示される.
|
Select an installation option: 2 Installation option: heavy selected. |
- 次に,AnswerBookのデータをインストールするディレクトリを設定する. 特に空き容量の問題がなければRETURNキーを押す.
|
The next request for input asks you to specify the parent directory of AnswerBook Make sure to choose a parent directory on a file system big enough to accommodate all the files to be moved for the INSTALL OPTION you selected. Specify the parent of the AnswerBook home directory:<RETURN> Specify the parent of the AnswerBook home directory: For the heavy option all files will be placed under /opt/SUNWjaws. Using </opt> as the package base directory. |
|
This package contains scripts which will be executed with super-user permission during the process of installing this package. Do you want to continue with the installation of <SUNWjaws> [y,n,?] y |
- これも何か判らないけど,yを押す.
|
Wabi 2.2 Japanese User's Guide AnswerBook を <SUNWjaws> としてインストールしています。 /opt/SUNWjaws/ps/JWABIUG/Tables Installation of <SUNWjaws> was successful. |
- 以上でインストール作業は終了.
6.環境変数の設定
Wabiを使うには,アカウント毎に次の環境設定を行なっておく必要が有る.
これを.cshrc等のファイルに記述する.
| setenv WABIDIR /wabi/wabihome setenv LANG ja set path = ( $path /opt/SUNWwabi/bin ) |
7.Wabiの起動
/opt/SUNWwabi/bin/wabiを起動する.
