


ブログ - 写真に写る人間の顔をモザイクにするPython3 OpenCV mediapipe 横顔対応
写真の会写真にモザイクを入れるPythonスクリプトを作ってみたけど,ライブラリmediapipeを使うとより良いというので使ってみた.
引用:
まずは環境構築から.
引用:
MediaPipeの顔検出モデルの特徴
MediaPipeの顔検出は主に BlazeFace モデルをベースにしており、以下のような特性があります:
・高速かつ軽量:モバイルGPUでもリアルタイム処理が可能
・6つのランドマーク検出:両目、鼻先、口、耳の位置を推定
・複数顔対応:1枚の画像に複数の顔があっても検出可能
・部分的な顔にも対応:顔の一部が隠れていても、ランドマークが十分に見えていれば検出可能
まずは環境構築から.
顔認識をより正確にするためのmediapipeライブラリは,Pythonの環境を選ぶ模様.現時点での条件を確認.
引用: 最初にOSのバージョンを確認.
Pythonのバージョン.
Python 3.10.11を仮想環境で利用する.
環境変数を設定.
インストール.
pyenvでバージョンを確認.
グローバルに設定.
バージョンを確認.
インストール確認.
face_detection_yunet_2023mar.onnxファイルがあるか確認し,無かったらダウンロードする.
無かったのでダウンロード.
※ユーザujpadminの下に作成した仮想環境mp_envの配下にコピー.
環境を作成したら,以下のスクリプトを保存.
k=30の部分の数字を変更すると,モザイクのサイズが変更できる.
実行してみる.
モザイクを付与された画像はこちら.
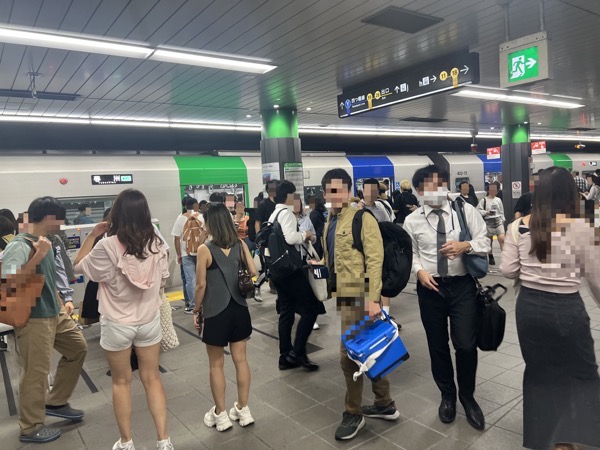
おお.前回より圧倒的に正確.少し誤検知はあるけど,未検知は無い.
mediapipeを使ってないバージョンはこれ.
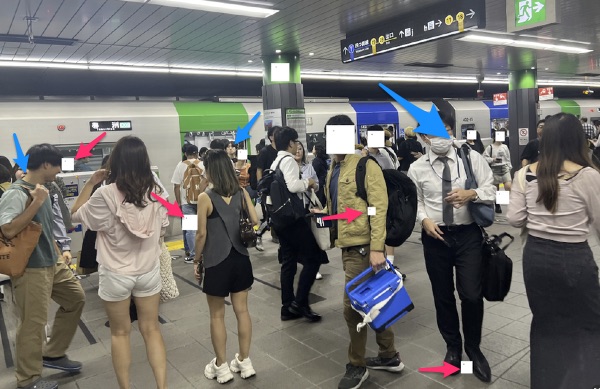
次に横を向いている人ばかりの写真.

完璧だな.
引用:
mediapipeが公式に対応しているPythonのバージョンは、3.9、3.10、3.11、そして一部環境で3.12です。それ以外(3.13以降)は現時点では未対応です
% sw_vers🆑

ProductName:		macOS
ProductVersion:		15.3.1
BuildVersion:		24D70
%
% python3 --version🆑
Python 3.14.0
%
環境変数を設定.
export PYENV_ROOT="$HOME/.pyenv"
export PATH="$PYENV_ROOT/bin:$PATH"
eval "$(pyenv init --path)"
eval "$(pyenv init -)"
brew install pyenv
pyenv install 3.10.11
% pyenv versions🆑

  system
* 3.10.11 (set by /Users/server/.pyenv/version)
  3.10.12
%
% pyenv global 3.10.11🆑
$
% python3 --version🆑
Python 3.10.11
pip install --upgrade pip setuptools wheel🆑
pip install mediapipe opencv-contrib-python🆑
(mp_env) % pip list|grep mediapipe🆑
mediapipe             0.10.21🈁
(mp_env) % pip list|grep opencv🆑
opencv-contrib-python 4.11.0.86🈁
(mp_env) %
$ ls /Users/ujpadmin/bin/mp_env/lib/python3.10/site-packages/cv2/data/face_detection_yunet_20
23mar.onnx🆑

ls: cannot access '/Users/ujpadmin/bin/mp_env/lib/python3.10/site-packages/cv2/data/face_dete
ction_yunet_2023mar.onnx': No such file or directory
(mp_env) %
$ curl -L -o face_detection_yunet_2023mar.onnx https://github.com/opencv/opencv_zoo/raw/main/mo
dels/face_detection_yunet/face_detection_yunet_2023mar.onnx
$ mv face_detection_yunet_2023mar.onnx /Users/ujpadmin/bin/mp_env/lib/python3.10/site-packages/cv2/data/.
環境を作成したら,以下のスクリプトを保存.
% cat face_maskerStrongMozaic2.py
import cv2
import os
import sys

def apply_mosaic(image, x, y, w, h, k=30):
    face_roi = image[y:y+h, x:x+w]
    small = cv2.resize(face_roi, (max(1, w//k), max(1, h//k)))
    mosaic = cv2.resize(small, (w, h), interpolation=cv2.INTER_NEAREST)
    image[y:y+h, x:x+w] = mosaic
    return image

def process_image(image_path, model_path):
    image = cv2.imread(image_path)
    if image is None:
        print(f"Failed to load: {image_path}")
        return

    detector = cv2.FaceDetectorYN.create(model_path, "", (image.shape[1], image.shape[0]))
    detector.setInputSize((image.shape[1], image.shape[0]))
    detector.setScoreThreshold(0.3)

    success, faces = detector.detect(image)
    if success and faces is not None:
        for face in faces:
            x, y, w, h = map(int, face[:4])
            image = apply_mosaic(image, x, y, w, h, k=30)

    # 保存先は元画像と同じディレクトリ
    dir_name = os.path.dirname(image_path)
    base_name = os.path.basename(image_path)
    output_path = os.path.join(dir_name, "masked_" + base_name)
    cv2.imwrite(output_path, image)
    print(f"Saved: {output_path}")

def main(input_dir):
    if not os.path.isdir(input_dir):
        print(f"Error: {input_dir} is not a directory.")
        return

    # モデルパスを構築
    cv2_data_dir = os.path.join(os.path.dirname(cv2.__file__), "data")
    model_path = os.path.join(cv2_data_dir, "face_detection_yunet_2023mar.onnx")

    # 対象画像ファイルを処理
    for filename in os.listdir(input_dir):
        if filename.lower().endswith((".jpg", ".jpeg", ".png", ".bmp")):
            image_path = os.path.join(input_dir, filename)
            process_image(image_path, model_path)

if __name__ == "__main__":
    if len(sys.argv) < 2:
        print("Usage: python face_maskerStrongMozaic2.py <image_directory>")
    else:
        main(sys.argv[1])
実行してみる.
(mp_env) server@apollo20250119 bin % python3 face_maskerStrongMozaic2.py /Users/ujpadmin/Documents
(mp_env) server@apollo20250119 bin %
モザイクを付与された画像はこちら.
おお.前回より圧倒的に正確.少し誤検知はあるけど,未検知は無い.
mediapipeを使ってないバージョンはこれ.
次に横を向いている人ばかりの写真.
完璧だな.
