MySQLでレプリケーションを設定する(スナップショットから)
MySQLでレプリケーションを設定する(スナップショットから)
0.改訂履歴
1.はじめに
このドキュメントでは,MySQLのレプリケーション設定の手順を説明する. 今回は,ログポジションを確認しながら,テーブルをロックした上でレプリケーションを行う手順となる. my.cnfでmaster-host,master-user,master-password,master-port,relay-log,relay-log-index,relay-log-info,master-connect-retry,master-retry-count等の設定の意味を説明し,show master status,show slave status等で確認しながら,change master toやその後のmaster.infoの確認方法まで説明している. 利用しているのは,MySQL5.0である.
2.仕組み
- この章では,レプリケーションの仕組みについて理解する.
2.1.概念図
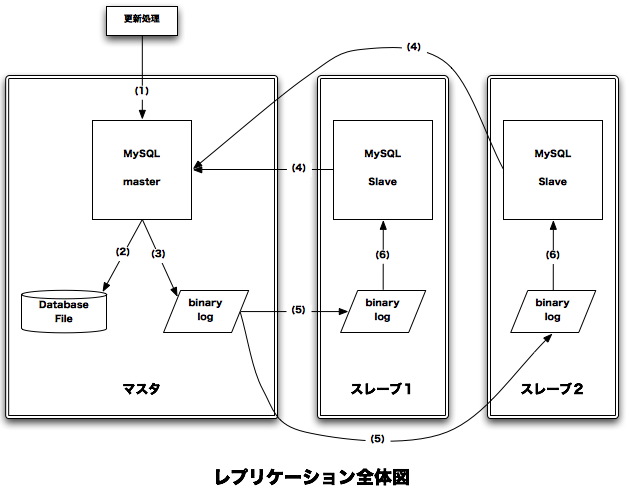
- MySQLのレプリケーション全体図を,以下に示す.
- 図に記載してる番号順に,動作の説明をする.
- マスタサーバのデータベースに,更新系のSQL文が実行される.
- 更新されたデータは,データベースファイルに書き込まれる.
- また,更新ログが,バイナリログファイルに書き出される.
- 定期的に,スレーブサーバがマスタサーバに接続して,更新ログのポジションを検索し,差分があるか確認する.
- 差分が在る場合,更新ログが,スレーブサーバに転送される.
- 転送された更新ログが,各スレーブサーバで適用される.
- マスタとスレーブでどれくらいのタイムラグが在るか?という質問があるが,各サーバの負荷状態によって異なるが,大量の同時接続ユーザと更新がないサーバの場合は,ほぼ瞬間的にレプリケーションが完了する.
2.2.マスタサーバ
- MySQLをレプリケーションのマスタサーバとして動作させるためには,/etc/my.cnfを編集して,再起動する.
- /etc/my.cnfにある,log-binを有効にするだけである.
- 初期インストール直後のサーバには,/etc/my.cnfが用意されていないが,モデルのmy.cnfがどのようになっているか確認する.
- まずは,モデルmy.cnfファイルを確認する.
master00:/usr/local/mysql ujpadmin$ ls -la /usr/local/mysql/support-files/*.cnf
-rw-r--r--   1 root  wheel   4933 Jul  5 02:53 /usr/local/mysql/support-files/my-huge.cnf
-rw-r--r--   1 root  wheel  20910 Jul  5 02:53 /usr/local/mysql/support-files/my-innodb-heavy-
4G.cnf
-rw-r--r--   1 root  wheel   4909 Jul  5 02:53 /usr/local/mysql/support-files/my-large.cnf
-rw-r--r--   1 root  wheel   4916 Jul  5 02:53 /usr/local/mysql/support-files/my-medium.cnf
-rw-r--r--   1 root  wheel   2486 Jul  5 02:53 /usr/local/mysql/support-files/my-small.cnf
master00:/usr/local/mysql ujpadmin$
|
master00:/usr/local/mysql ujpadmin$ grep log-bin /usr/local/mysql/support-files/*.cnf
/usr/local/mysql/support-files/my-huge.cnf:log-bin=mysql-bin
/usr/local/mysql/support-files/my-huge.cnf:#log-bin=mysql-bin
/usr/local/mysql/support-files/my-innodb-heavy-4G.cnf:log-bin=mysql-bin
/usr/local/mysql/support-files/my-large.cnf:log-bin=mysql-bin
/usr/local/mysql/support-files/my-large.cnf:#log-bin=mysql-bin
/usr/local/mysql/support-files/my-medium.cnf:log-bin=mysql-bin
/usr/local/mysql/support-files/my-medium.cnf:#log-bin=mysql-bin
/usr/local/mysql/support-files/my-small.cnf:#log-bin=mysql-bin
master00:/usr/local/mysql ujpadmin$
|
- small以外は,有効になっているようである.
- また,log-binの後ろにファイルバスをつける事で,バイナリログの保存先を変える事ができる.
- たとえば,次のように設定する.
my.cnfにlog-binを設定するサンプル
# Replication Master Server (default)
# binary logging is required for replication
#log-bin=mysql-bin
log-bin=/db/log-bin/binary-log

#
|
- このように設定すると,実際にはログファイルは次のように作成される.
master00:/usr/local/mysql ujpadmin$ ls -lath /db/log-bin/
total 1.5G
drwxr-xr-x    2 mysql    mysql        4.0K Oct  1 20:36 .
drwxr-xr-x    5 root     root         4.0K Sep 20 05:49 ..
-rw-rw----    1 mysql    mysql         117 Sep 26 19:15 binary-log.000001
-rw-rw----    1 mysql    mysql        1.0G Sep 26 22:35 binary-log.000002
-rw-rw----    1 mysql    mysql        186M Sep 27 03:07 binary-log.000003
-rw-rw----    1 mysql    mysql        144M Oct  1 20:05 binary-log.000004
-rw-rw----    1 mysql    mysql         117 Oct  1 20:31 binary-log.000005
-rw-rw----    1 mysql    mysql         82M Oct  4 12:23 binary-log.000006
-rw-rw----    1 mysql    mysql         180 Oct  1 20:36 binary-log.index
master00:/usr/local/mysql ujpadmin$
|
- 現在,どのログファイルが更新されているのかは,次のように確認できる.
master00:/usr/local/mysql ujpadmin$ mysql -uroot -p
Enter password: ■■■■■■■
Welcome to the MySQL monitor.  Commands end with ; or ¥g.
Your MySQL connection id is 2910 to server version: 5.0.24a-log

Type 'help;' or '¥h' for help. Type '¥c' to clear the buffer.

[root@localhost (none)]: >show master status;
+-------------------+----------+--------------+------------------+
| File              | Position | Binlog_Do_DB | Binlog_Ignore_DB |
+-------------------+----------+--------------+------------------+
| binary-log.000006 | 85847305 |              |                  |
+-------------------+----------+--------------+------------------+
1 row in set (0.00 sec)

[root@localhost (none)]: >
|
- この場合は,ログファイルはbinary-log.00006で,ログのポジションは85847305だと判る.
2.3.スレーブサーバ
- スレーブサーバの設定も,/etc/my.cnfファイルに記述して起動する事で完了となる.
スレーブサーバの/etc/my.cnf
master-host=mastrer
master-user=repl
master-password=reppass
master-port=3306
relay-log=/db/log-bin/slave01.Relay.log
relay-log-index=/db/log-bin/slave01-relay-bin.index
relay-log-info-file=/db/log-bin/relay-log.info
|
スレーブサーバの設定
| 項目名 |
説明 |
必須 |
| master-host |
マスタサーバのホスト名. |
○
|
| master-user |
マスタに接続するときのユーザ.マスタサーバ側でIDを作成しておく必要が在る. |
○
|
| master-password |
マスタに接続するときのユーザのパスワード. |
○
|
| master-port |
マスタに接続するときのTCP/IPポート. MySQLは3306がデフォルト. |
○
|
| relay-log |
リレーログの名前. |
|
| relay-log-index |
リレーログのインデックスの名前 |
|
| relay-log-info |
スレーブが,リレーログの情報を記録するファイルに使う名前. |
|
| master-connect-retry |
マスタが接続できない場合に再接続するまでの待ち時間.秒で指定する. |
|
| master-retry-count |
マスタが接続できない時の再接続回数. |
|
- 実際に稼働しているサーバのリレーログを確認すると,次のようになっている.
[root@slave01 ujpadmin]# ls -la /db/log-bin/
total 20
drwxr-xr-x    2 mysql    mysql        4096 Oct  4 19:23 .
drwxr-xr-x    6 mysql    mysql        4096 Sep 26 22:45 ..
-rw-rw----    1 mysql    mysql         236 Oct  4 19:23 slave01.000191 ←リレーログファイル
-rw-rw----    1 mysql    mysql          25 Oct  4 19:23 slave01-relay-bin.index
-rw-rw----    1 mysql    mysql          65 Oct  4 19:23 relay-log.info
[root@slave01 ujpadmin]# cat /db/log-bin/slave01-relay-bin.index
/db/log-bin/slave01.000191
[root@slave01 ujpadmin]# cat /db/log-bin/relay-log.info
/db/log-bin/slave01.000191
236
binary-log.000006
85847305
7305


8
[root@slave01 ujpadmin]#
|
- relay-log-indexファイルには現在のリレーログファイルの名前が記入されている.
- relay-log.infoには,masterのバイナリログ,ポジション等が記載されている.
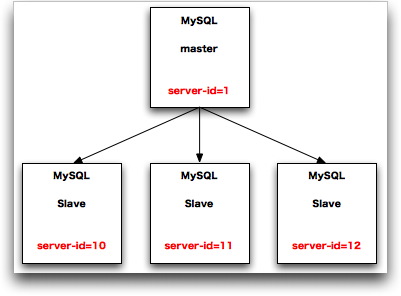
2.4.server-id
- 同時に複数のスレーブサーバを接続してレプリケーション構成を組む事ができるが,各サーバを識別するために,sever-idを用いている.
- sever-idは,/etc/my.cnfに記述するだけとなるが,1つのレプリケーションを構成するサーバの中で,重複しないように構成する必要が在る.
- 各サーバで,重複しないように勝手にIDを降り出して設定するだけで良くて,たとえばマスタサーバ等に登録するような必要は無い.
3.レプリケーションを設定する
- この設定では,マスタサーバのデータベースが更新されないようにロックして作業するため,24時間更新が行われているサーバでは作業できない欠点が在る.
3.1.マスタサーバにて,ユーザアカウントの作成
- レプリケーションをするためには,スレーブサーバが,マスタサーバに接続してデータを取得する必要が在る.
- その為に,MySQL上にスレーブサーバから接続できるユーザアカウントが必要となる.
- ユーザアカウントは,REPLICATION SLAVE権限を保有する必要が在る.
- マスタサーバに接続し,MySQLモニタから,以下のようにgrantでユーザアカウントを作成する.
- ユーザID: repl
- パスワード:reppass
- スレーブのホスト名:slave01
- 次のようなgrant文を実行する.
[root@master (none)]: >grant replication slave,replication client on *.* to repl@slave01
 identified by 'reppass';
Query OK, 0 rows affected (0.00 sec)

[root@master (none)]: >
|
[root@master (none)]: > flush privileges;
Query OK, 0 rows affected (0.00 sec)

[root@master (none)]: >
|
3.2.マスタサーバにて,/etc/my.cnfの設定してバイナリログを確認する
- マスタサーバを停止して,バイナリログを有効化する設定を行う.
- まずは,MySQLを停止する.
mysqladmin -uroot -p shutdown
|
- /etc/my.cnfを編集し,バイナリログを有効にする.
my.cnfにlog-binを設定するサンプル
# Replication Master Server (default)
# binary logging is required for replication
#log-bin=mysql-bin
log-bin=/db/log-bin/binary-log

#
|
- ディレクトリのオーナーを,mysqlユーザに設定する
|
chown -R mysql:mysql /db/log-bin
|
- MySQLモニタでMySQLに接続する.
- ここでバイナリログが作成されていないようであれば,データベースのエラーログを確認する.
- データベースのエラーログは,通常以下の場所に在る.
- datadir変数で指定されたディレクトリ配下に在る,hostname.errのファイル.
- まずはdatadirの場所を確認する.
mysql> show variables like 'datadir';
+---------------+-------------+
| Variable_name | Value       |
+---------------+-------------+
| datadir       | /db/DBfile/ |
+---------------+-------------+
1 row in set (0.00 sec)

mysql>
|
master00:~ root# ls -la /db/DBfile/`hostname`.err
-rw-rw----   1 mysql  wheel  3855 Oct  5 16:07 /db/DBfile/master00.err
master00:~ root# tail /db/DBfile/`hostname`.err
071005 16:06:41  InnoDB: Shutdown completed; log sequence number 0 43655
071005 16:06:41 [Note] /usr/local/mysql/bin/mysqld: Shutdown complete

071005 16:06:41  mysqld ended

071005 16:07:18  mysqld started
071005 16:07:18 [Warning] Setting lower_case_table_names=2 because file system
for /db/DBfile/ is case insensitive
071005 16:07:18  InnoDB: Started; log sequence number 0 43655
071005 16:07:18 [Note] /usr/local/mysql/bin/mysqld: ready for connections.
Version: '5.0.45-log'  socket: '/tmp/mysql.sock'  port: 3306  MySQL Community
Server (GPL)
master00:~ root#
|
- なんかワーニングがでているすが,レプリケーションには関係ない.
- バイナリログが吐き出されているか確認する.
master00:~ root# ls -la /db/log-bin/
total 16
drwxr-xr-x   4 mysql  mysql  136 Oct  5 16:07 .
drwxr-xr-x   4 root   admin  136 Oct  5 16:06 ..
-rw-rw----   1 mysql  mysql   98 Oct  5 16:07 binary-log.000001
-rw-rw----   1 mysql  mysql   30 Oct  5 16:07 binary-log.index
master00:~ root# cat /db/log-bin/binary-log.index
/db/log-bin/binary-log.000001
master00:~ root#
|
- テストデータベースに書き込みをして,ログファイルが書き出されているか,確認する.
- 次の様にtestデータベースにテーブルを作成する.
mysql> use test;
Database changed
mysql> create table logwritetest ( a int);
Query OK, 0 rows affected (0.09 sec)

mysql>
|
mysql> quit
Bye
master00:~ root# ls -la /db/log-bin/*
-rw-rw----   1 mysql  mysql  195 Oct  5 16:16 /db/log-bin/binary-log.000001
-rw-rw----   1 mysql  mysql   30 Oct  5 16:07 /db/log-bin/binary-log.index
master00:~ root#
|
- サイズが更新されている事が確認できる.
- 次に,データを更新して,バイナリログのステータスを確認してみる.
mysql> insert into logwritetest values(1);
Query OK, 1 row affected, 1 warning (0.00 sec)

mysql> show master status;
+-------------------+----------+--------------+------------------+
| File              | Position | Binlog_Do_DB | Binlog_Ignore_DB |
+-------------------+----------+--------------+------------------+
| binary-log.000001 |      294 |              |                  |
+-------------------+----------+--------------+------------------+
1 row in set (0.00 sec)

mysql>
|
mysql> insert into logwritetest values(2);
Query OK, 1 row affected, 1 warning (0.00 sec)

mysql> show master status;
+-------------------+----------+--------------+------------------+
| File              | Position | Binlog_Do_DB | Binlog_Ignore_DB |
+-------------------+----------+--------------+------------------+
| binary-log.000001 |      393 |              |                  |
+-------------------+----------+--------------+------------------+
1 row in set (0.00 sec)

mysql>
|
3.3.スナップショットの作成
- スレーブサーバを作成するために,マスタサーバのデータベースのスナップショットを行う.
- スナップショットとは,データベースが更新されないようにして,OSコマンド(tarとか)でデータベースファイルをアーカイブしたデータの事で,mysqldump等では無い.
- また,ターミナルを2つ開いて作業する必要が在る.
- まずは,テーブルをロックする.
[root@master00 (none)]: >flush tables with read lock;
Query OK, 0 rows affected (0.01 sec)

[root@master00 (none)]: >
|
- このまま,MySQLのセッションは閉じない.
- 書き込めない事を確認してみる.
mysql> insert into logwritetest values(3);
ERROR 1223 (HY000): Can't execute the query because you have a conflicting read lock
mysql>
|
- エラーがでて確認できた.
- ロックした時点のログポジションを確認する.
[root@localhost (none)]: >show master status;
+-------------------+-----------+--------------+------------------+
| File              | Position  | Binlog_Do_DB | Binlog_Ignore_DB |
+-------------------+-----------+--------------+------------------+
| binary-log.000006 | 115213675 |              |                  |
+-------------------+-----------+--------------+------------------+
1 row in set (0.00 sec)

[root@localhost (none)]: >
|
- このログファイル名とログポジションは,スレーブ側でレプリケーションの再実行時に必須な情報.
- もう1つのターミナルを開いてデータベースファイルのバックアップを行う.
- まずはデータディレクトリを確認.
mysql>  show variables like 'datadir';
+---------------+-------------+
| Variable_name | Value       |
+---------------+-------------+
| datadir       | /db/DBfile/ |
+---------------+-------------+
1 row in set (0.00 sec)

mysql>
|
[root@master00 db]# ls -la
total 28
drwxr-xr-x    5 root     root         4096 Sep 20 05:49 .
drwxr-xr-x   23 root     root         4096 Sep 25 18:16 ..
drwxr-xr-x    9 mysql    mysql        4096 Oct  1 20:36 DBfile
drwxr-xr-x    2 mysql    mysql        4096 Oct  1 20:36 log-bin
-rw-r--r--    1 mysql    mysql        7643 Oct  5 12:22 slow.log
drwxr-xr-x    2 root     root         4096 Sep 20 05:49 temp
[root@master00 db]# tar cfz DBfile20071005.tar.gz DBfile
[root@master00 db]# ls -lha
total 613M
drwxr-xr-x    5 root     root         4.0K Oct  5 16:44 .
drwxr-xr-x   23 root     root         4.0K Sep 25 18:16 ..
drwxr-xr-x    9 mysql    mysql        4.0K Oct  1 20:36 DBfile
-rw-r--r--    1 root     root         612M Oct  5 16:54 DBfile20071005.tar.gz
drwxr-xr-x    2 mysql    mysql        4.0K Oct  1 20:36 log-bin
-rw-r--r--    1 mysql    mysql        7.5K Oct  5 12:22 slow.log
drwxr-xr-x    2 root     root         4.0K Sep 20 05:49 temp
[root@master00 db]#
|
- スナップショットが作成できた.
- MySQLの書き込み禁止を解除しておく.
[root@localhost (none)]: >unlock tables;
Query OK, 0 rows affected (0.00 sec)

[root@localhost (none)]: >
|
3.4.スレーブサーバを設定する
- /etc/my.cnfを設定し,マスタサーバで取得したスナップショットのデータを復元した後,コマンドを使ってレプリケーションを実行する手順となる.
- mysqlプロセスが起動していない事を確認する.
[root@slave01 db]# ps -ef | grep mysqld
root     18704 18650  0 17:04 pts/0    00:00:00 grep mysqld
[root@slave01 db]#
|
- /etc/my.cnfを開く.
- 以下の記述を追加する.
#master-host=master00
#master-user=repl
#master-password=reppass
#master-port=3306
relay-log=/db/log-bin/slave01.Relay.log
relay-log-index=/db/log-bin/slave01-relay-bin.index
relay-log-info-file=/db/log-bin/relay-log.info
|
- この記述では,マスタサーバへの接続情報がコメントアウトされているが,これらは後で設定する.
- スナップショットファイルを,展開する.
[root@slave01 ujpadmin]# cd /db
[root@slave01 db]# tar xfz /fileserver/DBfile20071005.tar
[root@slave01 db]# ls -la
total 32
drwxr-xr-x    7 mysql    mysql        4096 Oct  5 17:05 .
drwxr-xr-x   23 root     root         4096 Oct  4 12:51 ..
drwxr-xr-x    9 mysql    mysql        4096 Oct  1 20:36 DBfile
drwxr-xr-x    2 mysql    mysql        4096 Oct  4 12:54 log-bin
-rw-rw----    1 mysql    mysql         912 Oct  4 12:54 slow.log
drwxr-xr-x    2 mysql    mysql        4096 Sep 26 18:36 temp
[root@slave01 db]#
|
- 展開したディレクトリ,ここではDBFileディレクトリ以下のファイルのオーナー,アクセス権についてmysql用ユーザと設定して在るか確認しておく.
- 次に,レプリケーション用のユーザで,マスタサーバに接続できるか確認する.
[root@slave01 db]# mysql -urepl -preppass -hmaster00
Welcome to the MySQL monitor.  Commands end with ; or ¥g.
Your MySQL connection id is 4000 to server version: 5.0.24a-log

Type 'help;' or '¥h' for help. Type '¥c' to clear the buffer.

[repl@master00 (none)]: >quit
Bye
[root@slave01 db]#
|
- ここで接続できない場合は,マスタサーバ上でgrantが足りないので,確認する.
- MySQLを起動する.
[root@slave01 db]# mysqld_safe &
[1] 19354
[root@slave01 db]# Starting mysqld daemon with databases from /db/DBfile

[root@slave01 db]#
|
[root@slave01 db]# tail DBfile/`hostname`.err
071005 17:19:45  mysqld started
071005 17:19:45  InnoDB: Started; log sequence number 0 43655
071005 17:19:45 [Note] /usr/local/libexec/mysqld: ready for connections.
Version: '5.0.24a-log'  socket: '/tmp/mysql.sock'  port: 3306  Source distribution
[root@slave01 db]#
|
- 問題ないようである.
- スレーブサーバのMySQLに接続する.
[root@slave01 db]# mysql -uroot -p
Enter password:
Welcome to the MySQL monitor.  Commands end with ; or ¥g.
Your MySQL connection id is 45 to server version: 5.0.24a-log

Type 'help;' or '¥h' for help. Type '¥c' to clear the buffer.

[root@localhost (none)]: >
|
- change masterコマンドでレプリケーション用の設定をする.
[root@localhost (none)]: >change master to
    -> master_host = 'master00',
    -> master_user = 'repl',
    -> master_password = 'reppass',
    -> master_log_file = 'binary-log.000006',
    -> master_log_pos = 115213675
    -> ;
Query OK, 0 rows affected (0.02 sec)

[root@localhost (none)]: >
|
[root@localhost (none)]: >show slave status ¥G
*************************** 1. row ***************************
             Slave_IO_State:
                Master_Host: master00
                Master_User: repl
                Master_Port: 3306
              Connect_Retry: 60
            Master_Log_File: binary-log.000006
        Read_Master_Log_Pos: 115213675
             Relay_Log_File: slave01.000001
              Relay_Log_Pos: 4
      Relay_Master_Log_File: binary-log.000006
           Slave_IO_Running: No
          Slave_SQL_Running: No
            Replicate_Do_DB:
        Replicate_Ignore_DB:
         Replicate_Do_Table:
     Replicate_Ignore_Table:
    Replicate_Wild_Do_Table:
Replicate_Wild_Ignore_Table:
                 Last_Errno: 0
                 Last_Error:
               Skip_Counter: 0
        Exec_Master_Log_Pos: 115213675
            Relay_Log_Space: 98
            Until_Condition: None
             Until_Log_File:
              Until_Log_Pos: 0
         Master_SSL_Allowed: No
         Master_SSL_CA_File:
         Master_SSL_CA_Path:
            Master_SSL_Cert:
          Master_SSL_Cipher:
             Master_SSL_Key:
      Seconds_Behind_Master: NULL
1 row in set (0.00 sec)

[root@localhost (none)]: >
|
- ログファイルやログポジションの値が設定した通りとなっている.
- スレーブを開始する.
[root@localhost (none)]: >start slave;
Query OK, 0 rows affected (0.00 sec)

[root@localhost (none)]: >
|
- 問題なく開始できた模様.
- 確認のために,マスターサーバでデータを更新してみる.
- testデータベースにデータを投入する.
マスタサーバでデータを追加してみる
[root@localhost (none)]: >show master status;
+-------------------+-----------+--------------+------------------+
| File              | Position  | Binlog_Do_DB | Binlog_Ignore_DB |
+-------------------+-----------+--------------+------------------+
| binary-log.000006 | 115213675 |              |                  |
+-------------------+-----------+--------------+------------------+
1 row in set (0.00 sec)

[root@localhost (none)]: >use test;
Database changed
[root@localhost test]: >show tables;
Empty set (0.04 sec)

[root@localhost test]: >insert into logwritetest values(4);
Query OK, 1 row affected, 1 warning (0.00 sec)

[root@localhost test]: >show master status;
+-------------------+-----------+--------------+------------------+
| File              | Position  | Binlog_Do_DB | Binlog_Ignore_DB |
+-------------------+-----------+--------------+------------------+
| binary-log.000006 | 115213976 |              |                  |
+-------------------+-----------+--------------+------------------+
1 row in set (0.00 sec)

[root@localhost test]: >
|
- ログポジションが変化した事が判る.
- スレーブサーバで,中身を確認する.
[root@localhost (none)]: >show slave status ¥G
*************************** 1. row ***************************
             Slave_IO_State: Waiting for master to send event
                Master_Host: master00
                Master_User: repl
                Master_Port: 3306
              Connect_Retry: 60
            Master_Log_File: binary-log.000006
        Read_Master_Log_Pos: 115213976
             Relay_Log_File: slave01.000002
              Relay_Log_Pos: 537
      Relay_Master_Log_File: binary-log.000006
           Slave_IO_Running: Yes
          Slave_SQL_Running: Yes
            Replicate_Do_DB:
        Replicate_Ignore_DB:
         Replicate_Do_Table:
     Replicate_Ignore_Table:
    Replicate_Wild_Do_Table:
Replicate_Wild_Ignore_Table:
                 Last_Errno: 0
                 Last_Error:
               Skip_Counter: 0
        Exec_Master_Log_Pos: 115213976
            Relay_Log_Space: 537
            Until_Condition: None
             Until_Log_File:
              Until_Log_Pos: 0
         Master_SSL_Allowed: No
         Master_SSL_CA_File:
         Master_SSL_CA_Path:
            Master_SSL_Cert:
          Master_SSL_Cipher:
             Master_SSL_Key:
      Seconds_Behind_Master: 0
1 row in set (0.00 sec)

[root@localhost (none)]: >
[root@localhost (none)]: >select * from test.logwritetest;
+------+
| a    |
+------+
|    1 |
|    2 |
|    3 |
|    4 |
+------+
3 rows in set (0.00 sec)

[root@localhost (none)]: >
|
- ログポジションがマスタと同じで在る事と,データも伝搬されている事が確認できた.
3.5.スレーブサーバでの後処理
- 今回の手法では,スレーブサーバの設定は,/etc/my.cnfを利用するのでは無く,change masterコマンドを用いた.
- そのために/etc/my.cnfの設定をコメントアウトしていたが,コメントアウトを外す.
- 一度レプリケーションを設定すると,この/etc/my.cnfファイルの変更は読み込まれないが,あとあと混乱しないためである.
スレーブサーバの/etc/my.cnf
| 変更前 |
#master-host=master00
#master-user=repl
#master-password=reppass
#master-port=3306
relay-log=/db/log-bin/slave01.Relay.log
relay-log-index=/db/log-bin/slave01-relay-bin.index
relay-log-info-file=/db/log-bin/relay-log.info
|
| 変更後 |
master-host=master00
master-user=repl
master-password=reppass
master-port=3306
relay-log=/db/log-bin/slave01.Relay.log
relay-log-index=/db/log-bin/slave01-relay-bin.index
relay-log-info-file=/db/log-bin/relay-log.info
|
- スレーブサーバで設定したマスタサーバの情報は,datadirディレクトリにmaster.infoが作成されて保存される.
- このファイルの中身を確認する.
[root@slave01 DBfile]# cat master.info
14
binary-log.000006
115214073
master00
repl
reppass
3306
60
0


[root@slave01 DBfile]#
|
- 将来的に,レプリケーションユーザのパスワードを変更したりした場合には,このmaster.infoファイルを書き換える必要が在る.